研究背景:工厂生产一批布料,会对布料的整个生产环境检测记录下来,包括生产布料时的机器的张力,车速,温度,压力,机器转速等一些基本数据,生产出来的布料检测机器会对布料的参数记录,包括布料的颜色,克重,刀工,透光点等等。
那么有了这些数据,我们可以通过 深度学习 来预测 布料是否合格,应该是下面这个公式。
根据现场生产布料的老师傅经验 ,认为可能生产机器的压力,张力,温度等对布料的透光点有重大影响,这是根据经验来判断的,显然我们需要数据支撑,需要机器模型来验证是否这样。
开搞
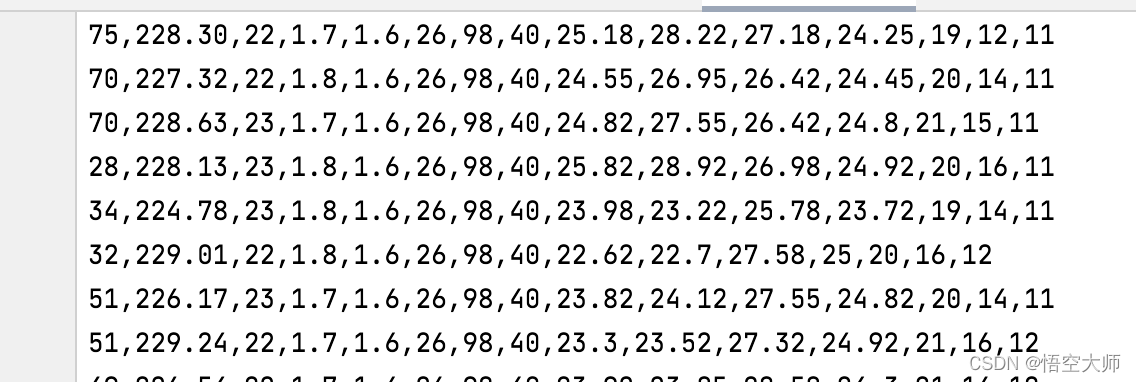
1.第一步 我们需要把检测机器记录的历史数据 整理归纳,导出到 csv 文件,方便 我们下一步处理,记录数据用的mongodb 数据库。我们 用python 导出到 csv文件,我们需要 一个透光点值和 对应的张力,压力,温度值。
import pymongo
import json
import csv
import os
from dateutil.parser import *

#################
stime       = '2022-03-02 00:00:00' #开始时间
etime       = '2022-03-10 00:00:00' #结束时间
b_path      = 'b_train.csv';        #写入的文件
mongo_name  = 'tensorflow'          # 数据库名称
line_name   = '三号产线DeviceHisData' #产线名称
line_code   = 'U306'                #产线code
cut_code    = 'A302'                #cut code
#####################
client = pymongo.MongoClient(host='localhost', port=27017)
db     = client[mongo_name]
#写入数据

if os.path.exists('b_path'):
    os.makedirs(b_path)

#时间范围 先生成数据
myDatetime  = parse(stime)
myDatetime2 = parse(etime)

lin306  = db[line_name].find({'code':line_code,'TimeData': {'$gte':myDatetime,'$lt':myDatetime2}},{"_id": 0,'line':1,'value':1,'code':1,'TimeData':1}).sort("TimeData")   #查询全部
cuts    = db['cutscreendataHis'].find({'type': 'Data','code':cut_code,'Begintime': {'$gte':myDatetime,'$lt':myDatetime2}},{"_id": 0,'type':1,'code':1,'dataCnc':1,'data':1,'Begintime':1}).sort("Begintime") #查询全部

dianshu = []
for line in lin306:  #循环打印
    value    = json.loads(line['value'])
    TimeData = line['TimeData'].strftime("%Y-%m-%d %H:%M:%S")
    dianshu.append(value)

#print("dianshu==",dianshu)
colors_len = len(dianshu)
print("colors_len",colors_len)

### 中间省略 for循环处理数据

with open(b_path, 'w', newline='') as file:
    writer = csv.writer(file)
    writer.writerows(lists)

print("-----------导出csv完成------------")
导出的csv 文件数据如下,总共5000多数据:
2.第二步 数据预处理,通过 pandas 读取 b_train.csv文件。
dataset_path = 'b_train.csv'

column_names = ['dianshu','a','b','c','d','e','f']
                #'o','p','q','r','s','t','u','v','w','x','y','z',
              #'ab','ac','ad','ae','af','ag']

raw_dataset = pd.read_csv(dataset_path,
                      na_values = "?", comment='\t', names=column_names,
                      sep=",", skipinitialspace=True)
dataset = raw_dataset.copy()

#数据清洗 去掉没用值
dataset.isna().sum()
dataset = dataset.dropna()

#打印数据详情
print("dataset.tail() ",dataset.tail());
3.第三步 分出训练数据80%和测试数据20% 并把数据 归一化处理。
#分离数据 80% 训练, 20%测试
train_dataset = dataset.sample(frac=0.8,random_state=0)
test_dataset  = dataset.drop(train_dataset.index)

#sns.pairplot(train_dataset[['dianshu', 'a', 'b']], diag_kind="kde")
#plt.show() #生存图片

#总体的数据统计:
train_stats = train_dataset.describe()
train_stats.pop("dianshu")
train_stats = train_stats.transpose()
#数据详情

test_result = test_dataset['dianshu']
train_labels = train_dataset.pop('dianshu')
test_labels  = test_dataset.pop('dianshu')

#归一化处理
def norm(x):
  return (x - train_stats['mean']) / train_stats['std']

normed_train_data = norm(train_dataset)
normed_test_data  = norm(test_dataset)
- 开始建模,我们损失函数需要用到 loss = 'mae'这个,即平均绝对误差它表示预测值和观测值之间绝对误差的平均值。这个适用于我们的研究对象。
#开始建模训练
def build_model():
      model = keras.Sequential([
        layers.Dense(64, activation='relu', input_shape=[len(train_dataset.keys())]),
        layers.Dense(64, activation='relu'),
        layers.Dense(64, activation='relu'),
        layers.Dense(1)
      ])
      optimizer = tf.keras.optimizers.RMSprop(0.001)
      model.compile(loss='mae', #均方误差(mae)Mean Absolute Error,即平均绝对误差:它表示预测值和观测值之间绝对误差的平均值。
                    optimizer=optimizer,#adam
                    metrics=['mae', 'mse'])
      return model

model = build_model() #建立模型
model.summary() #方法来打印该模型的简单描述。
我们看下此模型的描述信息,共4层,总包括 8833 参数够我们训练5000 数据了。
Model: "sequential"
_________________________________________________________________
Layer (type)                 Output Shape              Param #
=================================================================
dense (Dense)                (None, 64)                448
_________________________________________________________________
dense_1 (Dense)              (None, 64)                4160
_________________________________________________________________
dense_2 (Dense)              (None, 64)                4160
_________________________________________________________________
dense_3 (Dense)              (None, 1)                 65
=================================================================
Total params: 8,833
Trainable params: 8,833
Non-trainable params: 0
_________________________________________________________________
5.开始训练100次,并画出训练时mean走向统计图
通过为每个完成的时期打印一个点来显示训练进度
class PrintDot(keras.callbacks.Callback):
  def on_epoch_end(self, epoch, logs):
    if epoch % 50 == 0: print('')
    print('.', end='')

EPOCHS = 100

history = model.fit(
  normed_train_data, train_labels,
  epochs=EPOCHS, validation_split = 0.2, verbose=0,
  callbacks=[PrintDot()])

def plot_history(history):
  hist = pd.DataFrame(history.history)
  hist['epoch'] = history.epoch

  plt.figure(1)
  plt.subplot(211)
  plt.xlabel('Epoch')
  plt.ylabel('Mean Abs Error') #平均绝对值误差
  plt.plot(hist['epoch'], hist['mae'],label='Train Error') #训练错误
  plt.plot(hist['epoch'], hist['val_mae'],label = 'Val Error') #实际错误
  plt.legend()

  plt.figure(2)
  plt.subplot(212)
  plt.xlabel('Epoch')
  plt.ylabel('Mean Square Error [$MPG^2$]') #均方误差
  plt.plot(hist['epoch'], hist['mse'],label='Train Error')
  plt.plot(hist['epoch'], hist['val_mse'], label = 'Val Error')
  plt.legend()
  plt.show()

  plt.figure(1)
  plt.subplot(222)
  plt.xlabel('Epoch')
  plt.ylabel('loss and val_loss ') #错误率
  plt.plot(hist['epoch'], hist['loss'],label='loss Error')
  plt.plot(hist['epoch'], hist['val_loss'], label = 'val_loss Error')
  plt.legend()
  plt.show()
plot_history(history)
这个图描述了实际值方差和训练值方差走势图,训练到100次时mean 基本在10以下了。
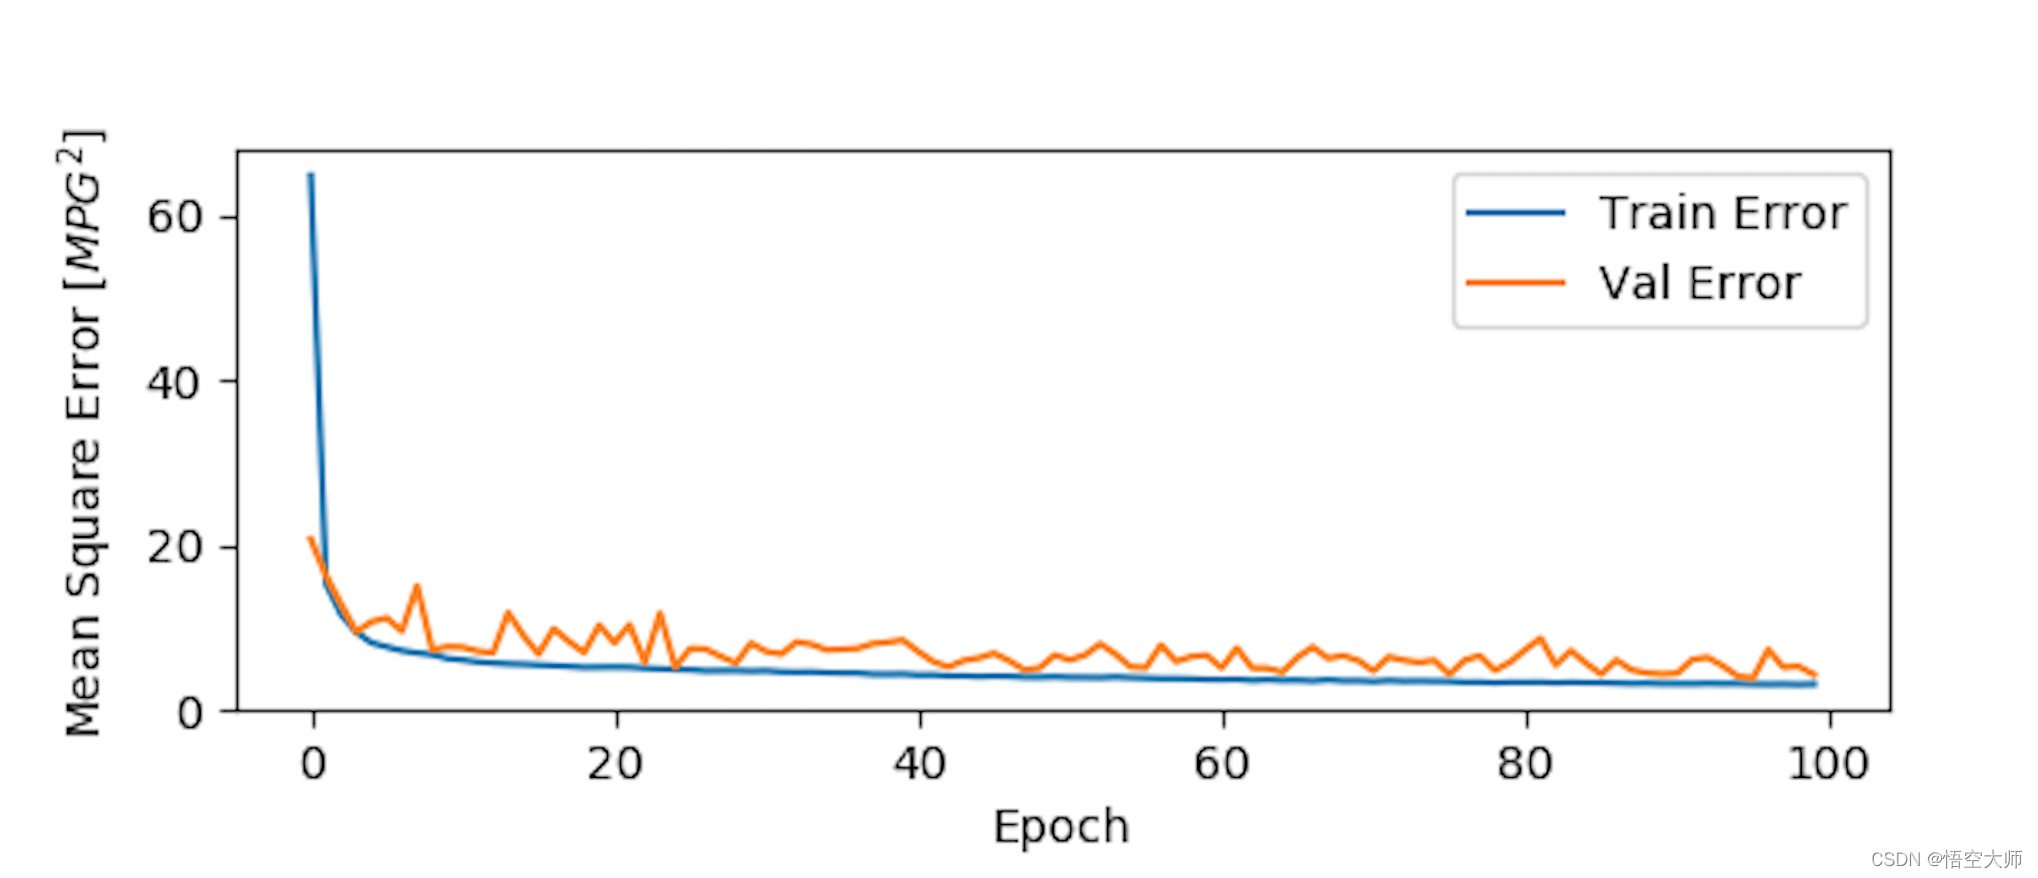
下面我们通过训练过的模型来预测一下测试数据的实际值和预测值的拟合程度,是否线性回归?
#预测 的结果 打印
test_predictions = model.predict(normed_test_data).flatten()

#新图 查看拟合效果图
plt.scatter(test_labels, test_predictions)
plt.xlabel('True Values ')
plt.ylabel('Predictions')
plt.axis('equal')
plt.axis('square')
plt.xlim([0,plt.xlim()[1]])
plt.ylim([0,plt.ylim()[1]])
plt.plot([-100, 100], [-100, 100])
plt.show()
如图基本在一条线上。
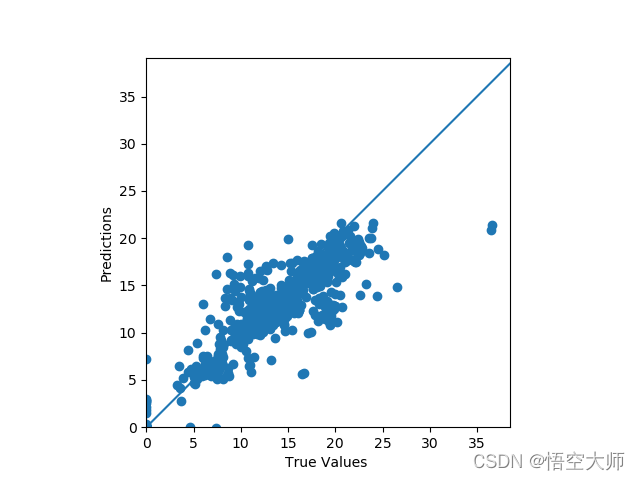
打印输出机器学习之后的预测值和实际记录值,我们发现俩个数据很接近

我们看下机器模型预测平均绝对方差值是:1.64 ,这个值很低了。说明生产布料时张力,压力,温度对布料的透光点数有很大相关性。老师傅的经验是对的,机器学习对此加强了验证。
30/30 - 0s - loss: 1.6414 - mae: 1.6414 - mse: 6.5162
Testing set Mean Abs Error:  1.64 
Original: https://blog.csdn.net/u012997396/article/details/124131121
Author: 悟空大师
Title: Tensorflow深度学习-对布料工艺参数的预测
相关阅读1
Title: Python不掉包初探自然语言处理One-Hot编码与解码
背景导入:
实现步骤:
⽂本预处理:
全部转换为⼩写
去除特殊符号
连续多个空⽩符号处理为 1 个
标点符号与词汇分开
缩写的处理
it's 处理为 it 's
i've 处理为 i 've
don't 处理为 do n't
i'll 处理为 i 'll
i'd 处理为 i 'd
构建词典:根据⽂本数据统计出⼀个词典,为每个词编号;
编码:根据词典,将⽂本切分为句⼦,每个句⼦利⽤ One-hot 表示为⼀个矩阵;
解码:根据词典,将 One-hot 序列转换为⽂本句⼦。
实现代码:
txt1='''Hi! This is Wang.

Hello! It's Sun speaking.

Do you have free time this evening?

Uh... Let's me see. What's the matter?

I hope you can see a new movie Super Hero with me. I've been wanting to see it for a long time.

Sorry, I didn't catch that. Could you say the name again?

Super Hero.

Oh! Super Hero. I'm very interested in it. I haven't seen it. I can go with you. When the movie start?

It begin at seven o'clock. Let's gather at the cinema at ten to seven.

Ok, I'll arrive there on time. Goodbye!

Bye.'''
txt2="Hi! Wang. I've arrive the cinema. Where are you?"

#自定义文本预处理函数
def txtpre():
    global txt#txt为全局变量
    txt=txt.lower()
    #变特殊字符为空格
    for ch in "!,.?":
        txt=txt.replace(ch," ")
    #对于缩写,通过空格按要求分隔
    txt=txt.replace("it's","it 's")
    txt=txt.replace("i've","i 've")
    txt=txt.replace("don't","do n't")
    txt=txt.replace("i'll","i 'll")
    txt=txt.replace("i'd","i 'd")

#将txt1赋给txt,作预处理
txt=txt1
txtpre()
list1=list(txt.split())#将字符串按空格分隔转换成列表
dict1=dict.fromkeys(list1,0)#创建一个新字典,默认键对应的值为0

#记录词频到字典的值当中,避免重复词(键)
for x in list1:
    dict1[x]+=1

#将词(键)组合成列表,并添加"UNKNOWN"为列表的最后一个元素
key_lst=[]
for k in range(len(dict1)):
    key_lst=list(dict1.keys())
key_lst.append("UNKNOWN")

char_to_int = dict((c, i) for i, c in enumerate(key_lst))#词转化为编号需要用到的数据类型
int_to_char = dict((i, c) for i, c in enumerate(key_lst))#编号转化为词需要用到的数据类型
print(int_to_char)#以“编号 词”的方式输出词典

#将txt2赋给txt,作预处理
txt=txt2
txtpre()
list2=list(txt.split())

integer_encoded = []#编号组合成的整数矩阵
#依次检索表2元素,如果在key_lst中,加编号到整数矩阵中,否则加"UNKONWN"的编号到矩阵中
for char in list2:
    if (char in key_lst):
        integer_encoded.append(char_to_int[char])
    else:
        integer_encoded.append(key_lst.index("UNKNOWN"))

#构成onehot形式并输出,编码的过程
onehot_encoded =[]
for value in integer_encoded:
       letter = [0 for _ in range(len(key_lst))]
       letter[value] = 1
       onehot_encoded.append(letter)
print(onehot_encoded)

#解码,并输出由词组合成的列表
list_decode=[]
for i in range(len(onehot_encoded)):
    decode = int_to_char[integer_encoded[onehot_encoded.index(onehot_encoded[i])]]#逐步往回推
    list_decode.append(decode)
print(list_decode)
运行结果:
{0: 'hi', 1: 'this', 2: 'is', 3: 'wang', 4: 'hello', 5: 'it', 6: "'s", 7: 'sun', 8: 'speaking', 9: 'do', 10: 'you', 11: 'have', 12: 'free', 13: 'time', 14: 'evening', 15: 'uh', 16: "let's", 17: 'me', 18: 'see', 19: "what's", 20: 'the', 21: 'matter', 22: 'i', 23: 'hope', 24: 'can', 25: 'a', 26: 'new', 27: 'movie', 28: 'super', 29: 'hero', 30: 'with', 31: "'ve", 32: 'been', 33: 'wanting', 34: 'to', 35: 'for', 36: 'long', 37: 'sorry', 38: "didn't", 39: 'catch', 40: 'that', 41: 'could', 42: 'say', 43: 'name', 44: 'again', 45: 'oh', 46: "i'm", 47: 'very', 48: 'interested', 49: 'in', 50: "haven't", 51: 'seen', 52: 'go', 53: 'when', 54: 'start', 55: 'begin', 56: 'at', 57: 'seven', 58: "o'clock", 59: 'gather', 60: 'cinema', 61: 'ten', 62: 'ok', 63: "'ll", 64: 'arrive', 65: 'there', 66: 'on', 67: 'goodbye', 68: 'bye', 69: 'UNKNOWN'}
[[1, 0, 0, 0, 0, 0, 0, 0, 0, 0, 0, 0, 0, 0, 0, 0, 0, 0, 0, 0, 0, 0, 0, 0, 0, 0, 0, 0, 0, 0, 0, 0, 0, 0, 0, 0, 0, 0, 0, 0, 0, 0, 0, 0, 0, 0, 0, 0, 0, 0, 0, 0, 0, 0, 0, 0, 0, 0, 0, 0, 0, 0, 0, 0, 0, 0, 0, 0, 0, 0], [0, 0, 0, 1, 0, 0, 0, 0, 0, 0, 0, 0, 0, 0, 0, 0, 0, 0, 0, 0, 0, 0, 0, 0, 0, 0, 0, 0, 0, 0, 0, 0, 0, 0, 0, 0, 0, 0, 0, 0, 0, 0, 0, 0, 0, 0, 0, 0, 0, 0, 0, 0, 0, 0, 0, 0, 0, 0, 0, 0, 0, 0, 0, 0, 0, 0, 0, 0, 0, 0], [0, 0, 0, 0, 0, 0, 0, 0, 0, 0, 0, 0, 0, 0, 0, 0, 0, 0, 0, 0, 0, 0, 1, 0, 0, 0, 0, 0, 0, 0, 0, 0, 0, 0, 0, 0, 0, 0, 0, 0, 0, 0, 0, 0, 0, 0, 0, 0, 0, 0, 0, 0, 0, 0, 0, 0, 0, 0, 0, 0, 0, 0, 0, 0, 0, 0, 0, 0, 0, 0], [0, 0, 0, 0, 0, 0, 0, 0, 0, 0, 0, 0, 0, 0, 0, 0, 0, 0, 0, 0, 0, 0, 0, 0, 0, 0, 0, 0, 0, 0, 0, 1, 0, 0, 0, 0, 0, 0, 0, 0, 0, 0, 0, 0, 0, 0, 0, 0, 0, 0, 0, 0, 0, 0, 0, 0, 0, 0, 0, 0, 0, 0, 0, 0, 0, 0, 0, 0, 0, 0], [0, 0, 0, 0, 0, 0, 0, 0, 0, 0, 0, 0, 0, 0, 0, 0, 0, 0, 0, 0, 0, 0, 0, 0, 0, 0, 0, 0, 0, 0, 0, 0, 0, 0, 0, 0, 0, 0, 0, 0, 0, 0, 0, 0, 0, 0, 0, 0, 0, 0, 0, 0, 0, 0, 0, 0, 0, 0, 0, 0, 0, 0, 0, 0, 1, 0, 0, 0, 0, 0], [0, 0, 0, 0, 0, 0, 0, 0, 0, 0, 0, 0, 0, 0, 0, 0, 0, 0, 0, 0, 1, 0, 0, 0, 0, 0, 0, 0, 0, 0, 0, 0, 0, 0, 0, 0, 0, 0, 0, 0, 0, 0, 0, 0, 0, 0, 0, 0, 0, 0, 0, 0, 0, 0, 0, 0, 0, 0, 0, 0, 0, 0, 0, 0, 0, 0, 0, 0, 0, 0], [0, 0, 0, 0, 0, 0, 0, 0, 0, 0, 0, 0, 0, 0, 0, 0, 0, 0, 0, 0, 0, 0, 0, 0, 0, 0, 0, 0, 0, 0, 0, 0, 0, 0, 0, 0, 0, 0, 0, 0, 0, 0, 0, 0, 0, 0, 0, 0, 0, 0, 0, 0, 0, 0, 0, 0, 0, 0, 0, 0, 1, 0, 0, 0, 0, 0, 0, 0, 0, 0], [0, 0, 0, 0, 0, 0, 0, 0, 0, 0, 0, 0, 0, 0, 0, 0, 0, 0, 0, 0, 0, 0, 0, 0, 0, 0, 0, 0, 0, 0, 0, 0, 0, 0, 0, 0, 0, 0, 0, 0, 0, 0, 0, 0, 0, 0, 0, 0, 0, 0, 0, 0, 0, 0, 0, 0, 0, 0, 0, 0, 0, 0, 0, 0, 0, 0, 0, 0, 0, 1], [0, 0, 0, 0, 0, 0, 0, 0, 0, 0, 0, 0, 0, 0, 0, 0, 0, 0, 0, 0, 0, 0, 0, 0, 0, 0, 0, 0, 0, 0, 0, 0, 0, 0, 0, 0, 0, 0, 0, 0, 0, 0, 0, 0, 0, 0, 0, 0, 0, 0, 0, 0, 0, 0, 0, 0, 0, 0, 0, 0, 0, 0, 0, 0, 0, 0, 0, 0, 0, 1], [0, 0, 0, 0, 0, 0, 0, 0, 0, 0, 1, 0, 0, 0, 0, 0, 0, 0, 0, 0, 0, 0, 0, 0, 0, 0, 0, 0, 0, 0, 0, 0, 0, 0, 0, 0, 0, 0, 0, 0, 0, 0, 0, 0, 0, 0, 0, 0, 0, 0, 0, 0, 0, 0, 0, 0, 0, 0, 0, 0, 0, 0, 0, 0, 0, 0, 0, 0, 0, 0]]
['hi', 'wang', 'i', "'ve", 'arrive', 'the', 'cinema', 'UNKNOWN', 'UNKNOWN', 'you']
Original: https://blog.csdn.net/m0_48946024/article/details/123408171
Author: GarveyPython
Title: Python不掉包初探自然语言处理One-Hot编码与解码
相关阅读2
Title: Lidar_imu自动标定
系统版本:Ubuntu20.04
ROS版本:Noetic
前提条件,安装以下内容:
- Cmake
- opencv 2.4
- eigen 3
- PCL 1.9
- Pangolin
执行以下命令,进行软件的编译:
这里给出程序的链接,自行下载:
 https://github.com/PJLab-ADG/SensorsCalibration/tree/master/lidar2imu/auto_calib ;
cd ~/auto_lib
# mkdir build
mkdir -p build && cd build
# build
cmake .. && make
小技巧:根据自己电脑的线程可选择编译的速度 ,make时可选择
make make -j4 make -j12
当自己进行编译时,出现以下错误:
第一个错误:
解决方法:
需要找到报错对应功能包,在功能包的CMakeList.txt文档里加入下面语句:
set(CMAKE_CXX_STANDARD 14)
第二个错误:
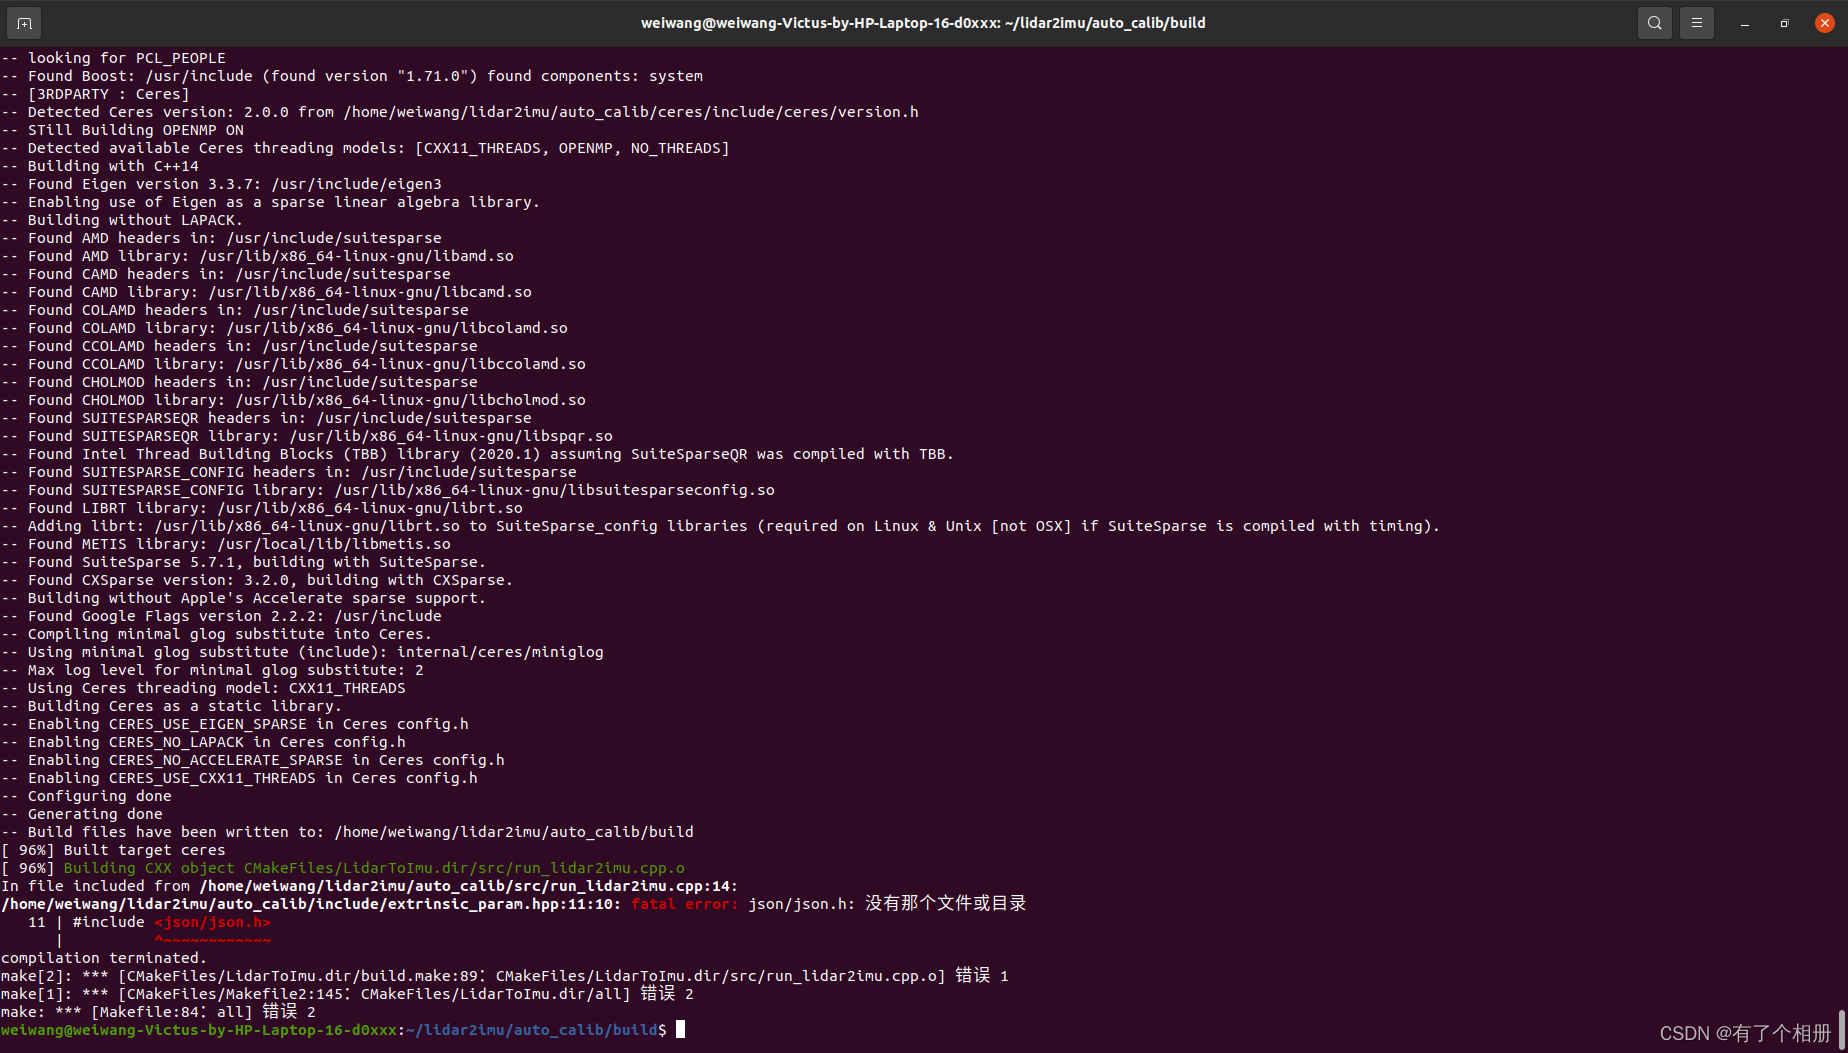
解决方法:
首先检查一下有没有这个文件;如果有,则应该是文件路径不对,通过链接建立关系;如果没有,则下载该相关文件。
sudo apt-get install libjsoncpp-dev
sudo ln -s /usr/include/jsoncpp/json/ /usr/include/json
include
解决上述两个问题后,编译成功,如下图所示。
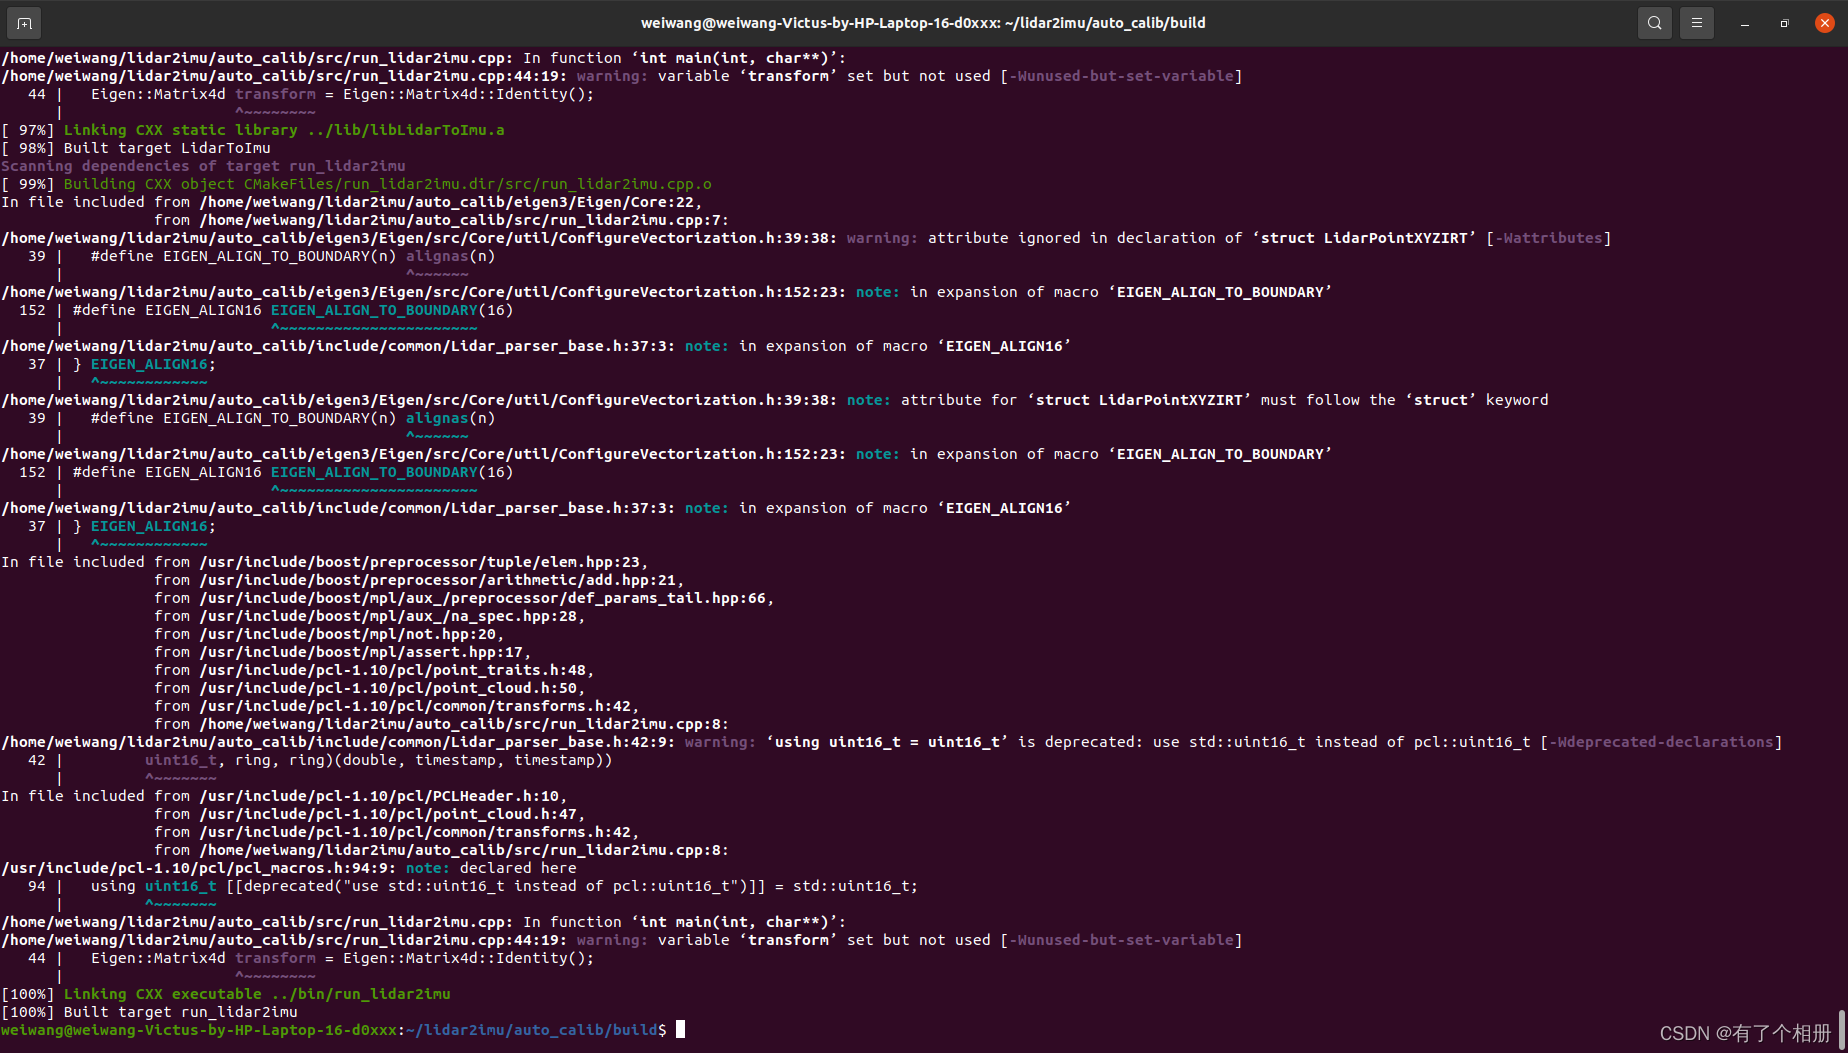
然后就可以运行程序,需注意在运行程序前须将数据集换为官方提供的数据集。
官方提供的数据集百度网盘链接:
Link (链接): https://pan.baidu.com/s/1AODTuqhmgwbRWxGGCmo0iA
Extraction code (提取码): 94id
然后执行命令:
cd ~./auto_calib/
./bin/run_lidar2imu data/top_center_lidar/ data/NovAtel-pose-lidar-time.txt data/gnss-to-top_center_lidar-extrinsic.json
就可以得到lidar和imu间的外参变化:
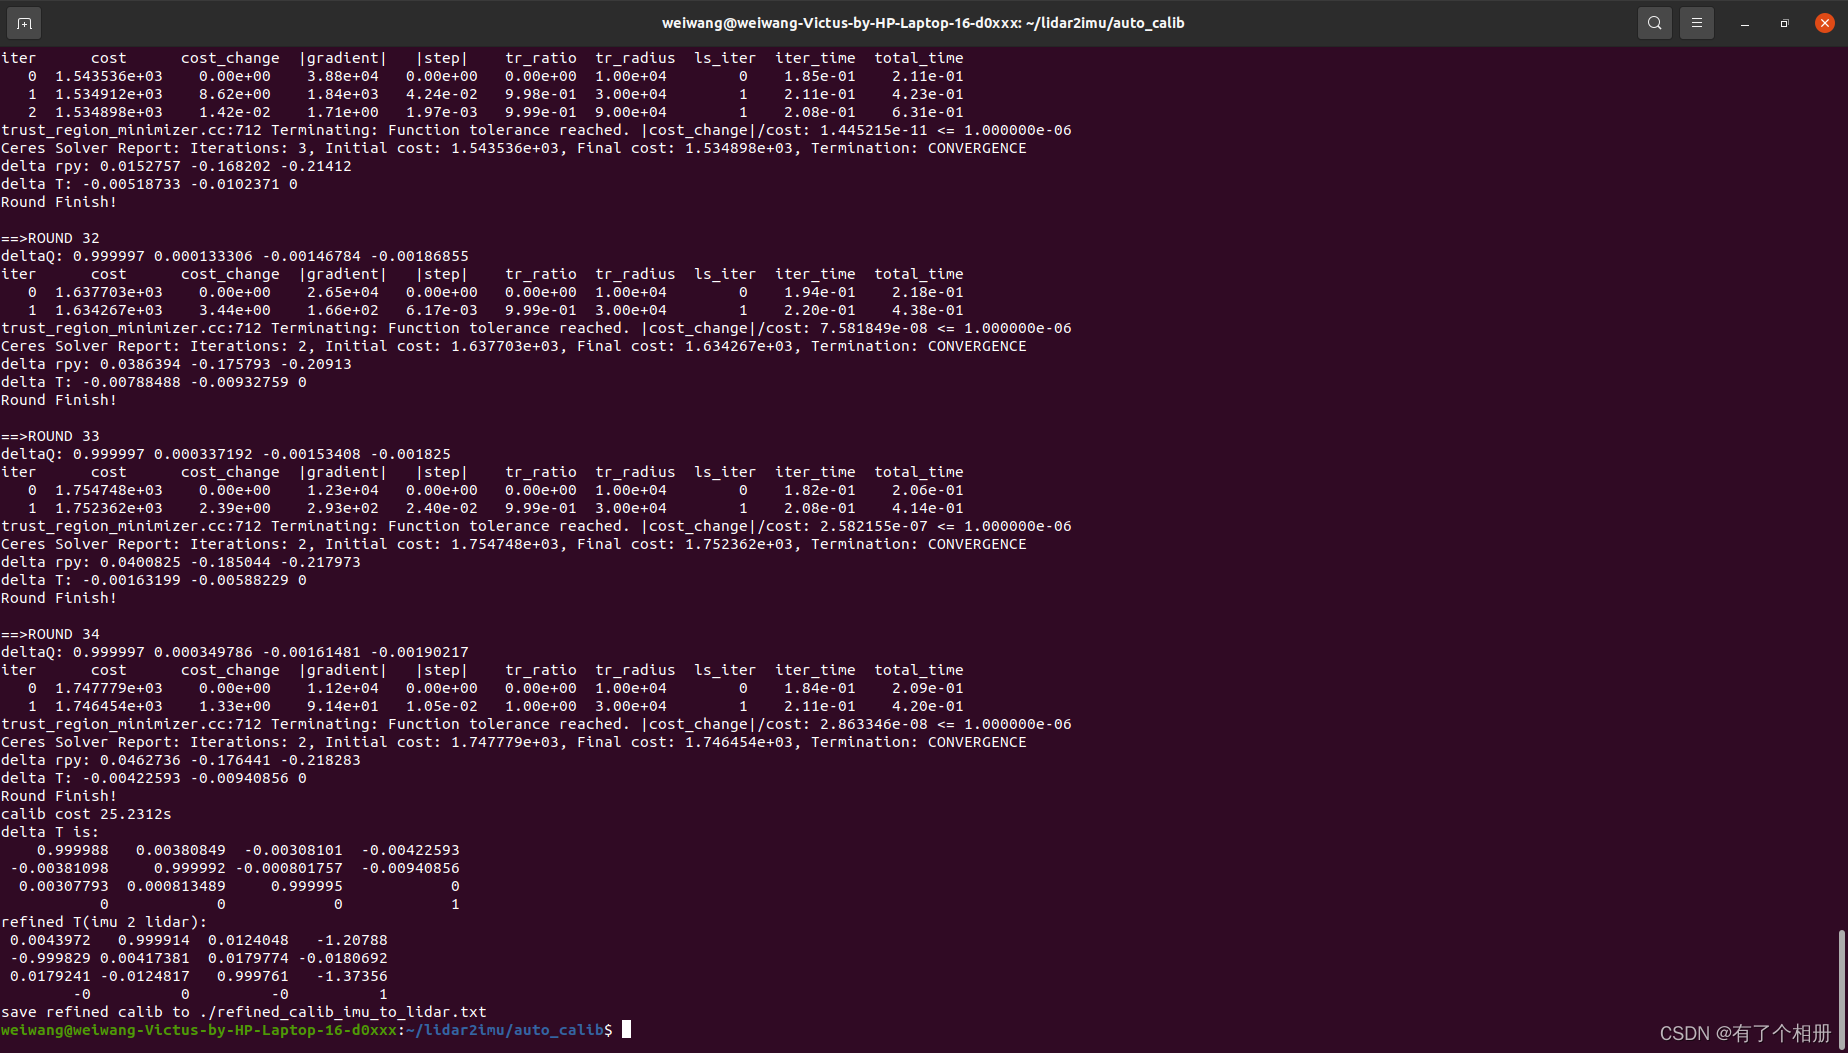
在运行过程中,我们可以看到迭代了34次,并将得到的结果放在auto_calib目录下的refined_calib_imu_to_lidar.txt文件中。
文件的内容如下:
refined calib:
R: 0.0043972 0.999914 0.0124048 -0.999829 0.00417381 0.0179774 0.0179241 -0.0124817 0.999761
t: -1.20788 -0.0180692 -1.37356
deltaTrans:
0.999988 0.00380849 -0.00308101 -0.00422593
-0.00381098 0.999992 -0.000801757 -0.00940856
0.00307793 0.000813489 0.999995 0
0 0 0 1
delta roll, pitch, yaw, tx, ty, tz:
0.000807626 -0.00307948 -0.00380975 -0.00422593 -0.00940856 0
delta roll, pitch, yaw, tx, ty, tz from begin:
1.0008 -0.00688495 -0.000581471 -0.00422593 -0.00560535 0.999993Original: https://blog.csdn.net/m0_48748418/article/details/125965374
Author: 有了个相册
Title: Lidar_imu自动标定
相关阅读3
Title: Seven---pytorch学习---维度变换
pytorch学习(4)
维度变换
-
view & reshape
-
squeeze & unsqueeze
-
transpose & permute
-
expand & repeat
-
contiguous
view & reshape
view() 与 reshape() 的区别
- view() 只适用于满足连续性条件的tensor,且不会开辟新的内存空间
- reshape() 的返回值既可以是视图,也可以是副本,当曼珠连续性条件时返回 view() ,否则返回副本;且使用 reshape() 时,会开辟新的内存空间
- 故当不确定能否使用 view() 时,可以使用 reshape()
view()函数
import torch

a = torch.rand(4,3,32,32) #维度为4
b = a.view(4,3,32*32) #维度为3
c = a.view(4,-1) #维度为2,使用-1可进行省略缩进
print(a.shape)
print(b.shape)
print(c.shape)
torch.Size([4, 3, 1024])
torch.Size([4, 3072])
squeeze & unsqueeze
squeeze & unsqueeze 的功能时维度的减少 / 增加
squeeze()函数
- torch.squeeze(input,dim) 返回一个tensor
- 当dim不设置时,去掉input的所有为1的维度
- 当dim为整数时(0
import torch

a = torch.rand(1,1,2,2,5)
print(a.squeeze().shape)
print(a.squeeze(0).shape)
print(a.squeeze(1).shape)
print(a.squeeze(2).shape)
print(a.squeeze(-1).shape)
torch.Size([1, 1, 1, 2, 2, 5])
torch.Size([1, 1, 1, 2, 2, 5])
torch.Size([1, 1, 2, 1, 2, 5])
torch.Size([1, 1, 2, 2, 5, 1])
transpose & permute
transpose()函数
- transpose() 函数只能有两个相关的交换的位置参数
- 使用transpose() 函数的时候,tensor 自身不会改变,因此需要将结果重新赋值
import torch

a = torch.rand(2,3,32,32)
print(a.transpose(0,3).shape)
print(a.transpose(1,2).shape)
torch.Size([2, 32, 32, 3])
torch.Size([3, 32, 32, 2])
expand & repeat
expand()函数
- torch.expand() 返回 tensor 的一个视图,单个维度扩大为更大的维度,或者在第0维新增加一个维度来扩大为更高维
- 如果哪个维度为 -1,就是该维度不变
- 使用expand时,不会创建新的内存地址
repeat()函数
- torch.repeat() 会将 tensor 在指定的维度方向上进行重复,参数表示在不同的维度上重复的次数
- 使用repeat时,会重新赋值,重新创建新的内存地址进行占用
```python
import torch
a = torch.rand(1,1,32,32)
print('a的数据是:',a.shape)
print('a的地址为:',a.data_ptr())
b = a.expand(1,3,32,32)
print('b的数据是:',b.shape)
print('b的地址为:',b.data_ptr())
c = a.repeat(1,3,1,1)
print('c的数据是:',c.shape)
print('c的地址为:',c.data_ptr())
d = a.repeat(1,3,2,2)
print('d的数据是:',d.shape)
print('d的地址为:',d.data_ptr())
Original: https://www.cnblogs.com/311dih/p/16583853.html
Author: 叁_311
Title: Seven---pytorch学习---维度变换