整体思路:
1)使用tensorflow2加载预训练bert模型,进行训练,然后将模型部署载tfseving中。
2)使用flask部署模型推理,模型推理时会requrest请求 1) 中tfserving部署的模型
3) 将2)的flask构建成一个docker镜像,运行镜像即启动了服务
4)模型更新:只需将最新模型放入tfserving的对应模型路径下
1 模型训练及tfserving部署
参考博客
https://blog.csdn.net/weixin_42529756/article/details/122420339?spm=1001.2014.3001.5501
2 模型推理及flask部署
模型整理文件如下:
- requirements.txt #由于使用原生的Python构建dockeer镜像,需要安装很多依赖包。
- flask_infer.py # 模型推理文件,如下所示
- bert-case-chinese # Google须训练bert模型,(只需要里面的配置文件即可,不需要模型,主要用来分词tokenizer)
注意: app.run(port=5000,host="0.0.0.0")
中的host不要使用默认的,不然远程会访问不了的。
flask_infer.py文件如下
from flask import Flask,request,jsonify
app=Flask(__name__)
from transformers import BertTokenizer
import pandas as pd
import json
import requests
import numpy as np
model_path = "./bert-case-chinese/"
max_length=50
df_label = pd.DataFrame({"label":["财经","房产","股票","教育","科技","社会","时政","体育","游戏","娱乐"],"y":list(range(10))})
new_label=df_label.to_dict()['label']

tokenizer = BertTokenizer.from_pretrained(model_path )
headers = {"content-type": "application/json"}
def predict(text):
    input_dict = tokenizer(text, return_tensors='tf',max_length=max_length,padding  ='max_length')
    input_ids = input_dict["input_ids"].numpy().tolist()[0]
    attention_mask = input_dict["attention_mask"].numpy().tolist()[0]
    token_type_ids = input_dict["token_type_ids"].numpy().tolist()[0]

    features = [{'input_ids': input_ids, 'attention_mask': attention_mask,'token_type_ids':token_type_ids}]

    data = json.dumps({ "signature_name": "serving_default", "instances": features})

    json_response = requests.post('http://192.168.10.100:8501/v1/models/model:predict', data=data, headers=headers)

    predictions = json.loads(json_response.text)['predictions']
    return predictions
app.config['JSON_AS_ASCII'] = False
@app.route('/hello')
def hello():
    return "hello world "

@app.route('/predict',methods=['POST'])
def pred():
    try:
        data=request.get_json()['data']
        print("data," ,data)
        predictions=predict(data)
        print("predictions : ",predictions)
        label_to_index=np.argmax(predictions)
        index_to_label=new_label[label_to_index]

        response={"label":index_to_label,
                 "response_state":"success"}
    except:
        response={"reponse_state":"error"}
    return jsonify(response)
if __name__=='__main__':
    app.run(port=5000,host="0.0.0.0")
requirements.txt,内容如下
transformers==4.12.5
flask==2.0.1
numpy==1.19.5
pandas==1.1.2
tensorflow==2.4.1
3 docker镜像创建及运行
1)使用上面的文件构建Dockerfile镜像

2)Dockerfile 文件内容
FROM python:3.6
WORKDIR /opt
RUN mkdir -p /opt/serving/bertclf
COPY . /opt
RUN pip install -r requirements.txt -i  https://pypi.tuna.tsinghua.edu.cn/simple
ENTRYPOINT ["python"]
CMD ["flask_infer.py"]
3)镜像构建
docker build -t my_docker_flask:1.1 .
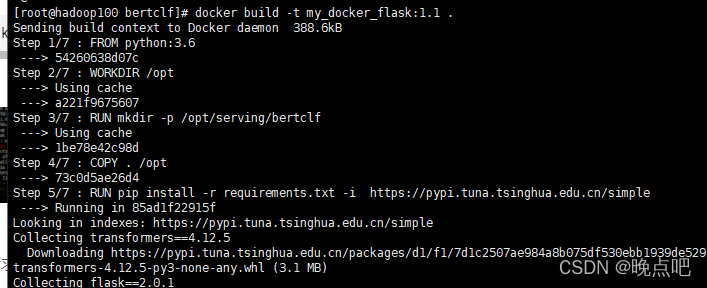
4) 容器运行
docker run -it -p 5000:5000 my_docker_flask:1.1
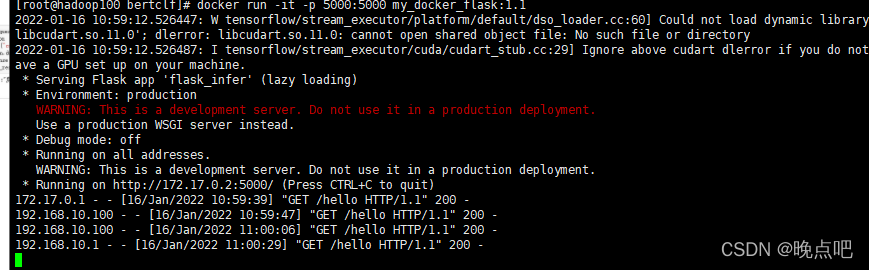
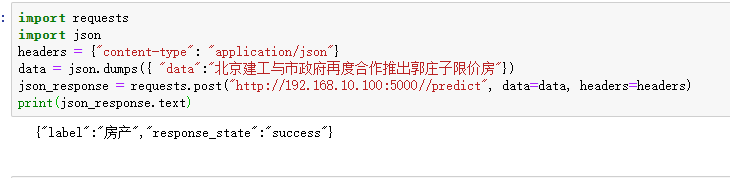
5)请求
Original: https://blog.csdn.net/weixin_42529756/article/details/122522556
Author: 晚点吧
Title: 基于docker的tensorflow2 bert 新闻分类模型部署
相关阅读1
Title: 【SLAM】LIO-SAM解析——数据预处理imageProjection(2)
知识点:
如何用IMU的角加速度对lidar帧去旋转畸变,如何用里程计的平移数据对lidar帧去平移畸变,如何用IMU和里程计初始时刻的位姿给这一帧找到位姿。
这部分内容对应imageProjection.cpp,雷达帧是一定角度旋转的(例如360°),同时机器人也在运动,这就造成了雷达在不同角度获取数据时机器人的位姿是不同的,也就是说,lidar在一帧时间范围内的每一个时刻所在的坐标系是不同的,对应获得的点云也是在不同坐标系下的。
这部分代码的作用就是把雷达旋转一周时,所有的点云都转换到同一个位姿下,也就是该帧初始时刻的lidar坐标系下。如何做到呢?初始时刻的位姿我知道,起止时间内的位姿变化我知道,每一个点云的时刻我知道,那么每一个时刻相对于初始时刻的位姿变化(平移有里程计变化量获得,旋转角由IMU变化量获得)就可以根据时间线性插值获得,然后根据这个位姿变化量把点变换过去就行了。
对每一个激光点云都这么玩一下,就实现了lidar帧的运动去畸变。
int main(int argc, char** argv)
{
    ros::init(argc, argv, "lio_sam");
    ImageProjection IP;

    ROS_INFO("\033[1;32m----> Image Projection Started.\033[0m");

    ros::MultiThreadedSpinner spinner(3);
    spinner.spin();

    return 0;
}
核心内容就在创建ImageProjection对象时进行的,看一下他的构造函数:
    ImageProjection():deskewFlag(0)
    {
        // 订阅原始imu数据
        subImu        = nh.subscribe(imuTopic, 2000, &ImageProjection::imuHandler, this, ros::TransportHints().tcpNoDelay());
        // 订阅imu里程计,由imuPreintegration积分计算得到的每时刻imu位姿
        subOdom       = nh.subscribe(odomTopic+"_incremental", 2000, &ImageProjection::odometryHandler, this, ros::TransportHints().tcpNoDelay());
        // 订阅原始lidar数据
        subLaserCloud = nh.subscribe(pointCloudTopic, 5, &ImageProjection::cloudHandler, this, ros::TransportHints().tcpNoDelay());

        // 发布当前激光帧运动畸变校正后的点云,有效点
        pubExtractedCloud = nh.advertise ("lio_sam/deskew/cloud_deskewed", 1);
        // 发布当前激光帧运动畸变校正后的点云信息
        pubLaserCloudInfo = nh.advertise ("lio_sam/deskew/cloud_info", 1);

        // 初始化
        allocateMemory();
        // 重置参数
        resetParameters();

        // pcl日志级别,只打ERROR日志
        pcl::console::setVerbosityLevel(pcl::console::L_ERROR);
    }
在这里可以看到,在对象构造的时候,就创建了ROS的回调函数,这里有三个关键的函数,分别是imuHandler(),odometryHandler()和cloudHandler(),分别对应IMU数据,里程计数据和雷达数据。
2.1 回调函数imuHandler()
这部分作用是把IMU数据的坐标系转换到lidar系上,从而和lidar数据进行匹配,然后放到容器里去。
    /**
     * 订阅原始imu数据
     * 1、imu原始测量数据转换到lidar系,加速度、角速度、RPY
    */
    void imuHandler(const sensor_msgs::Imu::ConstPtr& imuMsg)
    {
        // imu原始测量数据转换到lidar系,加速度、角速度、RPY
        sensor_msgs::Imu thisImu = imuConverter(*imuMsg);

        // 上锁,添加数据的时候队列不可用
        std::lock_guard lock1(imuLock);
        imuQueue.push_back(thisImu);
    }
imuConverter()定义在utility.h文件里,这个文件定义了全部通用的工具函数。它把线加速度和角速度转化到lidar系下,rot转化为从lidar->world的旋转。
    /**
     * imu原始测量数据转换到lidar系,加速度、角速度、RPY
    */
    sensor_msgs::Imu imuConverter(const sensor_msgs::Imu& imu_in)
    {
        sensor_msgs::Imu imu_out = imu_in;
        // 加速度,只跟xyz坐标系的旋转有关系
        Eigen::Vector3d acc(imu_in.linear_acceleration.x, imu_in.linear_acceleration.y, imu_in.linear_acceleration.z);
        acc = extRot * acc;
        imu_out.linear_acceleration.x = acc.x();
        imu_out.linear_acceleration.y = acc.y();
        imu_out.linear_acceleration.z = acc.z();
        // 角速度,只跟xyz坐标系的旋转有关系
        Eigen::Vector3d gyr(imu_in.angular_velocity.x, imu_in.angular_velocity.y, imu_in.angular_velocity.z);
        gyr = extRot * gyr;
        imu_out.angular_velocity.x = gyr.x();
        imu_out.angular_velocity.y = gyr.y();
        imu_out.angular_velocity.z = gyr.z();
        // RPY
        Eigen::Quaterniond q_from(imu_in.orientation.w, imu_in.orientation.x, imu_in.orientation.y, imu_in.orientation.z);
        Eigen::Quaterniond q_final = q_from * extQRPY;
        imu_out.orientation.x = q_final.x();
        imu_out.orientation.y = q_final.y();
        imu_out.orientation.z = q_final.z();
        imu_out.orientation.w = q_final.w();

        if (sqrt(q_final.x()*q_final.x() + q_final.y()*q_final.y() + q_final.z()*q_final.z() + q_final.w()*q_final.w()) < 0.1)
        {
            ROS_ERROR("Invalid quaternion, please use a 9-axis IMU!");
            ros::shutdown();
        }

        return imu_out;
    }
2.2 回调函数odometryHandler()
直接把里程计放到buffer里去,注意这里接收的里程计都已经是lidar系在world系下的表示 T(world
Original: https://blog.csdn.net/iwanderu/article/details/123058727
Author: iwander。
Title: 【SLAM】LIO-SAM解析——数据预处理imageProjection(2)
相关阅读2
Title: React中props.children和React.Children的区别
在React中,当涉及组件嵌套,在父组件中使用
props.children把所有子组件显示出来。如下:
function ParentComponent(props){
    return (
        <div>
            {props.children}
        </div>
    )
}
如果想把父组件中的属性传给所有的子组件,该怎么做呢?
--使用 React.Children帮助方法就可以做到。
比如,把几个Radio组合起来,合成一个RadioGroup,这就要求所有的Radio具有同样的name属性值。可以这样设计:把Radio看做子组件,RadioGroup看做父组件,name的属性值在RadioGroup这个父组件中设置。
首先是子组件:
//子组件
function RadioOption(props) {
  return (
    <label>
      <input type="radio" value="{props.value}" name="{props.name}">
      {props.label}
    </label>
  )
}
然后是父组件,不仅需要把它所有的子组件显示出来,还需要为每个子组件赋上name属性和值:
//父组件用,props是指父组件的props
function renderChildren(props) {
//遍历所有子组件
return React.Children.map(props.children, child => {
if (child.type === RadioOption)
return React.cloneElement(child, {
//把父组件的props.name赋值给每个子组件
name: props.name
})
else
return child
})
}
//父组件
function RadioGroup(props) {
return (
<div>
{renderChildren(props)}
</div>
)
}
function App() {
return (
<radiogroup name="hello">
<radiooption label="选项一" value="1">
<radiooption label="选项二" value="2">
<radiooption label="选项三" value="3">
</radiooption></radiooption></radiooption></radiogroup>
)
}
export default App;
以上, React.Children.map让我们对父组件的所有子组件又更灵活的控制。
Original: https://www.cnblogs.com/darrenji/p/5650410.html
Author: Darren Ji
Title: React中props.children和React.Children的区别
相关阅读3
Title: 单细胞亚群降维聚类分群
单细胞亚群降维聚类分群
大家好,这里是想做生信大恐龙🦖的生信小白,今天的暗杀目标是一个叫做'降维聚类分析'的小boss,看完记得一键三连(点赞收藏+评论)。文章参考微信公众号"生信技能树",也学生信的小伙伴可以关注哦!
降维聚类分析
前言
在单细胞和多细胞生物中,单个细胞之间的差异可以产生较大的功能影响。单细胞RNA测序方法揭示了组织组成、转录动态和基因之间的调控关系方面的新的生物学。不但如此,单细胞RNA测序可以指导细胞分类,更精确地确定细胞种类。
一、数据准备
1.打开 https://www.ncbi.nlm.nih.gov/geo/query/acc.cgi?acc=GSE173087网站。

2. 下载17.4Mb的http文件,保存至一个没有中文名称的路径。
; 二、实现分类(过程记录)
1.引入相关库
引入相关库代码如下:
library(Seurat)
library(data.table)
如果没有下载这些包的小伙伴,可以使用下列代码下载相关的R包:
install.packages('Seurat')
install.packages('data.frame')
下载好相关包之后,运行出现了版本不兼容的警告。

使用下列代码更新R语言版本:
install.package('installr')
library(installr)
updateR()
更新之后,紧接着出现了报错了

大概的意思是要我们使用install.packages('R.utils')安装'R.utils'。按照它的要求进行。运行下列代码即可进行:
install.package('R.utils')

2.数据处理
接下来对数据进行处理,运行下列代码
library(Seurat)
library(data.table)

ct=fread( 'C:/Users/86184/Desktop/exp/bioinf_student/single_data/GSE173087_Maize_rootsc_counts.txt.gz',data.table = F)
ct[1:4,1:4]
rownames(ct)=ct[,1]
ct=ct[,-1]

maize  CreateSeuratObject(counts = ct,
                            project = "maize",
                            min.cells = 3,
                            min.features = 200)
maize

maize  NormalizeData(maize, normalization.method = "LogNormalize",
                       scale.factor = 10000)

maize  NormalizeData(maize)

maize  FindVariableFeatures(maize, selection.method = "vst", nfeatures = 2000)

all.genes  rownames(maize)
maize  ScaleData(maize, features = all.genes)

maize  RunPCA(maize, features = VariableFeatures(object = maize),
                verbose = FALSE)
maize  FindNeighbors(maize, dims = 1:10, verbose = FALSE)
maize  FindClusters(maize, resolution = 0.5, verbose = FALSE)
maize  RunUMAP(maize, dims = 1:10, umap.method = "uwot", metric = "cosine")
table(maize$seurat_clusters)
phe=maize@meta.data
save(phe,file = 'phe-by-basic-seurat.Rdata')

DimPlot(maize, reduction = "umap", group.by = 'seurat_clusters',
        label = TRUE, pt.size = 0.5)
结果如下图:

可以看到2000个单细胞被分成了十八类。虽然对于Seurat原理我还不是很理解,但是对于R中的这个库的使用还是理解了一点。
总结
以上就是本次的内容,本文记录了学习"生信技能树"公众号的学徒任务中的单细胞降维聚类分群,大家有相关的想法可以评论交流,尤其是关于生物上的和语言上的,🦖都很感兴趣的。最后看到这里的小伙伴不妨一键三连啊(点赞评论+关注)
Original: https://blog.csdn.net/ouyangk1026/article/details/122135105
Author: Bio大恐龙
Title: 单细胞亚群降维聚类分群