目录
前言
根据我的另一篇文章:如何将照片美化,DPED机器学习开源项目安装使用 | 机器学习_阿良的博客-CSDN博客
发现DPED项目需要命令化执行且需要图片目录作为处理源。我还是把项目魔改了一下,简化项目结构,合并到一个python代码中。
模型文件比较大,我提供了下载地址,下载后放到项目对应目录即可。
Github仓库地址:github地址
项目说明
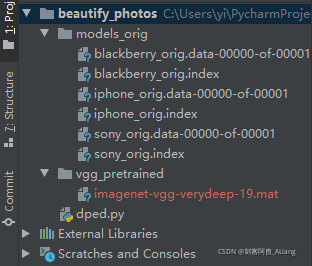
项目结构
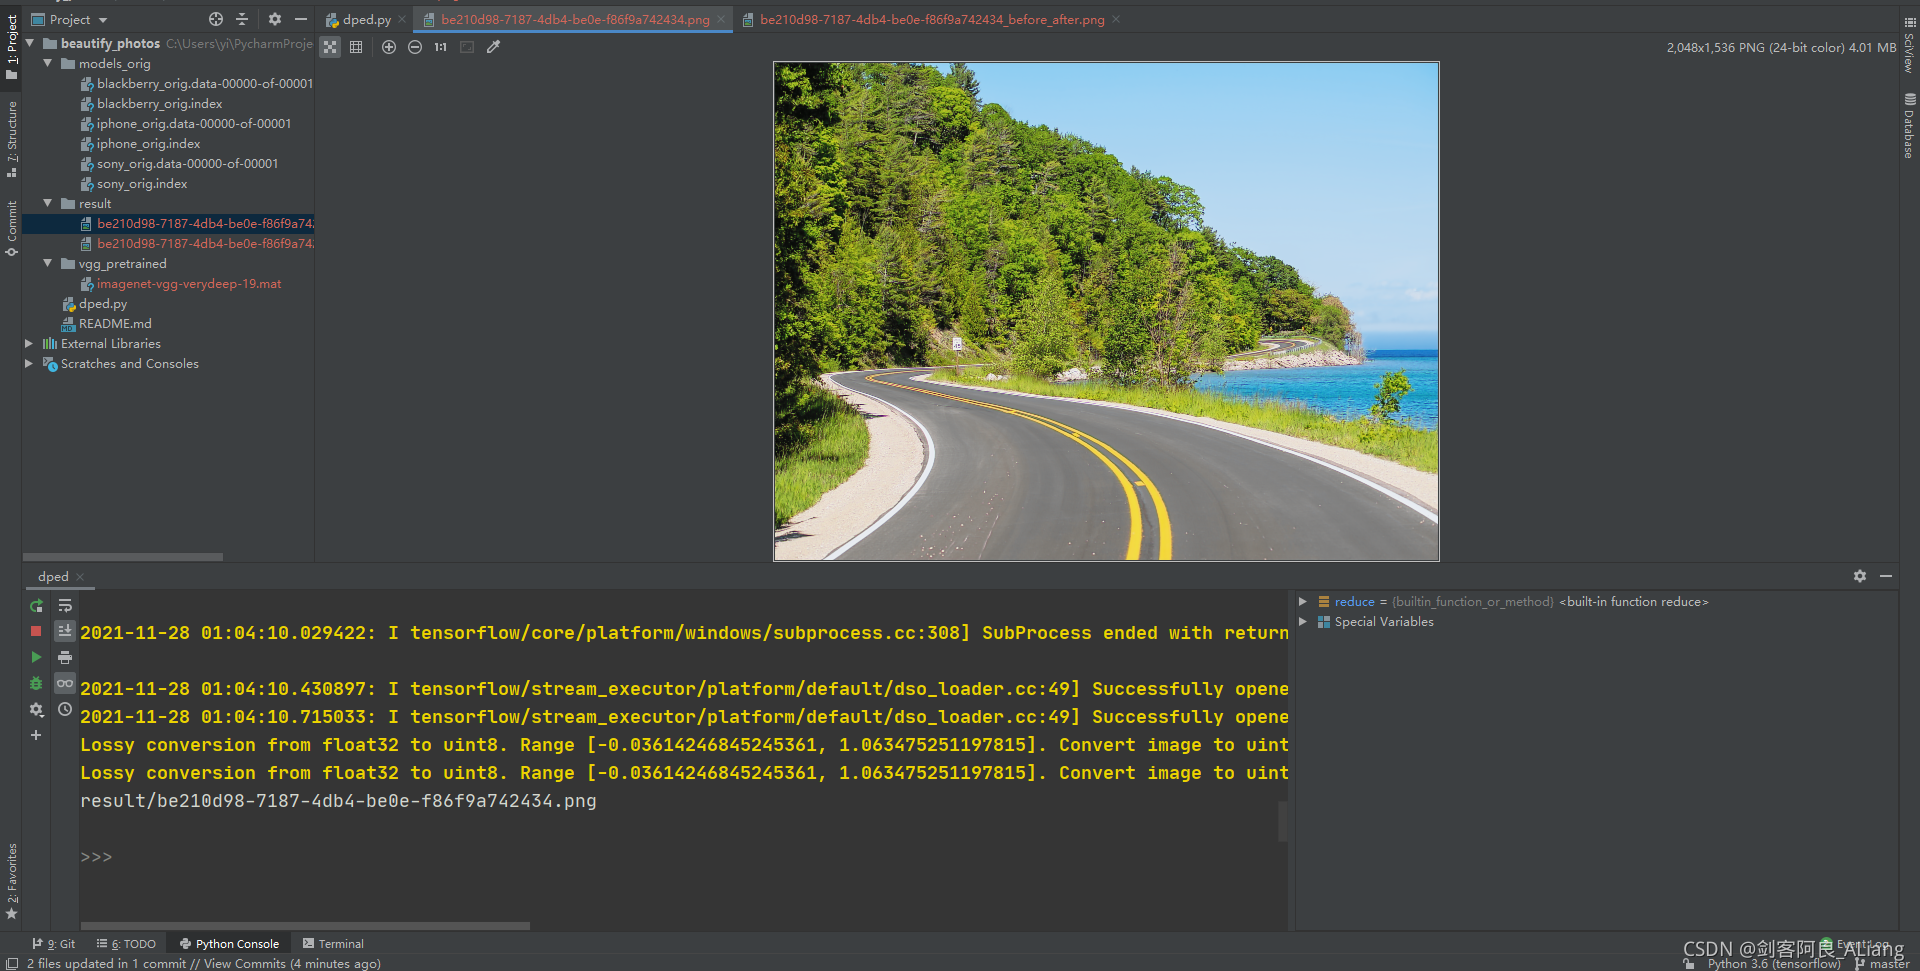
看一下项目的结构,如下图:
其中模型文件下载地址:https://pan.baidu.com/s/1IUm8xz5dhh8iW_bLWfihPQ 提取码:TUAN
将imagenet-vgg-verydeep-19.mat下载后放在vgg_pretrained目录中。
环境依赖可以直接参考:Python实现替换照片人物背景,精细到头发丝(附上代码) | 机器学习_阿良的博客-CSDN博客
数据准备
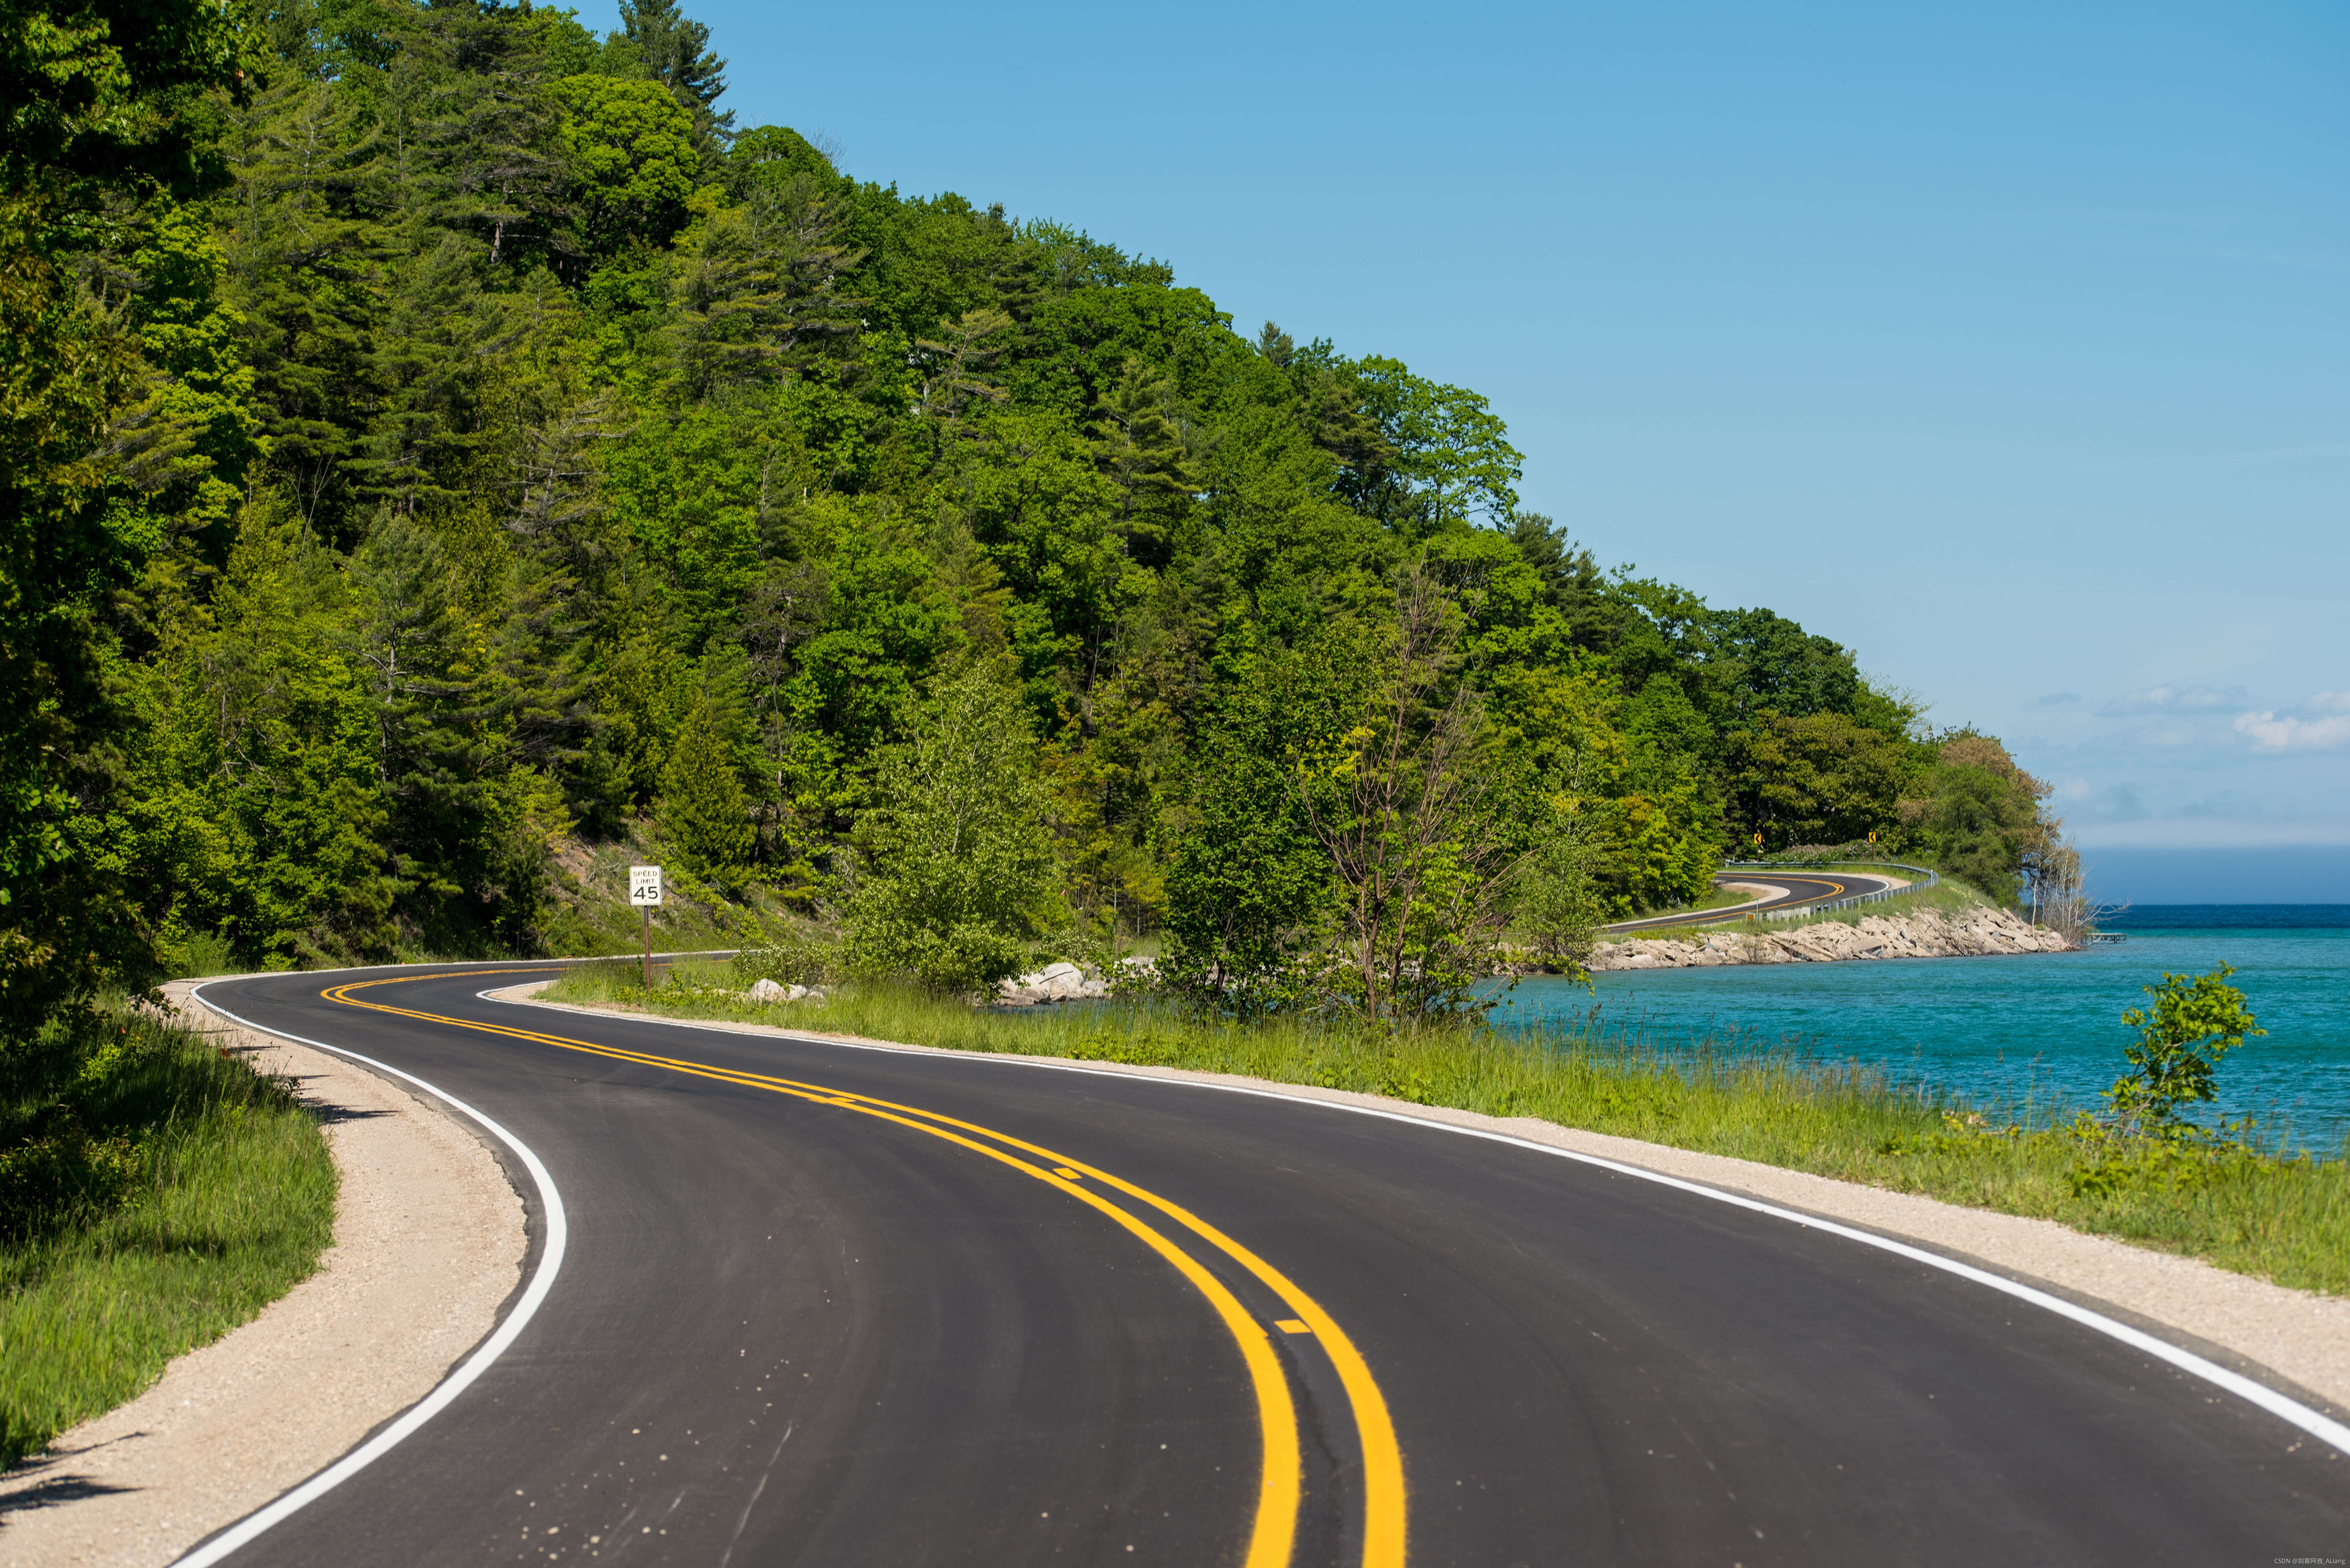
我准备了一张测试图如下:
魔改代码
不废话了,上核心代码。
#!/usr/bin/env python
-*- coding: utf-8 -*-
@Time    : 2021/11/27 13:48
@Author  : 剑客阿良_ALiang
@Site    :
@File    : dped.py

python test_model.py model=iphone_orig dped_dir=dped/ test_subset=full
iteration=all resolution=orig use_gpu=true

import imageio
from PIL import Image
import numpy as np
import tensorflow as tf
import os
import sys
import scipy.stats as st
import uuid
from functools import reduce

---------------------- hy add 2 ----------------------
def log10(x):
    numerator = tf.compat.v1.log(x)
    denominator = tf.compat.v1.log(tf.constant(10, dtype=numerator.dtype))
    return numerator / denominator

def _tensor_size(tensor):
    from operator import mul
    return reduce(mul, (d.value for d in tensor.get_shape()[1:]), 1)

def gauss_kernel(kernlen=21, nsig=3, channels=1):
    interval = (2 * nsig + 1.) / (kernlen)
    x = np.linspace(-nsig - interval / 2., nsig + interval / 2., kernlen + 1)
    kern1d = np.diff(st.norm.cdf(x))
    kernel_raw = np.sqrt(np.outer(kern1d, kern1d))
    kernel = kernel_raw / kernel_raw.sum()
    out_filter = np.array(kernel, dtype=np.float32)
    out_filter = out_filter.reshape((kernlen, kernlen, 1, 1))
    out_filter = np.repeat(out_filter, channels, axis=2)
    return out_filter

def blur(x):
    kernel_var = gauss_kernel(21, 3, 3)
    return tf.nn.depthwise_conv2d(x, kernel_var, [1, 1, 1, 1], padding='SAME')

def process_command_args(arguments):
    # specifying default parameters

    batch_size = 50
    train_size = 30000
    learning_rate = 5e-4
    num_train_iters = 20000

    w_content = 10
    w_color = 0.5
    w_texture = 1
    w_tv = 2000

    dped_dir = 'dped/'
    vgg_dir = 'vgg_pretrained/imagenet-vgg-verydeep-19.mat'
    eval_step = 1000

    phone = ""

    for args in arguments:

        if args.startswith("model"):
            phone = args.split("=")[1]

        if args.startswith("batch_size"):
            batch_size = int(args.split("=")[1])

        if args.startswith("train_size"):
            train_size = int(args.split("=")[1])

        if args.startswith("learning_rate"):
            learning_rate = float(args.split("=")[1])

        if args.startswith("num_train_iters"):
            num_train_iters = int(args.split("=")[1])

        # -----------------------------------

        if args.startswith("w_content"):
            w_content = float(args.split("=")[1])

        if args.startswith("w_color"):
            w_color = float(args.split("=")[1])

        if args.startswith("w_texture"):
            w_texture = float(args.split("=")[1])

        if args.startswith("w_tv"):
            w_tv = float(args.split("=")[1])

        # -----------------------------------

        if args.startswith("dped_dir"):
            dped_dir = args.split("=")[1]

        if args.startswith("vgg_dir"):
            vgg_dir = args.split("=")[1]

        if args.startswith("eval_step"):
            eval_step = int(args.split("=")[1])

    if phone == "":
        print("\nPlease specify the camera model by running the script with the following parameter:\n")
        print("python train_model.py model={iphone,blackberry,sony}\n")
        sys.exit()

    if phone not in ["iphone", "sony", "blackberry"]:
        print("\nPlease specify the correct camera model:\n")
        print("python train_model.py model={iphone,blackberry,sony}\n")
        sys.exit()

    print("\nThe following parameters will be applied for CNN training:\n")

    print("Phone model:", phone)
    print("Batch size:", batch_size)
    print("Learning rate:", learning_rate)
    print("Training iterations:", str(num_train_iters))
    print()
    print("Content loss:", w_content)
    print("Color loss:", w_color)
    print("Texture loss:", w_texture)
    print("Total variation loss:", str(w_tv))
    print()
    print("Path to DPED dataset:", dped_dir)
    print("Path to VGG-19 network:", vgg_dir)
    print("Evaluation step:", str(eval_step))
    print()
    return phone, batch_size, train_size, learning_rate, num_train_iters, \
           w_content, w_color, w_texture, w_tv, \
           dped_dir, vgg_dir, eval_step

def process_test_model_args(arguments):
    phone = ""
    dped_dir = 'dped/'
    test_subset = "small"
    iteration = "all"
    resolution = "orig"
    use_gpu = "true"

    for args in arguments:

        if args.startswith("model"):
            phone = args.split("=")[1]

        if args.startswith("dped_dir"):
            dped_dir = args.split("=")[1]

        if args.startswith("test_subset"):
            test_subset = args.split("=")[1]

        if args.startswith("iteration"):
            iteration = args.split("=")[1]

        if args.startswith("resolution"):
            resolution = args.split("=")[1]

        if args.startswith("use_gpu"):
            use_gpu = args.split("=")[1]

    if phone == "":
        print("\nPlease specify the model by running the script with the following parameter:\n")
        print(
            "python test_model.py model={iphone,blackberry,sony,iphone_orig,blackberry_orig,sony_orig}\n")
        sys.exit()

    return phone, dped_dir, test_subset, iteration, resolution, use_gpu

def get_resolutions():
    # IMAGE_HEIGHT, IMAGE_WIDTH

    res_sizes = {}

    res_sizes["iphone"] = [1536, 2048]
    res_sizes["iphone_orig"] = [1536, 2048]
    res_sizes["blackberry"] = [1560, 2080]
    res_sizes["blackberry_orig"] = [1560, 2080]
    res_sizes["sony"] = [1944, 2592]
    res_sizes["sony_orig"] = [1944, 2592]
    res_sizes["high"] = [1260, 1680]
    res_sizes["medium"] = [1024, 1366]
    res_sizes["small"] = [768, 1024]
    res_sizes["tiny"] = [600, 800]

    return res_sizes

def get_specified_res(res_sizes, phone, resolution):
    if resolution == "orig":
        IMAGE_HEIGHT = res_sizes[phone][0]
        IMAGE_WIDTH = res_sizes[phone][1]
    else:
        IMAGE_HEIGHT = res_sizes[resolution][0]
        IMAGE_WIDTH = res_sizes[resolution][1]

    IMAGE_SIZE = IMAGE_WIDTH * IMAGE_HEIGHT * 3

    return IMAGE_HEIGHT, IMAGE_WIDTH, IMAGE_SIZE

def extract_crop(image, resolution, phone, res_sizes):
    if resolution == "orig":
        return image

    else:

        x_up = int((res_sizes[phone][1] - res_sizes[resolution][1]) / 2)
        y_up = int((res_sizes[phone][0] - res_sizes[resolution][0]) / 2)

        x_down = x_up + res_sizes[resolution][1]
        y_down = y_up + res_sizes[resolution][0]

        return image[y_up: y_down, x_up: x_down, :]

---------------------- hy add 1 ----------------------
def resnet(input_image):
    with tf.compat.v1.variable_scope("generator"):
        W1 = weight_variable([9, 9, 3, 64], name="W1")
        b1 = bias_variable([64], name="b1")
        c1 = tf.nn.relu(conv2d(input_image, W1) + b1)

        # residual 1

        W2 = weight_variable([3, 3, 64, 64], name="W2")
        b2 = bias_variable([64], name="b2")
        c2 = tf.nn.relu(_instance_norm(conv2d(c1, W2) + b2))

        W3 = weight_variable([3, 3, 64, 64], name="W3")
        b3 = bias_variable([64], name="b3")
        c3 = tf.nn.relu(_instance_norm(conv2d(c2, W3) + b3)) + c1

        # residual 2

        W4 = weight_variable([3, 3, 64, 64], name="W4")
        b4 = bias_variable([64], name="b4")
        c4 = tf.nn.relu(_instance_norm(conv2d(c3, W4) + b4))

        W5 = weight_variable([3, 3, 64, 64], name="W5")
        b5 = bias_variable([64], name="b5")
        c5 = tf.nn.relu(_instance_norm(conv2d(c4, W5) + b5)) + c3

        # residual 3

        W6 = weight_variable([3, 3, 64, 64], name="W6")
        b6 = bias_variable([64], name="b6")
        c6 = tf.nn.relu(_instance_norm(conv2d(c5, W6) + b6))

        W7 = weight_variable([3, 3, 64, 64], name="W7")
        b7 = bias_variable([64], name="b7")
        c7 = tf.nn.relu(_instance_norm(conv2d(c6, W7) + b7)) + c5

        # residual 4

        W8 = weight_variable([3, 3, 64, 64], name="W8")
        b8 = bias_variable([64], name="b8")
        c8 = tf.nn.relu(_instance_norm(conv2d(c7, W8) + b8))

        W9 = weight_variable([3, 3, 64, 64], name="W9")
        b9 = bias_variable([64], name="b9")
        c9 = tf.nn.relu(_instance_norm(conv2d(c8, W9) + b9)) + c7

        # Convolutional

        W10 = weight_variable([3, 3, 64, 64], name="W10")
        b10 = bias_variable([64], name="b10")
        c10 = tf.nn.relu(conv2d(c9, W10) + b10)

        W11 = weight_variable([3, 3, 64, 64], name="W11")
        b11 = bias_variable([64], name="b11")
        c11 = tf.nn.relu(conv2d(c10, W11) + b11)

        # Final

        W12 = weight_variable([9, 9, 64, 3], name="W12")
        b12 = bias_variable([3], name="b12")
        enhanced = tf.nn.tanh(conv2d(c11, W12) + b12) * 0.58 + 0.5

    return enhanced

def adversarial(image_):
    with tf.compat.v1.variable_scope("discriminator"):
        conv1 = _conv_layer(image_, 48, 11, 4, batch_nn=False)
        conv2 = _conv_layer(conv1, 128, 5, 2)
        conv3 = _conv_layer(conv2, 192, 3, 1)
        conv4 = _conv_layer(conv3, 192, 3, 1)
        conv5 = _conv_layer(conv4, 128, 3, 2)

        flat_size = 128 * 7 * 7
        conv5_flat = tf.reshape(conv5, [-1, flat_size])

        W_fc = tf.Variable(tf.compat.v1.truncated_normal(
            [flat_size, 1024], stddev=0.01))
        bias_fc = tf.Variable(tf.constant(0.01, shape=[1024]))

        fc = leaky_relu(tf.matmul(conv5_flat, W_fc) + bias_fc)

        W_out = tf.Variable(
            tf.compat.v1.truncated_normal([1024, 2], stddev=0.01))
        bias_out = tf.Variable(tf.constant(0.01, shape=[2]))

        adv_out = tf.nn.softmax(tf.matmul(fc, W_out) + bias_out)

    return adv_out

def weight_variable(shape, name):
    initial = tf.compat.v1.truncated_normal(shape, stddev=0.01)
    return tf.Variable(initial, name=name)

def bias_variable(shape, name):
    initial = tf.constant(0.01, shape=shape)
    return tf.Variable(initial, name=name)

def conv2d(x, W):
    return tf.nn.conv2d(x, W, strides=[1, 1, 1, 1], padding='SAME')

def leaky_relu(x, alpha=0.2):
    return tf.maximum(alpha * x, x)

def _conv_layer(net, num_filters, filter_size, strides, batch_nn=True):
    weights_init = _conv_init_vars(net, num_filters, filter_size)
    strides_shape = [1, strides, strides, 1]
    bias = tf.Variable(tf.constant(0.01, shape=[num_filters]))

    net = tf.nn.conv2d(net, weights_init, strides_shape, padding='SAME') + bias
    net = leaky_relu(net)

    if batch_nn:
        net = _instance_norm(net)

    return net

def _instance_norm(net):
    batch, rows, cols, channels = [i.value for i in net.get_shape()]
    var_shape = [channels]

    mu, sigma_sq = tf.compat.v1.nn.moments(net, [1, 2], keepdims=True)
    shift = tf.Variable(tf.zeros(var_shape))
    scale = tf.Variable(tf.ones(var_shape))

    epsilon = 1e-3
    normalized = (net - mu) / (sigma_sq + epsilon) ** (.5)

    return scale * normalized + shift

def _conv_init_vars(net, out_channels, filter_size, transpose=False):
    _, rows, cols, in_channels = [i.value for i in net.get_shape()]

    if not transpose:
        weights_shape = [filter_size, filter_size, in_channels, out_channels]
    else:
        weights_shape = [filter_size, filter_size, out_channels, in_channels]

    weights_init = tf.Variable(
        tf.compat.v1.truncated_normal(
            weights_shape,
            stddev=0.01,
            seed=1),
        dtype=tf.float32)
    return weights_init

---------------------- hy add 0 ----------------------

def beautify(pic_path: str, output_dir: str, gpu='1'):
    tf.compat.v1.disable_v2_behavior()

    # process command arguments
    phone = "iphone_orig"
    test_subset = "full"
    iteration = "all"
    resolution = "orig"

    # get all available image resolutions
    res_sizes = get_resolutions()

    # get the specified image resolution
    IMAGE_HEIGHT, IMAGE_WIDTH, IMAGE_SIZE = get_specified_res(
        res_sizes, phone, resolution)

    if gpu == '1':
        use_gpu = 'true'
    else:
        use_gpu = 'false'

    # disable gpu if specified
    config = tf.compat.v1.ConfigProto(
        device_count={'GPU': 0}) if use_gpu == "false" else None

    # create placeholders for input images
    x_ = tf.compat.v1.placeholder(tf.float32, [None, IMAGE_SIZE])
    x_image = tf.reshape(x_, [-1, IMAGE_HEIGHT, IMAGE_WIDTH, 3])

    # generate enhanced image
    enhanced = resnet(x_image)

    with tf.compat.v1.Session(config=config) as sess:
        # test_dir = dped_dir + phone.replace("_orig",
        #                                     "") + "/test_data/full_size_test_images/"
        # test_photos = [f for f in os.listdir(
        #     test_dir) if os.path.isfile(test_dir + f)]
        test_photos = [pic_path]

        if test_subset == "small":
            # use five first images only
            test_photos = test_photos[0:5]

        if phone.endswith("_orig"):

            # load pre-trained model
            saver = tf.compat.v1.train.Saver()
            saver.restore(sess, "models_orig/" + phone)

            for photo in test_photos:
                # load training image and crop it if necessary
                new_pic_name = uuid.uuid4()
                print(
                    "Testing original " +
                    phone.replace(
                        "_orig",
                        "") +
                    " model, processing image " +
                    photo)
                image = np.float16(np.array(
                    Image.fromarray(imageio.imread(photo)).resize([res_sizes[phone][1], res_sizes[phone][0]]))) / 255

                image_crop = extract_crop(
                    image, resolution, phone, res_sizes)
                image_crop_2d = np.reshape(image_crop, [1, IMAGE_SIZE])

                # get enhanced image

                enhanced_2d = sess.run(enhanced, feed_dict={x_: image_crop_2d})
                enhanced_image = np.reshape(
                    enhanced_2d, [IMAGE_HEIGHT, IMAGE_WIDTH, 3])

                before_after = np.hstack((image_crop, enhanced_image))
                photo_name = photo.rsplit(".", 1)[0]

                # save the results as .png images

                # imageio.imwrite(
                #     "visual_results/" +
                #     phone +
                #     "_" +
                #     photo_name +
                #     "_enhanced.png",
                #     enhanced_image)
                imageio.imwrite(os.path.join(output_dir, '{}.png'.format(new_pic_name)), enhanced_image)
                # imageio.imwrite(
                #     "visual_results/" +
                #     phone +
                #     "_" +
                #     photo_name +
                #     "_before_after.png",
                #     before_after)
                imageio.imwrite(os.path.join(output_dir, '{}_before_after.png'.format(new_pic_name)), before_after)
                return os.path.join(output_dir, '{}.png'.format(new_pic_name))
        else:
            num_saved_models = int(len([f for f in os.listdir(
                "models_orig/") if f.startswith(phone + "_iteration")]) / 2)

            if iteration == "all":
                iteration = np.arange(1, num_saved_models) * 1000
            else:
                iteration = [int(iteration)]

            for i in iteration:

                # load pre-trained model
                saver = tf.compat.v1.train.Saver()
                saver.restore(
                    sess,
                    "models_orig/" +
                    phone +
                    "_iteration_" +
                    str(i) +
                    ".ckpt")

                for photo in test_photos:
                    # load training image and crop it if necessary
                    new_pic_name = uuid.uuid4()
                    print("iteration " + str(i) + ", processing image " + photo)
                    image = np.float16(np.array(
                        Image.fromarray(imageio.imread(photo)).resize(
                            [res_sizes[phone][1], res_sizes[phone][0]]))) / 255

                    image_crop = extract_crop(
                        image, resolution, phone, res_sizes)
                    image_crop_2d = np.reshape(image_crop, [1, IMAGE_SIZE])

                    # get enhanced image

                    enhanced_2d = sess.run(enhanced, feed_dict={x_: image_crop_2d})
                    enhanced_image = np.reshape(
                        enhanced_2d, [IMAGE_HEIGHT, IMAGE_WIDTH, 3])

                    before_after = np.hstack((image_crop, enhanced_image))
                    photo_name = photo.rsplit(".", 1)[0]

                    # save the results as .png images
                    # imageio.imwrite(
                    #     "visual_results/" +
                    #     phone +
                    #     "_" +
                    #     photo_name +
                    #     "_iteration_" +
                    #     str(i) +
                    #     "_enhanced.png",
                    #     enhanced_image)
                    imageio.imwrite(os.path.join(output_dir, '{}.png'.format(new_pic_name)), enhanced_image)
                    # imageio.imwrite(
                    #     "visual_results/" +
                    #     phone +
                    #     "_" +
                    #     photo_name +
                    #     "_iteration_" +
                    #     str(i) +
                    #     "_before_after.png",
                    #     before_after)
                    imageio.imwrite(os.path.join(output_dir, '{}_before_after.png'.format(new_pic_name)), before_after)
                    return os.path.join(output_dir, '{}.png'.format(new_pic_name))

if __name__ == '__main__':
    print(beautify('C:/Users/yi/Desktop/6.jpg', 'result/'))
代码说明
1、beautify方法有3个参数,分别为图片地址、输出目录、是否使用gpu(默认使用)。
2、输出的图片有两张,为了文件名不重复,使用uuid作为文件名,后缀带_before_after为对比图。
3、没有对文件做校验,如果需要可以自行添加。
验证一下效果
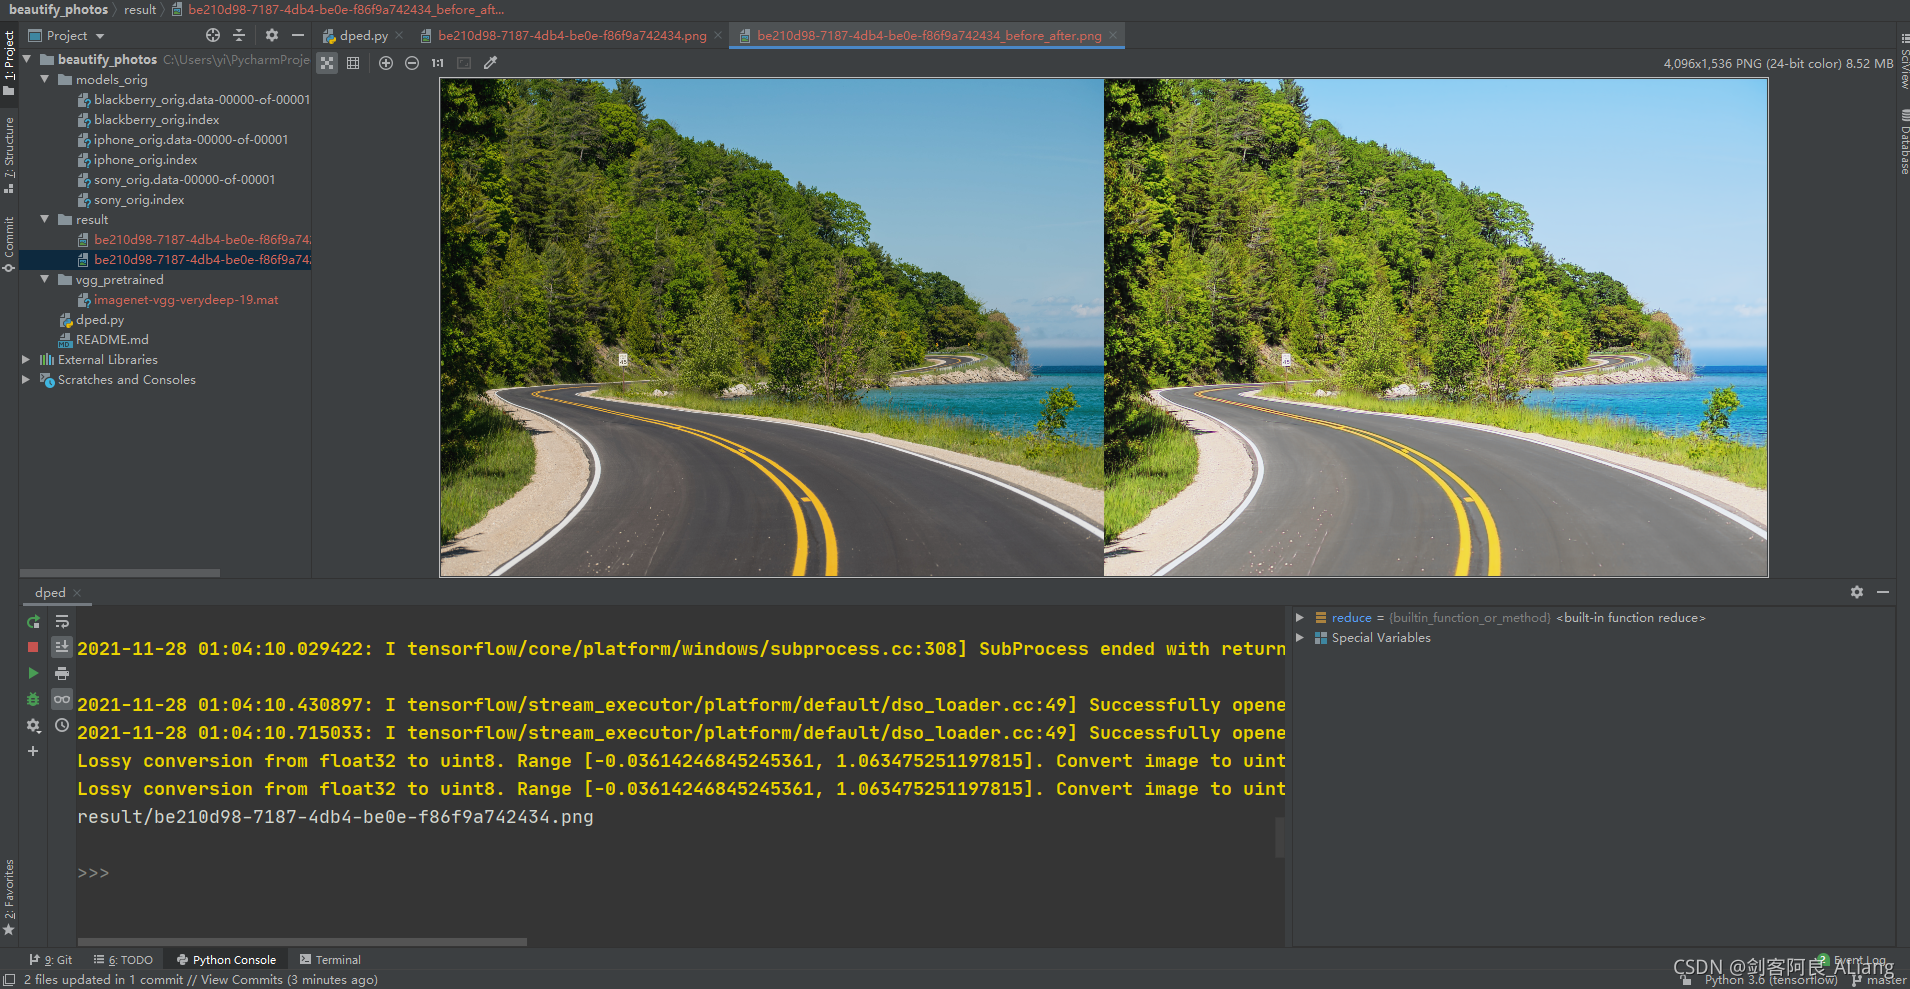
怎么样?很炫吧。
总结
研究这个项目还是很有意思的,记录与分享又是另一种快乐。以前以为自己是个开朗的人,现在细细翻阅自己的人生,更多的是宁静与孤独。以前曾看书看马尔克斯的一句话:在变老的路上,与其抗拒孤独,不如学会享受孤独。所以孤独没什么不好的,沉浸在程序的另一个世界里,就是另一个心情。
分享:
生命从来不曾离开过孤独而独立存在。无论是我们出生、我们成长、我们相爱还是我们成功失败,直到最后的最后,孤独犹如影子一样存在于生命一隅。——《马尔克斯》
如果本文对你有用的话, 请点个赞吧,谢谢!

Original: https://blog.csdn.net/zhiweihongyan1/article/details/121586116
Author: 剑客阿良_ALiang
Title: Python实现图片美化,醉后不知天在水?(附上代码) | 机器学习
相关阅读1
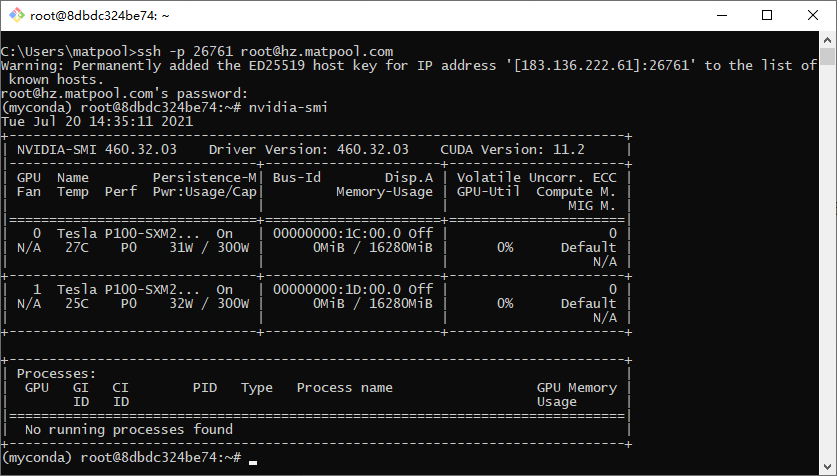
Title: 矩池云上使用nvidia-smi命令教程
简介
nvidia-smi全称是NVIDIA System Management Interface ,它是一个基于NVIDIA Management Library(NVML)构建的命令行实用工具,旨在帮助管理和监控NVIDIA GPU设备。
详解nvidia-smi命令
接下来我介绍一下,用nvidia-smi命令来查询机器GPU使用情况的相关内容。
nvidia-smi
我以上图的查询内容为例,已经复制出来了,如下,
(myconda) root@8dbdc324be74:~# nvidia-smi
Tue Jul 20 14:35:11 2021
+-----------------------------------------------------------------------------+
| NVIDIA-SMI 460.32.03    Driver Version: 460.32.03    CUDA Version: 11.2     |
|-------------------------------+----------------------+----------------------+
| GPU  Name        Persistence-M| Bus-Id        Disp.A | Volatile Uncorr. ECC |
| Fan  Temp  Perf  Pwr:Usage/Cap|         Memory-Usage | GPU-Util  Compute M. |
|                               |                      |               MIG M. |
|===============================+======================+======================|
|   0  Tesla P100-SXM2...  On   | 00000000:1C:00.0 Off |                    0 |
| N/A   27C    P0    31W / 300W |      0MiB / 16280MiB |      0%      Default |
|                               |                      |                  N/A |
+-------------------------------+----------------------+----------------------+
|   1  Tesla P100-SXM2...  On   | 00000000:1D:00.0 Off |                    0 |
| N/A   25C    P0    32W / 300W |      0MiB / 16280MiB |      0%      Default |
|                               |                      |                  N/A |
+-------------------------------+----------------------+----------------------+

+-----------------------------------------------------------------------------+
| Processes:                                                                  |
|  GPU   GI   CI        PID   Type   Process name                  GPU Memory |
|        ID   ID                                                   Usage      |
|=============================================================================|
|  No running processes found                                                 |
+-----------------------------------------------------------------------------+
我们来拆分一下
NVIDIA-SMI 460.32.03          #
Driver Version: 460.32.03     # 英伟达驱动版本
CUDA Version: 11.2            # CUDA版本
|-------------------------------+----------------------+----------------------+
| GPU  Name        Persistence-M| Bus-Id        Disp.A | Volatile Uncorr. ECC |
| Fan  Temp  Perf  Pwr:Usage/Cap|         Memory-Usage | GPU-Util  Compute M. |
|                               |                      |               MIG M. |
|===============================+======================+======================|
|   0  Tesla P100-SXM2...  On   | 00000000:1C:00.0 Off |                    0 |
| N/A   27C    P0    31W / 300W |      0MiB / 16280MiB |      0%      Default |
|                               |                      |                  N/A |
+-------------------------------+----------------------+----------------------+
|   1  Tesla P100-SXM2...  On   | 00000000:1D:00.0 Off |                    0 |
| N/A   25C    P0    32W / 300W |      0MiB / 16280MiB |      0%      Default |
|                               |                      |                  N/A |
+-------------------------------+----------------------+----------------------+

GPU:                # GPU的编号,0代表第一张显卡,1代表第二张,依次类推

Fan:                # 风扇转速(0%–100%),N/A表示没有风扇

Name:               # GPU的型号,以此处为例是P100

Temp:               # GPU温度(GPU温度过高会导致GPU频率下降)

Perf:               # 性能状态,从P0(最大性能)到P12(最小性能)

Pwr:                # GPU功耗

Persistence-M:      #  持续模式的状态(持续模式耗能大,但在新的GPU应用启动时花费时间更少)

Bus-Id:             # GPU总线,domain:bus:device.function

Disp.A:             # Display Active,表示GPU的显示是否初始化

Memory-Usage:       # 显存使用率(显示显存占用情况)

Volatile GPU-Util:  # 浮动的GPU利用率

ECC:                # 是否开启错误检查和纠正技术,0/DISABLED, 1/ENABLED

Compute M.:         # 计算模式,0/DEFAULT,1/EXCLUSIVE_PROCESS,2/PROHIBITED
Memory-Usage和Volatile GPU-Util的两个不一样的东西,显卡由GPU和显存等部分所构成,GPU相当于显卡上的CPU,显存相当于显卡上的内存。在跑任务的过程中可以通过优化代码来提高这两者的使用率。
nvcc和nvidia-smi显示的CUDA版本不同?
(myconda) root@8dbdc324be74:~# nvidia-smi
Tue Jul 20 14:35:11 2021
+-----------------------------------------------------------------------------+
| NVIDIA-SMI 460.32.03    Driver Version: 460.32.03    CUDA Version: 11.2     |
|-------------------------------+----------------------+----------------------+
| GPU  Name        Persistence-M| Bus-Id        Disp.A | Volatile Uncorr. ECC |
| Fan  Temp  Perf  Pwr:Usage/Cap|         Memory-Usage | GPU-Util  Compute M. |
|                               |                      |               MIG M. |
|===============================+======================+======================|
|   0  Tesla P100-SXM2...  On   | 00000000:1C:00.0 Off |                    0 |
| N/A   27C    P0    31W / 300W |      0MiB / 16280MiB |      0%      Default |
|                               |                      |                  N/A |
+-------------------------------+----------------------+----------------------+
|   1  Tesla P100-SXM2...  On   | 00000000:1D:00.0 Off |                    0 |
| N/A   25C    P0    32W / 300W |      0MiB / 16280MiB |      0%      Default |
|                               |                      |                  N/A |
+-------------------------------+----------------------+----------------------+

+-----------------------------------------------------------------------------+
| Processes:                                                                  |
|  GPU   GI   CI        PID   Type   Process name                  GPU Memory |
|        ID   ID                                                   Usage      |
|=============================================================================|
|  No running processes found                                                 |
+-----------------------------------------------------------------------------+
(myconda) root@8dbdc324be74:~# nvcc --version
nvcc: NVIDIA (R) Cuda compiler driver
Copyright (c) 2005-2020 NVIDIA Corporation
Built on Mon_Oct_12_20:09:46_PDT_2020
Cuda compilation tools, release 11.1, V11.1.105
Build cuda_11.1.TC455_06.29190527_0
可以看到nvcc的CUDA版本是11.1,而nvidia-smi的CUDA版本是11.2。这对运行任务是没有影响的,绝大多数代码都是可以正常跑起来的,引起这个的主要是因为CUDA两个主要的API,runtime API和driver API。神奇的是这两个API都有自己对应的CUDA版本(如图上的11.1和11.2)。在StackOverflow有一个解释,如果driver API和runtime API的CUDA版本不一致可能是因为你使用的是单独的GPU driver installer,而不是CUDA Toolkit installer里的GPU driver installer。在矩池云上的表现可以解释为driver API来自于物理机器的驱动版本,runtime API是来自于矩池云镜像环境内的CUDA Toolkit版本。
实时显示显存使用情况
nvidia-smi -l 5 #5秒刷新一次
动态刷新信息(默认5s刷新一次),按Ctrl+C停止,可指定刷新频率,以秒为单位
#每隔一秒刷新一次,刷新频率改中间数字即可
watch -n 1 -d nvidia-smi
在这里不建议使用watch查看nvidia-smi,watch每个时间周期开启一个进程(PID),查看后关闭进程,可能会影响到其他进程。
Original: https://www.cnblogs.com/matpool/p/15993476.html
Author: 矩池云
Title: 矩池云上使用nvidia-smi命令教程
相关阅读2
Title: Open3d利用彩色图和深度图生成点云进行室内三维重建
上一次得到的点云图在累加多张后配准会出现少量离群的点云,效果很差,于是考虑从 ICL-NUIM dataset这个数据集获得官方的室内图进行三维重建,数据集网址如下:
ICL-NUIM RGB-D Benchmark Dataset
一. 数据筛选
首先第一步,从九百多张彩色图和深度图中挑选部分图片进行点云生成,因为九百多张图太多了,重复的内容太多用来重建计算量太大(其实就是电脑配置不行)。
我选的是Living Room 'lr kt1'这个数据集,965张图,选36张,所以大概间隔27张选一张吧。注意,open3d生成rgbd图需要彩色图的深度是8位三通道或者是8位灰度图,所以在筛选时就要改成位深度,不然后面会报错说格式不符合要求: [CreateFromColorAndDepth] Unsupported image format
代码如下:
from PIL import Image
import os

def load(from_path, out_path):
    dirs = os.listdir(from_path)
    os.chdir(from_path)
    for file in dirs:
        # 把文件类型后缀去掉后就只剩数字,所以转换成数字然后每27张选一张出来
        if(int(file.strip('.png')) % 27 == 0):
            image = Image.open(file)
            # 这一步将彩色图转化为8位灰度图,会使后续点云没有颜色,建议保存成彩色8位
            # image = image.convert('L')
            image.save(os.path.join(out_path, file))

# 这是rgb图的路径,转换深度图就把路径改成depth的
load('.\pcldata\living_room_traj1_frei_png/rgb', '.\pcldata\living_room/rgb')
二.数据转换
然后使用open3d的create_from_color_and_depth函数将彩色图和深度图转换成RGBD图,注意,这里对格式的要求是,彩色图是8位深度三通道,深度图是16位深度,右键图片看看自己图片符不符合标准。还要注意的一点就是彩色图和深度图的size要一样大,我这里下载的数据集就都是640x480的。
然后,用以下的代码生成RGBD图并利用RGBD图生成点云。
import open3d as o3d
import matplotlib.pyplot as plt # plt 用于显示图片
import numpy as np
import os

rgb_path = '.\pcldata\living_room/rgb/'
depth_path = '.\pcldata\living_room\depth/'
rgb_dirs = os.listdir(rgb_path)
depth_dirs = os.listdir(depth_path)
print("读取RGB图片:", len(rgb_dirs), "张")
print("读取Depth图片:", len(depth_dirs), "张")

#一共转换36张图
for i in range(36):

    color_raw = o3d.io.read_image(rgb_path + rgb_dirs[i])
    depth_raw = o3d.io.read_image(depth_path + depth_dirs[i])
    # 这一步因为我的深度图的值都在10000左右,但depth_scale默认值是1000,我就把depth_trunc从默认的3改成30,深度就显示出来,原理不是很懂
    rgbd_image = o3d.geometry.RGBDImage.create_from_color_and_depth(color_raw, depth_raw, depth_scale=1000.0, depth_trunc=30, convert_rgb_to_intensity=False)
    plt.subplot(1, 2, 1)
    plt.title('read_depth')
    plt.imshow(rgbd_image.color)
    plt.subplot(1, 2, 2)
    plt.title('depth image')
    plt.imshow(rgbd_image.depth)
    plt.show()
    # 若要查看自己的深度图值是多少,使用下面的np函数显示
    # print(np.asarray(rgbd_image.depth))
    pcd = o3d.geometry.PointCloud.create_from_rgbd_image(rgbd_image,o3d.camera.PinholeCameraIntrinsic(
            o3d.camera.PinholeCameraIntrinsicParameters.PrimeSenseDefault))
    print("第%d张点云数据:"%i, pcd)
    pcd.transform([[1, 0, 0, 0], [0, -1, 0, 0], [0, 0, -1, 0], [0, 0, 0, 1]])
    # o3d.visualization.draw_geometries([pcd])
    o3d.io.write_point_cloud("./pcldata/living_room/pcd/%d.pcd" %i, pcd)
我遇到的一个问题是生成的RGBD图中的深度图是纯黑的,如下图
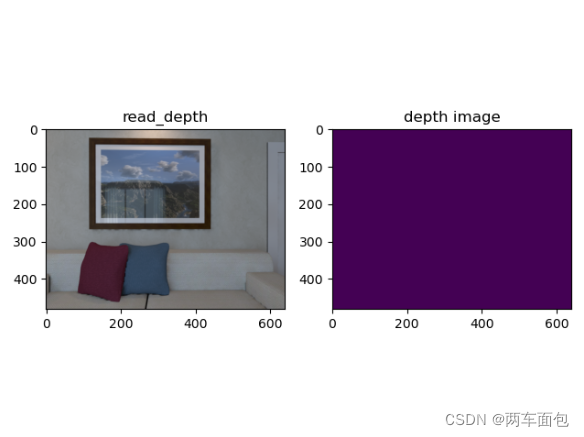
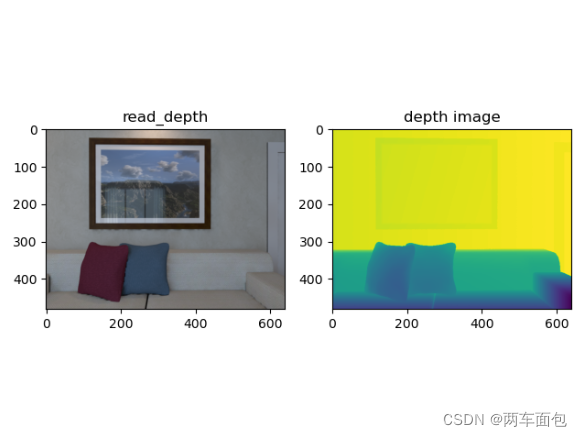
然后我用 print(np.asarray(rgbd_image.depth)) 看了下图片的深度值,基本在10000左右,但我看官方文档实例的图片深度在两三千浮动,怀疑自己的深度值太大导致的,然后看了下 PointCloud.create_from_rgbd_image 这个函数的文档,有个默认值depth_scale 的值是1000,我的深度范围10000明显超过了它的范围,我试了两种方法,一个是把depth_scale改成10000,深度图正常显示了,另一个方法是depth_scale还是保持1000不变,depth_trunc从默认值3改到30,也能正常显示,效果基本一样,我就用了第二种方法。显示效果如下:
至此,RGBD图的生成就结束了,接下来只需调用自带的点云生成函数PointCloud.create_from_rgbd_image 就好了,注意,如果要生成彩色点云,convert_rgb_to_intensity参数需要设为False。在可视化点云的时候官方文档加了个参数
zoom = 0.5,我加了这个参数后可视化就报错,把它删了就正常了。
保存下来,下一步准备进行点云配准和室内三维重建的工作。
Original: https://blog.csdn.net/weixin_45796500/article/details/124407422
Author: 两车面包人
Title: Open3d利用彩色图和深度图生成点云进行室内三维重建
相关阅读3
Title: 关于TensorBoard的使用问题
TensorBoard
是一组用于数据可视化的工具。它包含在流行的开源机器学习库 Tensorflow 中。TensorBoard 的主要功能包括:
- 可视化模型的网络架构
- 跟踪模型指标,如损失和准确性等
- 检查机器学习工作流程中权重、偏差和其他组件的直方图
- 显示非表格数据,包括图像、文本和音频
- 将高维嵌入投影到低维空间
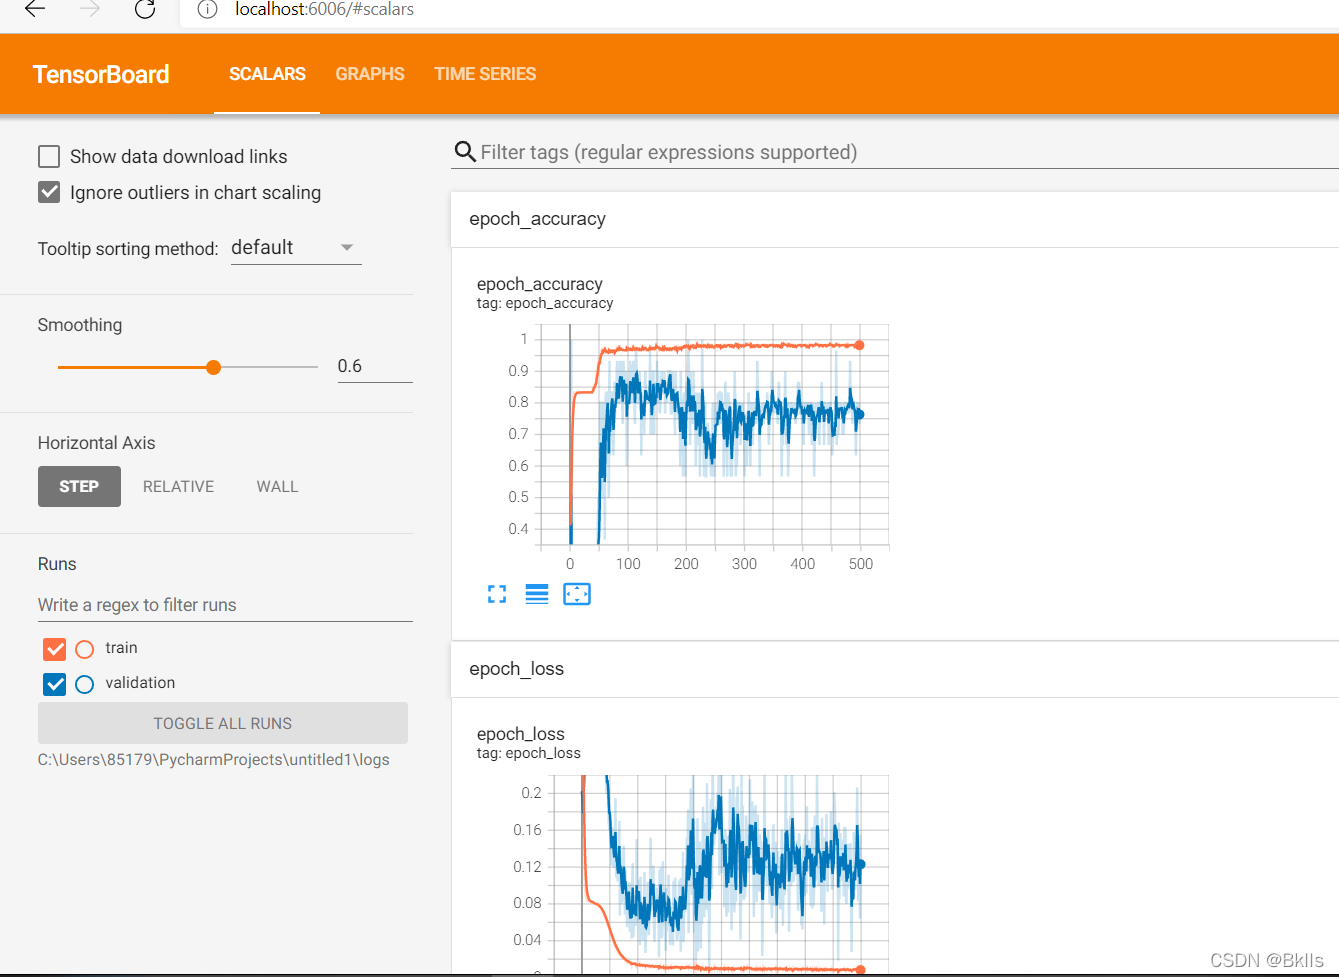
因为自己就本地使用回调函数调用TensorBoard的经历,因此只记录这一种方法。 下面的tf是TensorFlow啊,懂的都懂。这个"./logs"就是在当前目录下建一个logs文件夹,然后把东西放里边。
tf_callback = tf.keras.callbacks.TensorBoard(log_dir="./logs")  # 路径在这,调用回调
model.fit(X, dummy_y, epochs=500, batch_size=1, validation_split=0.2, callbacks=[tf_callback])
运行后,就要去cmd开启TensorBoard了
C:\Users\85179>tensorboard --logdir=C:\Users\85179\PycharmProjects\untitled1\logs
--logdir=后面输入你刚刚放logs的地址,不知道的话可以如下操作
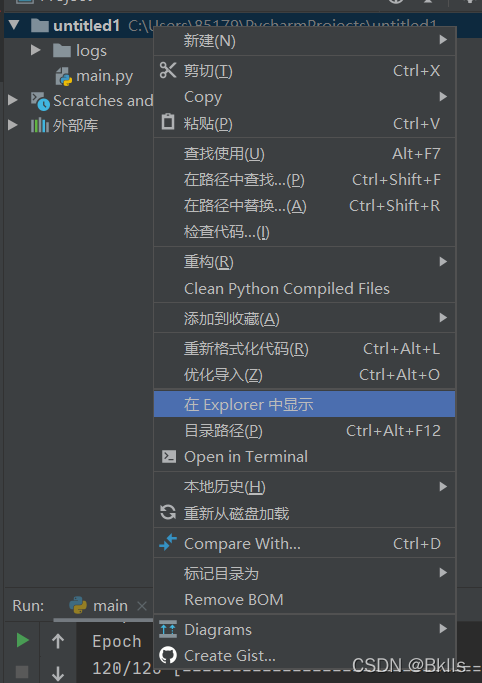
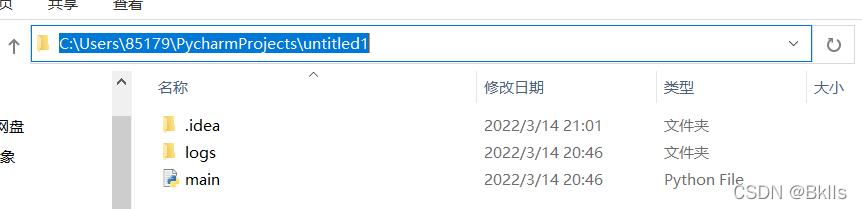
1、右键代码所在的文件夹,点击在Explorer中显示
2、复制粘贴即可
然后在浏览器中输入localhost:6006就可以看到绘制的图啦
import numpy as np
import tensorflow as tf
from imageio import imread, imsave
#from PIL import Image   # 调包PIL
import pandas as pd
from keras import optimizers
from keras.models import Sequential
from keras.layers import Dense
from keras.wrappers.scikit_learn import KerasClassifier
from keras.utils import np_utils
from sklearn.model_selection import train_test_split, cross_val_score
from sklearn.preprocessing import LabelEncoder
from keras.layers.core import Dense, Activation
import mglearn  # 机器学习教程上的库
dataframe = pd.read_csv("G:\\cv\\picture\\iris.csv", header=None)
output_graph = True
读取文件中的数据
dataset = dataframe.values

读取文件的第1到4列
X = dataset[1:, 1:5].astype(float)

指定第五列为标签
Y = dataset[1:, 5]

将标签转换为One-Hot形式
encoder = LabelEncoder()
encoded_Y = encoder.fit_transform(Y)
dummy_y = np_utils.to_categorical(encoded_Y, 3)

共三类,因此参数设置为3,即用三个神经元代表三种不同类型的话

显示读取的数据以及转化后的标签
print(X)
print(dummy_y)

构建模型
model = Sequential()

全连接层,4维输入,神经元个数为10,激活函数为ReLU,首层必须声明输入的维数
model.add(Dense(input_dim=4, units=10, activation='relu'))
model.add(Dense(units=5, activation='relu'))

定义输出层,由于采用One-Hot形式,因此对应着三种类型,输出层采用3个神经元
model.add(Dense(units=3, activation='softmax'))  # 在新版中,output_dim改成了units

编译模型
model.compile(loss='mean_squared_error',
              optimizer='rmsprop',
              metrics=['accuracy'])

显示模型
model.summary()

训练模型
X为输入,dummy_y为目标输出,迭代次数为500次,验证集比例为20%

这里的验证集为全部数据集的后20%,与训练完全独立
tf_callback = tf.keras.callbacks.TensorBoard(log_dir="./logs")  # 路径在这,调用回调
model.fit(X, dummy_y, epochs=500, batch_size=1, validation_split=0.2, callbacks=[tf_callback])
Original: https://blog.csdn.net/YourClerk/article/details/123488468
Author: Bklls
Title: 关于TensorBoard的使用问题