
视频链接:HuggingFace简明教程,BERT中文模型实战示例.NLP预训练模型,Transformers类库,datasets类库快速入门._哔哩哔哩_bilibili
1.huggingface简介与安装
什么是huggingface?huggingface是一个开源社区,它提供了先进的NLP模型,数据集,以及其他便利的工具。
数据集:Hugging Face – The AI community building the future.
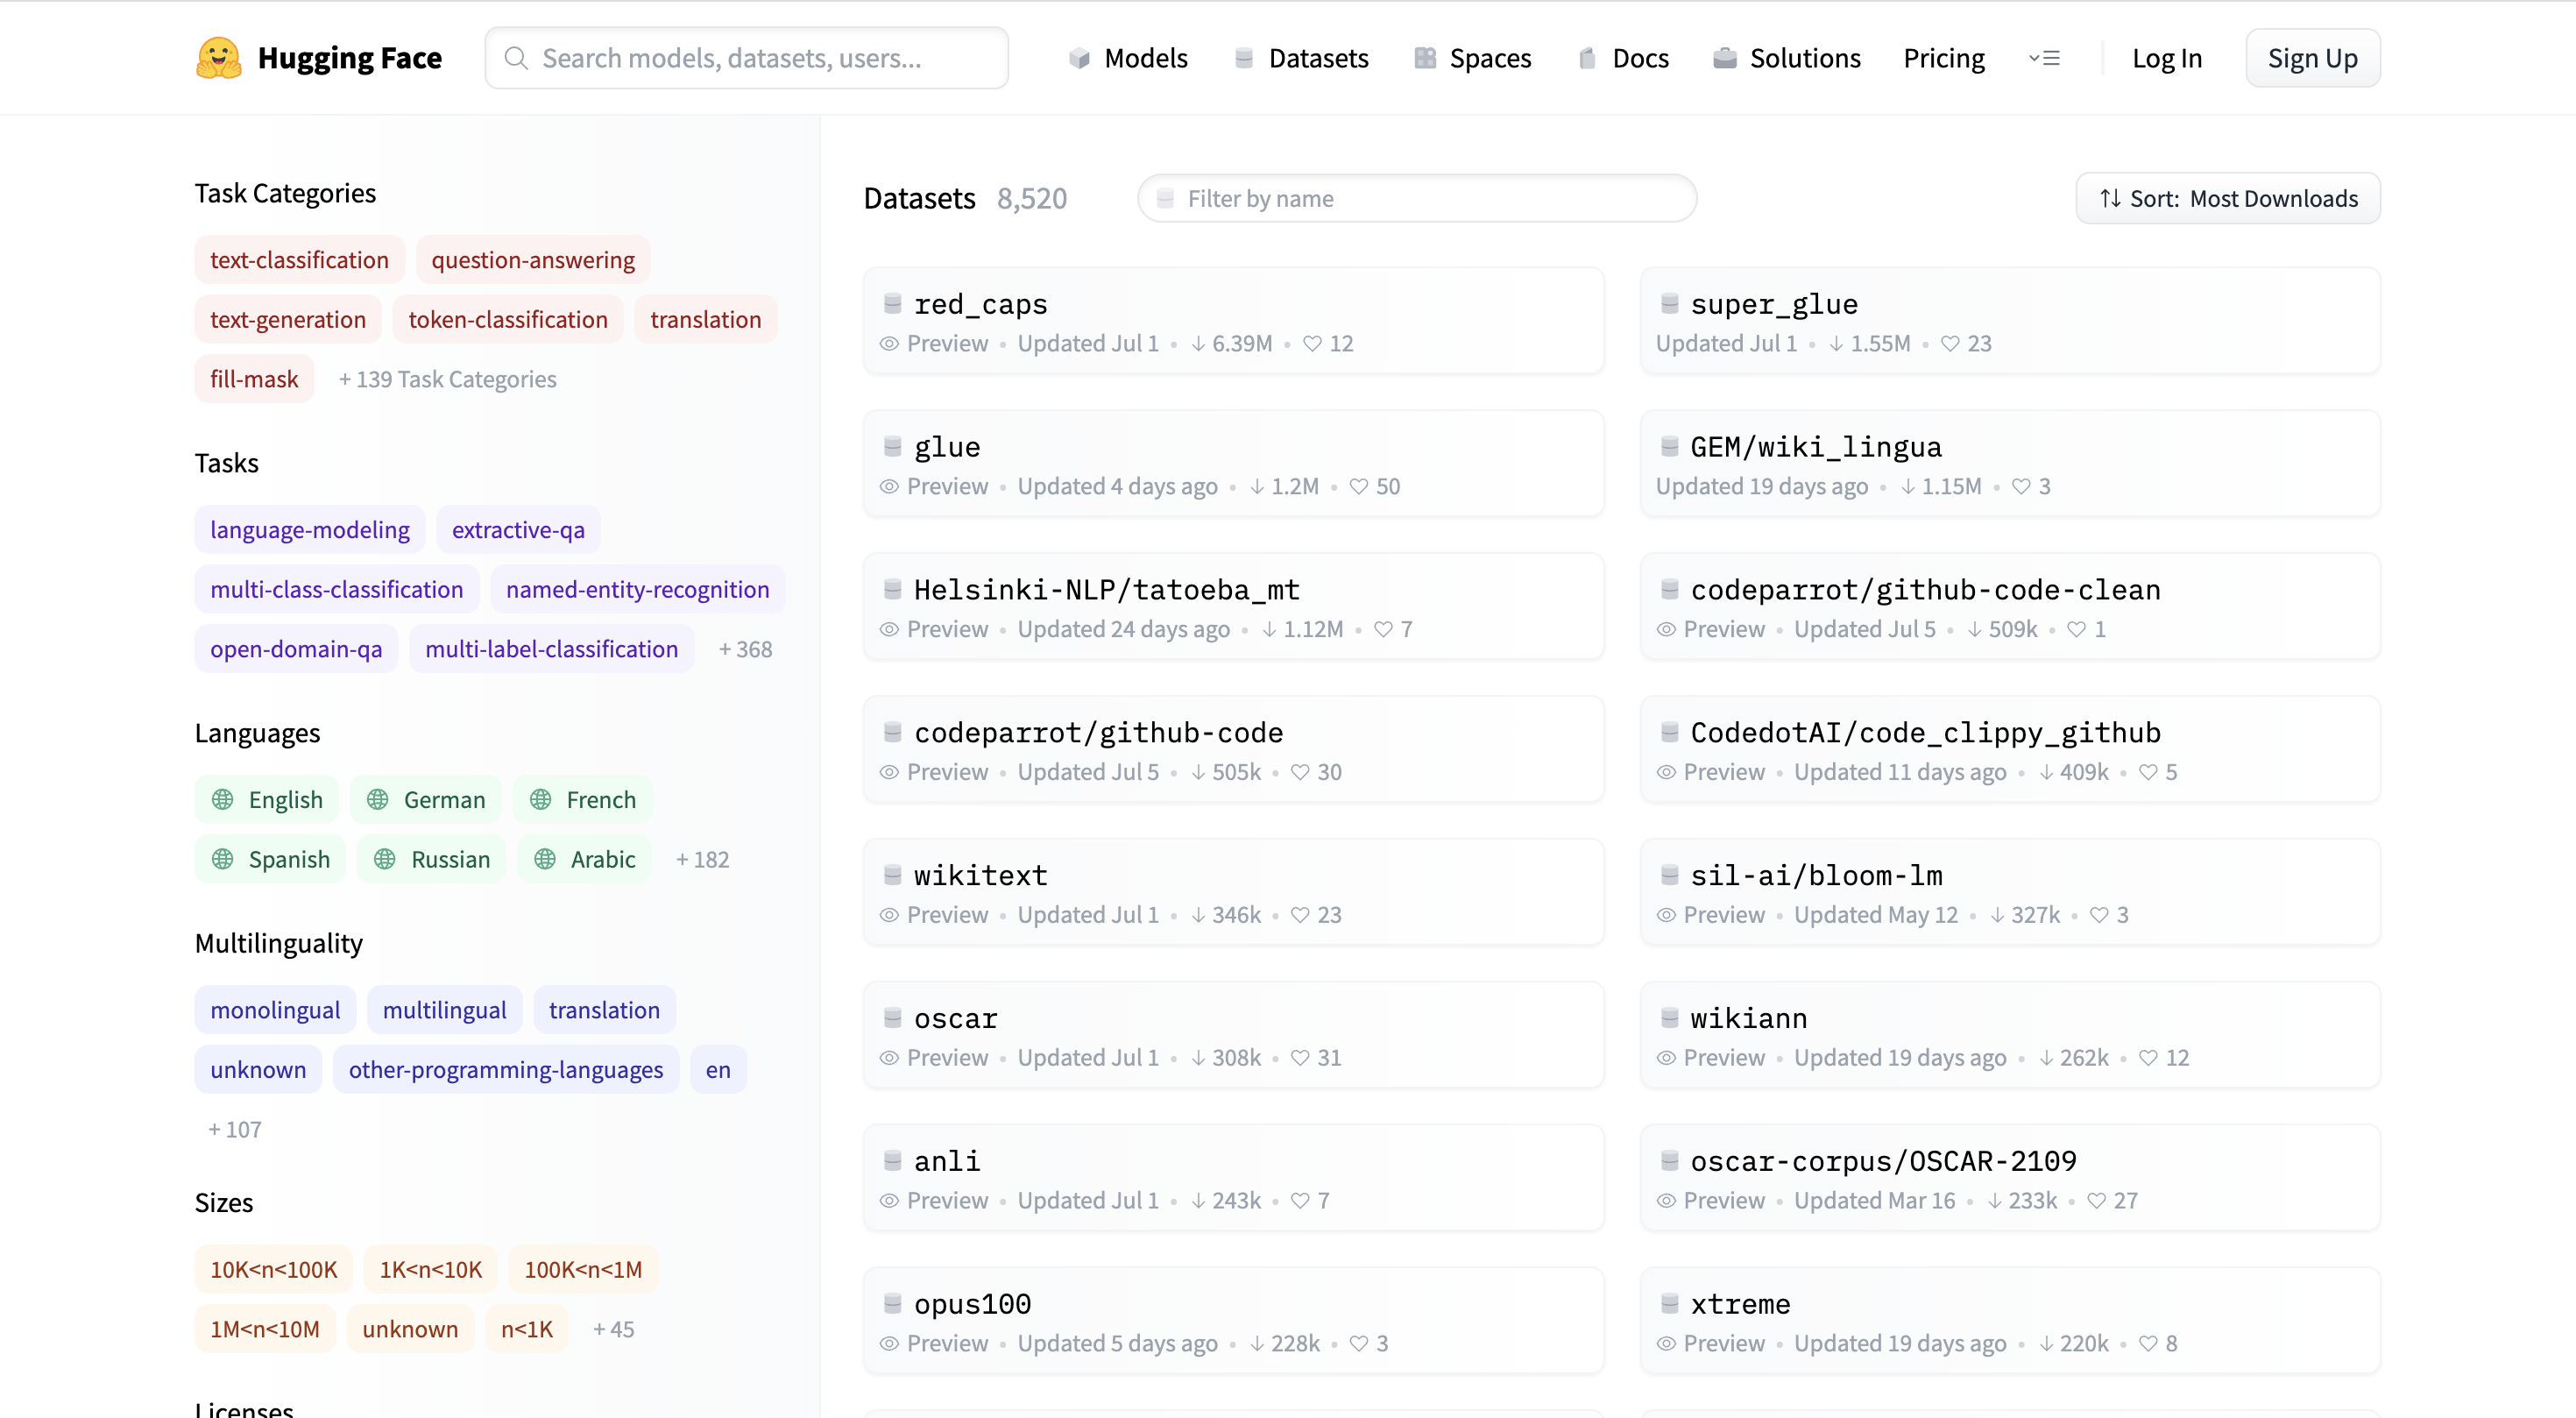
这些数据集可以根据任务、语言等来分类
官方文档: Hugging Face - Documentation

主要的模型:
自回归:GPT2、Transformer-XL、XLNet
自编码:BERT、ALBERT、RoBERTa、ELECTRA
Seq2Seq:BART、Pegasus、T5
安装环境:
前置环境:python、pytorch安装
安装transformers、datasets包:
#安装transformers
#pip安装
pip install transformers

#conda安装
conda install -c huggingface transformers

#安装datasets
#pip安装
pip install datasets

#conda安装
conda install -c huggingface -c conda-forge datasets
推荐使用pip进行安装
2.使用字典和分词工具
加载tokenizer,准备语料
在加载tokenizer的时候要传一个name,这个name与模型的name相一致,所以一个模型对应一个tokenizer
from transformers import BertTokenizer

#加载预训练字典和分词方法
tokenizer = BertTokenizer.from_pretrained(
    pretrained_model_name_or_path='bert-base-chinese',
    cache_dir=None,
    force_download=False,
)

sents = [
    '选择珠江花园的原因就是方便。',
    '笔记本的键盘确实爽。',
    '房间太小。其他的都一般。',
    '今天才知道这书还有第6卷,真有点郁闷.',
    '机器背面似乎被撕了张什么标签,残胶还在。',
]

tokenizer, sents
简单的编码
一次编码两个句子,text_pair是可以不传的,如果不传的话就是一次编码一个句子
#编码两个句子
out = tokenizer.encode(
    text=sents[0],
    text_pair=sents[1],

    #当句子长度大于max_length时,截断
    truncation=True,

    #一律补pad到max_length长度
    padding='max_length',
    add_special_tokens=True,
    max_length=30,
    return_tensors=None,# 默认返回list
)

print(out)

tokenizer.decode(out)
undefined
增强的编码函数
#增强的编码函数
out = tokenizer.encode_plus(
    text=sents[0],
    text_pair=sents[1],

    #当句子长度大于max_length时,截断
    truncation=True,

    #一律补零到max_length长度
    padding='max_length',
    max_length=30,
    add_special_tokens=True,

    #可取值tf,pt,np,默认为返回list
    return_tensors=None,

    #返回token_type_ids
    return_token_type_ids=True,

    #返回attention_mask
    return_attention_mask=True,

    #返回special_tokens_mask 特殊符号标识
    return_special_tokens_mask=True,

    #返回offset_mapping 标识每个词的起止位置,这个参数只能BertTokenizerFast使用
    #return_offsets_mapping=True,

    #返回length 标识长度
    return_length=True,
)
增强编码的结果:
#input_ids 就是编码后的词
#token_type_ids 第一个句子和特殊符号的位置是0,第二个句子的位置是1
#special_tokens_mask 特殊符号的位置是1,其他位置是0
#attention_mask pad的位置是0,其他位置是1
#length 返回句子长度
for k, v in out.items():
    print(k, ':', v)

tokenizer.decode(out['input_ids'])

批量编码句子
上述方式是一次编码一个或者一对句子,但是实际操作中需要批量编码句子。这里编码的是一个一个的句子,而不是一对一对的句子
#批量编码句子
out = tokenizer.batch_encode_plus(
    batch_text_or_text_pairs=[sents[0], sents[1]],
    add_special_tokens=True,

    #当句子长度大于max_length时,截断
    truncation=True,

    #一律补零到max_length长度
    padding='max_length',
    max_length=15,

    #可取值tf,pt,np,默认为返回list
    return_tensors=None,

    #返回token_type_ids
    return_token_type_ids=True,

    #返回attention_mask
    return_attention_mask=True,

    #返回special_tokens_mask 特殊符号标识
    return_special_tokens_mask=True,

    #返回offset_mapping 标识每个词的起止位置,这个参数只能BertTokenizerFast使用
    #return_offsets_mapping=True,

    #返回length 标识长度
    return_length=True,
)
批量编码的结果:
#input_ids 就是编码后的词
#token_type_ids 第一个句子和特殊符号的位置是0,第二个句子的位置是1
#special_tokens_mask 特殊符号的位置是1,其他位置是0
#attention_mask pad的位置是0,其他位置是1
#length 返回句子长度
for k, v in out.items():
    print(k, ':', v)

tokenizer.decode(out['input_ids'][0]), tokenizer.decode(out['input_ids'][1])

批量成对编码
传入的list中是一个一个的tuple,tuple中是一对句子
#批量编码成对的句子
out = tokenizer.batch_encode_plus(
    batch_text_or_text_pairs=[(sents[0], sents[1]), (sents[2], sents[3])],
    add_special_tokens=True,

    #当句子长度大于max_length时,截断
    truncation=True,

    #一律补零到max_length长度
    padding='max_length',
    max_length=30,

    #可取值tf,pt,np,默认为返回list
    return_tensors=None,

    #返回token_type_ids
    return_token_type_ids=True,

    #返回attention_mask
    return_attention_mask=True,

    #返回special_tokens_mask 特殊符号标识
    return_special_tokens_mask=True,

    #返回offset_mapping 标识每个词的起止位置,这个参数只能BertTokenizerFast使用
    #return_offsets_mapping=True,

    #返回length 标识长度
    return_length=True,
)
批量成对编码结果:
#input_ids 就是编码后的词
#token_type_ids 第一个句子和特殊符号的位置是0,第二个句子的位置是1
#special_tokens_mask 特殊符号的位置是1,其他位置是0
#attention_mask pad的位置是0,其他位置是1
#length 返回句子长度
for k, v in out.items():
    print(k, ':', v)

tokenizer.decode(out['input_ids'][0])
 字典操作
字典操作
操作tokenizer中的字典,当前的字典以一个字为一个词
#获取字典
zidian = tokenizer.get_vocab()

type(zidian), len(zidian), '月光' in zidian,

#添加新词
tokenizer.add_tokens(new_tokens=['月光', '希望'])

#添加新符号
tokenizer.add_special_tokens({'eos_token': '[EOS]'})

zidian = tokenizer.get_vocab()

type(zidian), len(zidian), zidian['月光'], zidian['[EOS]']

编码新词:
#编码新添加的词
out = tokenizer.encode(
    text='月光的新希望[EOS]',
    text_pair=None,

    #当句子长度大于max_length时,截断
    truncation=True,

    #一律补pad到max_length长度
    padding='max_length',
    add_special_tokens=True,
    max_length=8,
    return_tensors=None,
)

print(out)

tokenizer.decode(out)
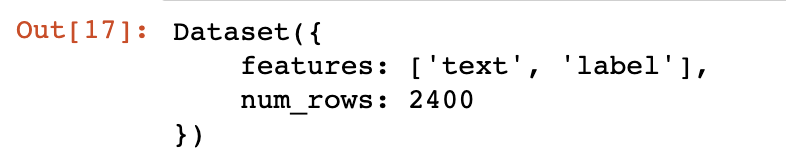
3.数据集操作
加载数据集
以情感分类数据集为例
from datasets import load_dataset
#加载数据
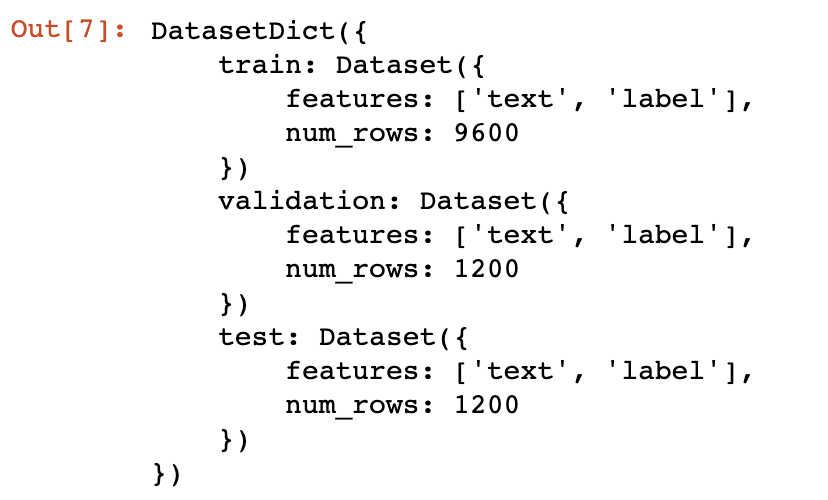
dataset = load_dataset(path='seamew/ChnSentiCorp')
dataset
#查看一个数据
dataset[0]
 排序和打乱
排序和打乱
#sort

#未排序的label是乱序的
print(dataset['label'][:10])

#排序之后label有序了
sorted_dataset = dataset.sort('label')
print(sorted_dataset['label'][:10])
print(sorted_dataset['label'][-10:])

#shuffle

#打乱顺序
shuffled_dataset = sorted_dataset.shuffle(seed=42)

shuffled_dataset['label'][:10]

选择和过滤
#select
dataset.select([0, 10, 20, 30, 40, 50])

#filter
def f(data):
    return data['text'].startswith('选择')

start_with_ar = dataset.filter(f)

len(start_with_ar), start_with_ar['text']

切分和分桶
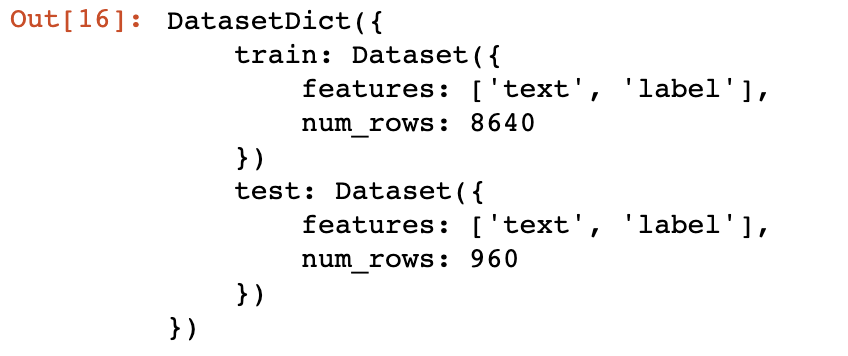
#train_test_split, 切分训练集和测试集
dataset.train_test_split(test_size=0.1)
#shard
#把数据切分到4个桶中,均匀分配
dataset.shard(num_shards=4, index=0)
列操作和类型转换
#rename_column
dataset.rename_column('text', 'textA')

#remove_columns
dataset.remove_columns(['text'])
#set_format
dataset.set_format(type='torch', columns=['label'])

dataset[0]

map函数
对数据集中的每一条数据都做函数f操作
#map
def f(data):
    data['text'] = 'My sentence: ' + data['text']
    return data

datatset_map = dataset.map(f)

datatset_map['text'][:5]

保存和加载
#保存数据集到磁盘
dataset.save_to_disk(dataset_dict_path='./data/ChnSentiCorp')

#从磁盘加载数据
from datasets import load_from_disk

dataset = load_from_disk('./data/ChnSentiCorp')
导出和保存为其他格式
#导出为csv格式
dataset = load_dataset(path='seamew/ChnSentiCorp', split='train')
dataset.to_csv(path_or_buf='./data/ChnSentiCorp.csv')

#加载csv格式数据
csv_dataset = load_dataset(path='csv',
                           data_files='./data/ChnSentiCorp.csv',
                           split='train')

#导出为json格式
dataset = load_dataset(path='seamew/ChnSentiCorp', split='train')
dataset.to_json(path_or_buf='./data/ChnSentiCorp.json')

#加载json格式数据
json_dataset = load_dataset(path='json',
                            data_files='./data/ChnSentiCorp.json',
                            split='train')
4.使用评价函数
查看可用的评价指标
from datasets import list_metrics

#列出评价指标
metrics_list = list_metrics()

len(metrics_list), metrics_list
查看该指标的说明文档
可以按照评价指标的说明文档中的示例代码来使用该指标
from datasets import load_metric

#加载一个评价指标
metric = load_metric('glue', 'mrpc')

print(metric.inputs_description)
计算一个评价指标
#计算一个评价指标
predictions = [0, 1, 0]
references = [0, 1, 1]

final_score = metric.compute(predictions=predictions, references=references)

final_score

5.使用pipline函数
pipeline提供了一些不需要训练就可以执行一些nlp任务的模型,实用价值不高
情感分类
from transformers import pipeline

#文本分类
classifier = pipeline("sentiment-analysis")

result = classifier("I hate you")[0]
print(result)

result = classifier("I love you")[0]
print(result)
阅读理解
from transformers import pipeline

#阅读理解
question_answerer = pipeline("question-answering")

context = r"""
Extractive Question Answering is the task of extracting an answer from a text given a question. An example of a
question answering dataset is the SQuAD dataset, which is entirely based on that task. If you would like to fine-tune
a model on a SQuAD task, you may leverage the examples/pytorch/question-answering/run_squad.py script.

"""

result = question_answerer(question="What is extractive question answering?",
                           context=context)
print(result)

result = question_answerer(
    question="What is a good example of a question answering dataset?",
    context=context)

print(result)
完形填空
from transformers import pipeline

#完形填空
unmasker = pipeline("fill-mask")

from pprint import pprint

sentence = 'HuggingFace is creating a  that the community uses to solve NLP tasks.'

unmasker(sentence)
文本生成
from transformers import pipeline

#文本生成
text_generator = pipeline("text-generation")

text_generator("As far as I am concerned, I will",
               max_length=50,
               do_sample=False)
命名实体识别
from transformers import pipeline

#命名实体识别
ner_pipe = pipeline("ner")

sequence = """Hugging Face Inc. is a company based in New York City. Its headquarters are in DUMBO,
therefore very close to the Manhattan Bridge which is visible from the window."""

for entity in ner_pipe(sequence):
    print(entity)
文本摘要
from transformers import pipeline

#文本总结
summarizer = pipeline("summarization")

ARTICLE = """ New York (CNN)When Liana Barrientos was 23 years old, she got married in Westchester County, New York.

A year later, she got married again in Westchester County, but to a different man and without divorcing her first husband.

Only 18 days after that marriage, she got hitched yet again. Then, Barrientos declared "I do" five more times, sometimes only within two weeks of each other.

In 2010, she married once more, this time in the Bronx. In an application for a marriage license, she stated it was her "first and only" marriage.

Barrientos, now 39, is facing two criminal counts of "offering a false instrument for filing in the first degree," referring to her false statements on the
2010 marriage license application, according to court documents.

Prosecutors said the marriages were part of an immigration scam.

On Friday, she pleaded not guilty at State Supreme Court in the Bronx, according to her attorney, Christopher Wright, who declined to comment further.

After leaving court, Barrientos was arrested and charged with theft of service and criminal trespass for allegedly sneaking into the New York subway through an emergency exit, said Detective
Annette Markowski, a police spokeswoman. In total, Barrientos has been married 10 times, with nine of her marriages occurring between 1999 and 2002.

All occurred either in Westchester County, Long Island, New Jersey or the Bronx. She is believed to still be married to four men, and at one time, she was married to eight men at once, prosecutors say.

Prosecutors said the immigration scam involved some of her husbands, who filed for permanent residence status shortly after the marriages.

Any divorces happened only after such filings were approved. It was unclear whether any of the men will be prosecuted.

The case was referred to the Bronx District Attorney\'s Office by Immigration and Customs Enforcement and the Department of Homeland Security\'s
Investigation Division. Seven of the men are from so-called "red-flagged" countries, including Egypt, Turkey, Georgia, Pakistan and Mali.

Her eighth husband, Rashid Rajput, was deported in 2006 to his native Pakistan after an investigation by the Joint Terrorism Task Force.

If convicted, Barrientos faces up to four years in prison.  Her next court appearance is scheduled for May 18.

"""

summarizer(ARTICLE, max_length=130, min_length=30, do_sample=False)
翻译
from transformers import pipeline

#翻译
translator = pipeline("translation_en_to_de")

sentence = "Hugging Face is a technology company based in New York and Paris"

translator(sentence, max_length=40)
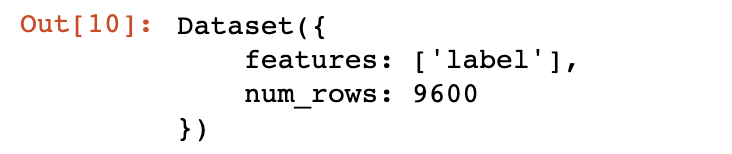
trainer API
加载分词工具
from transformers import AutoTokenizer

#加载分词工具
tokenizer = AutoTokenizer.from_pretrained('bert-base-cased')
定义数据集
from datasets import load_dataset
from datasets import load_from_disk

#加载数据集
#从网络加载
#datasets = load_dataset(path='glue', name='sst2')

#从本地磁盘加载数据
datasets = load_from_disk('./data/glue_sst2')

#分词
def f(data):
    return tokenizer(
        data['sentence'],
        padding='max_length',
        truncation=True,
        max_length=30,
    )

datasets = datasets.map(f, batched=True, batch_size=1000, num_proc=4)

#取数据子集,否则数据太多跑不动
dataset_train = datasets['train'].shuffle().select(range(1000))
dataset_test = datasets['validation'].shuffle().select(range(200))

del datasets

dataset_train
加载模型
from transformers import AutoModelForSequenceClassification

#加载模型
model = AutoModelForSequenceClassification.from_pretrained('bert-base-cased',
                                                           num_labels=2)

print(sum([i.nelement() for i in model.parameters()]) / 10000) # 查看模型参数数量
定义评价函数
import numpy as np
from datasets import load_metric
from transformers.trainer_utils import EvalPrediction

#加载评价函数
metric = load_metric('accuracy')

#定义评价函数
def compute_metrics(eval_pred):
    logits, labels = eval_pred
    logits = logits.argmax(axis=1)
    return metric.compute(predictions=logits, references=labels)

#模拟测试输出
eval_pred = EvalPrediction(
    predictions=np.array([[0, 1], [2, 3], [4, 5], [6, 7]]),
    label_ids=np.array([1, 1, 1, 1]),
)

compute_metrics(eval_pred)
定义训练器并测试
from transformers import TrainingArguments, Trainer

#初始化训练参数
args = TrainingArguments(output_dir='./output_dir', evaluation_strategy='epoch')
args.num_train_epochs = 1
args.learning_rate = 1e-4
args.weight_decay = 1e-2
args.per_device_eval_batch_size = 32
args.per_device_train_batch_size = 16

#初始化训练器
trainer = Trainer(
    model=model,
    args=args,
    train_dataset=dataset_train,
    eval_dataset=dataset_test,
    compute_metrics=compute_metrics,
)

#评价模型
trainer.evaluate()
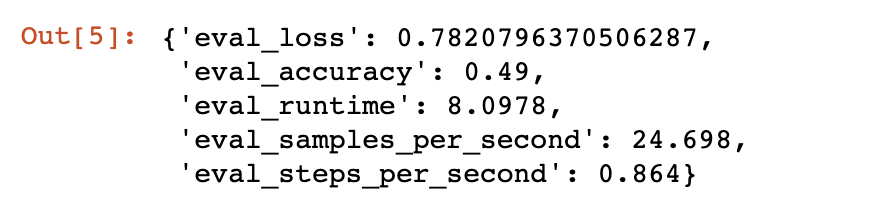
模型未训练前的准确率是0.49
#训练
trainer.train()

训练一个epoch之后的准确率为0.8
保存模型参数
#保存模型
trainer.save_model(output_dir='./output_dir')
使用保存的模型参数
定义测试数据集
import torch

def collate_fn(data):
    label = [i['label'] for i in data]
    input_ids = [i['input_ids'] for i in data]
    token_type_ids = [i['token_type_ids'] for i in data]
    attention_mask = [i['attention_mask'] for i in data]

    label = torch.LongTensor(label)
    input_ids = torch.LongTensor(input_ids)
    token_type_ids = torch.LongTensor(token_type_ids)
    attention_mask = torch.LongTensor(attention_mask)

    return label, input_ids, token_type_ids, attention_mask

#数据加载器
loader_test = torch.utils.data.DataLoader(dataset=dataset_test,
                                          batch_size=4,
                                          collate_fn=collate_fn,
                                          shuffle=True,
                                          drop_last=True)

for i, (label, input_ids, token_type_ids,
        attention_mask) in enumerate(loader_test):
    break

label, input_ids, token_type_ids, attention_mask
测试
import torch

#测试
def test():
    #加载参数
    model.load_state_dict(torch.load('./output_dir/pytorch_model.bin'))

    model.eval()

    #运算
    out = model(input_ids=input_ids,
                token_type_ids=token_type_ids,
                attention_mask=attention_mask)

    #[4, 2] -> [4]
    out = out['logits'].argmax(dim=1)

    correct = (out == label).sum().item()

    return correct / len(label)

test()
Original: https://blog.csdn.net/weixin_44748589/article/details/126359019
Author: weixin_44748589
Title: HuggingFace简明教程
相关阅读1
Title: Kafka入门实战教程(10):不再依赖ZooKeeper的KRaft
1 新的KRaft架构模式
在Kafka 2.8之前,Kafka重度依赖于Zookeeper集群做元数据管理和集群的高可用(即所谓的共识服务)。
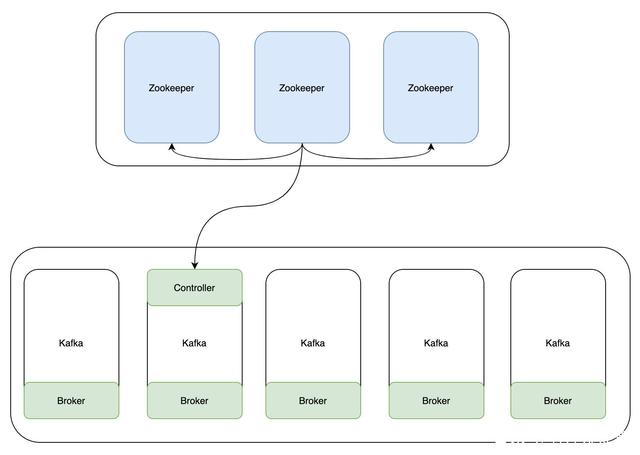
在Kafka 2.8之后,引入了基于Raft协议的KRaft模式,支持取消对Zookeeper的依赖。在此模式下,一部分Kafka Broker被指定为Controller,另一部分则为Broker。这些Controller的作用就是以前由Zookeeper提供的共识服务,并且所有的元数据都将存储在Kafka主题中并在内部进行管理。
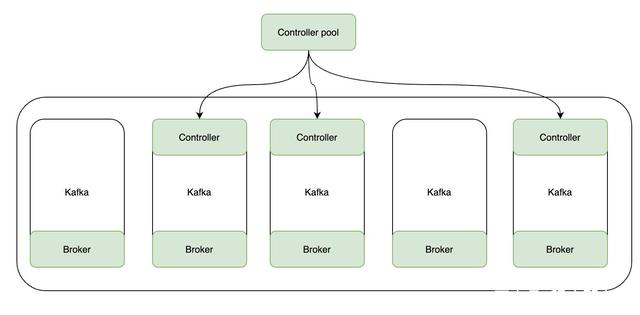
总体而言,使用KRaft的好处如下:
- Kafka不用再依赖外部框架,能够做到独立运行。类似于Redis的Sentinel,它的本质仍然是一个Kafka实例。
- Controller管理集群时,不再需要从Zookeeper中先读取数据,因此集群的性能得到一定的提升。
- 由于不再依赖Zookeeper,Kafka集群扩展时不用再受到Zookeeper读写能力的限制。
- Controller不再动态选举,而是由配置文件规定。这样可以有针对性的加强Controller节点的配置,而不是像以前一样对随机Controller节点的高负载束手无策。
2 KRaft架构模式部署实战
本次我们采用物理宿主机部署,本集群三个Kafka实例均在一台主机上。
下载Kafka安装包
从Apache Kafka官方社区下载最新版3.2.0的安装包(.tgz),然后将其拷贝到服务器上并解压。这里我使用一台Linux主机,启动三个Kafka实例,分别绑定9092,19092,29092端口来模拟三台服务器的集群效果。由于只有三个实例,因此 它们既是Controller节点,也是Broker节点。
修改KRaft必要配置
和基于Zookeeper的模式不同,KRaft模式下的配置需要进入Kraft目录,找到server.properties文件:
cd config/kraft
依次修改每个服务器下的kraft目录下的server.properties文件:
(1)kafka01
process.roles=broker,controller
node.id=1
controller.quorum.voters=1@kafka01:9093,2@kafka02:19093,3@kafka03:29093
listeners=PLAINTEXT://:9092,CONTROLLER://:9093
advertised.listeners=PLAINTEXT://kakfa01:9092
log.dirs=/usr/local/modules/kakfa01/logs
(2)kafka02
process.roles=broker,controller
node.id=2
controller.quorum.voters=1@kafka01:9093,2@kafka02:19093,3@kafka03:29093
listeners=PLAINTEXT://:19092,CONTROLLER://:19093
advertised.listeners=PLAINTEXT://kakfa02:19092
log.dirs=/usr/local/modules/kakfa02/logs
(3)kafka03
process.roles=broker,controller
node.id=2
controller.quorum.voters=1@kafka01:9093,2@kafka02:19093,3@kafka03:29093
listeners=PLAINTEXT://:29092,CONTROLLER://:29093
advertised.listeners=PLAINTEXT://kakfa03:29092
log.dirs=/usr/local/modules/kakfa03/logs
初始化集群数据目录
(1)生成存储目录唯一ID(UUID)
bin/kafka-storage.sh random-uuid
uTTIHcpoQSeiGlItgLau0A
(2)用这个唯一ID格式化Kafka存储目录
# kafka01
/usr/local/modules/kafka01/bin/kafka-storage.sh format -t uTTIHcpoQSeiGlItgLau0A -c /usr/local/modules/kafka01/config/kraft/server.properties
# kafka02
/usr/local/modules/kafka02/bin/kafka-storage.sh format -t uTTIHcpoQSeiGlItgLau0A -c /usr/local/modules/kafka02/config/kraft/server.properties
# kafka03
/usr/local/modules/kafka03/bin/kafka-storage.sh format -t uTTIHcpoQSeiGlItgLau0A -c /usr/local/modules/kafka03/config/kraft/server.properties
(3)启动Kafka KRaft集群节点服务
# kafka01
/usr/local/modules/kafka01/bin/kafka-server-start.sh -daemon /usr/local/modules/kafka01/config/kraft/server.properties
# kakfa02
/usr/local/modules/kafka02/bin/kafka-server-start.sh -daemon /usr/local/modules/kafka02/config/kraft/server.properties
# kafka03
/usr/local/modules/kafka03/bin/kafka-server-start.sh -daemon /usr/local/modules/kafka03/config/kraft/server.properties
(4)验证Kafka集群节点服务
# jps
1207 Kafka
2137 Jps
2013 Kafka
1614 Kafka
快速测试生产消费
(1)创建测试topic
kafka01/bin/kafka-topics.sh --create --bootstrap-server kafka01:9092,kafka02:19092,kafka03:29092 --replication-factor 2 --partitions 3 --topic test
Created topic test.
(2)模拟Producer
kafka01/bin/kafka-console-producer.sh --broker-list kafka01:9092,kafka02:19092,kafka03:29092 --topic test
>hello
>world
>edison
>zhou
(3)模拟Consumer
kafka02/bin/kafka-console-consumer.sh --bootstrap-server kafka01:9092,kafka02:19092,kafka03:29092 --from-beginning --topic test
hello
world
edison
zhou
可以看到,已经可以正常的生产和消费数据。
3 总结
本文总结了Kafka KRaft模式的基本概念和优点,介绍了Kafka KRaft模式的部署过程。基于KRaft模式,我们不再需要依赖Zookeeper进行元数据管理和共识服务,在技术选型时不再需要引入额外的组件,对于Kafka来说,实在是个好消息。
至此,Kafka学习征途系列已经有了11篇推文,目前已经走到了结尾, 总结这个系列既是我对自己学习的总结,也是系统地梳理所学知识,相信它对我有帮助,也一定对你有所帮助!
参考资料
极客时间,胡夕《Kafka核心技术与实战》
B站,尚硅谷《Kafka 3.x入门到精通教程》

作者:周旭龙
出处:https://edisonchou.cnblogs.com
本文版权归作者和博客园共有,欢迎转载,但未经作者同意必须保留此段声明,且在文章页面明显位置给出原文链接。
Original: https://www.cnblogs.com/edisonchou/p/kafka_study_notes_part10.html
Author: EdisonZhou
Title: Kafka入门实战教程(10):不再依赖ZooKeeper的KRaft
相关阅读2
Title: 【性能调优】NGINX的性能调优宝典

NGINX是众所周知的高性能负载均衡器、缓存和web服务器,为世界上40%以上最繁忙的网站供电。对于大多数用例,默认的NGINX和Linux设置工作得很好,但是要获得最佳性能有时需要进行一些调整。这篇博客文章讨论了在优化系统时要考虑的一些NGINX和Linux设置。
几乎可以对任何设置进行优化,但本文将集中讨论少数几个对大多数用户有利的设置。只有当您对NGINX和Linux有了深入的了解,或者按照我们的支持或专业服务团队的指导,我们才建议您更改某些设置,这里不介绍这些设置。专业服务团队与世界上一些最繁忙的网站合作,优化NGINX以获得最高级别的性能,并可与您一起充分利用NGINX或NGINX Plus部署。
介绍
假设对NGINX架构和配置概念有基本的了解。本文并不试图复制NGINX文档,而是提供了各种选项的概述以及到相关文档的链接。
优化时要遵循的一个好规则是一次更改一个设置,如果更改不能提高性能,则将其设置回默认值。
我们首先讨论Linux的调优,因为某些操作系统设置的值决定了如何调优NGINX配置。
调整Linux配置
现代Linux内核(2.6+)中的设置适用于大多数目的,但更改其中的一些设置可能是有益的。检查内核日志中指示设置过低的错误消息,并根据建议进行调整。在这里,我们只讨论那些在正常工作负载下最有可能从优化中受益的设置。有关调整这些设置的详细信息,请参阅Linux文档。
积压队列(The Backlog Queue)
以下设置与连接及其排队方式相关。如果传入连接的速率很高,并且性能水平参差不齐(例如,某些连接似乎处于暂停状态),则更改这些设置可能会有所帮助。
- net.core.somaxconn–可排队等待NGINX接受的最大连接数。默认值通常很低,这通常是可以接受的,因为NGINX可以很快接受连接,但如果您的网站遇到大量流量,则可以增加它。如果内核日志中的错误消息指示该值太小,请增大该值,直到错误停止。
- 注意:如果将其设置为大于512的值,请将backlog参数更改为NGINX listen指令以进行匹配。
- net.core.netdev_max_backlog–在将数据包交给CPU之前,网卡缓冲数据包的速率。增加该值可以提高具有高带宽的计算机上的性能。检查内核日志中是否存在与此设置相关的错误,并参考网卡文档中有关更改此设置的建议。
描述器
文件描述符是用于表示连接和打开的文件等的操作系统资源。NGINX每个连接最多可以使用两个文件描述符。例如,如果NGINX正在代理,它通常使用一个文件描述符作为客户端连接,另一个用于连接到代理服务器,尽管如果使用HTTP keepalives,这个比率要低得多。对于提供大量连接的系统,可能需要调整以下设置:
- sys.fs.file-max–文件描述符的系统范围限制
- nofile–在/etc/security/limits.conf文件中设置的用户文件描述符限制
短暂的端口(Ephemeral Ports)
当NGINX充当代理时,到上游服务器的每个连接都使用一个临时或短暂的端口。您可能需要更改此设置:
- net.ipv4.ip_local_port_range–端口值范围的开始和结束。如果发现端口不足,请增大范围。常见的设置是端口1024到65000。
调整NGINX配置
下面是一些可以影响性能的NGINX指令。如上所述,我们只讨论对您自己调整安全的指令。我们建议您不要在没有NGINX团队指导的情况下更改其他指令的设置。
工作进程(Worker Processes)
NGINX可以运行多个工作进程,每个进程都能够处理大量的同时连接。您可以使用以下指令控制工作进程的数量以及它们如何处理连接:
- worker_processes–NGINX工作进程的数量(默认值为1)。在大多数情况下,每个CPU核心运行一个工作进程工作良好,我们建议将此指令设置为auto以实现这一点。有时您可能希望增加这个数字,例如工作进程必须执行大量磁盘I/O。
- worker_connections–每个工作进程可以同时处理的最大连接数。默认值是512,但大多数系统都有足够的资源来支持更大的数目。适当的设置取决于服务器的大小和流量的性质,并且可以通过测试发现。
保持连接(Keepalive Connections)
Keepalive连接可以减少打开和关闭连接所需的CPU和网络开销,从而对性能产生重大影响。NGINX终止所有客户端连接,并创建到上游服务器的独立连接。NGINX支持客户端和上游服务器的keepalives。以下指令与客户端keepalives相关:
- keepalive_requests –客户端可以通过单个keepalive连接发出的请求数。默认值为100,但更高的值对于使用负载生成工具进行测试尤其有用,该工具通常从单个客户端发送大量请求。
- keepalive_timeout -空闲keepalive连接保持打开的时间。
以下指令与上游保持连接有关:
- keepalive–到上游服务器的空闲keepalive连接数,每个工作进程都保持打开状态。没有默认值。
要启用到上游服务器的keepalive连接,还必须在配置中包含以下指令:
proxy_http_version 1.1;proxy_set_header Connection "";
访问日志记录
记录每个请求会占用CPU和I/O周期,减少影响的一种方法是启用访问日志缓冲。使用缓冲,NGINX不会对每个日志条目执行单独的写操作,而是缓冲一系列条目,并在单个操作中将它们一起写入文件。
要启用访问日志缓冲,请将buffer=size参数包含到access_log指令中;NGINX在缓冲区达到size值时将缓冲区内容写入日志。要让NGINX在指定时间后写入缓冲区,请包含flush=time参数。当设置了这两个参数时,NGINX会在下一个日志条目无法放入缓冲区或缓冲区中的条目分别早于指定的时间时将条目写入日志文件。当工作进程重新打开其日志文件或关闭时,也会写入日志项。要完全禁用访问日志记录,请将off参数包含到access_log指令中。
发送文件(Sendfile)
操作系统的sendfile()系统调用将数据从一个文件描述符复制到另一个文件描述符,通常实现零拷贝,这可以加快TCP数据传输。要使NGINX能够使用它,请在http上下文或服务器或位置上下文中包含sendfile指令。然后,NGINX可以将缓存或磁盘上的内容写入套接字,而无需将任何上下文切换到用户空间,从而使写入速度极快,占用更少的CPU周期。但是,请注意,由于使用sendfile()复制的数据绕过了用户空间,因此它不受常规NGINX处理链和更改内容的过滤器(如gzip)的约束。当配置上下文同时包含sendfile指令和激活内容更改筛选器的指令时,NGINX会自动为该上下文禁用sendfile。
限制
您可以设置各种限制,帮助防止客户端消耗太多资源,这可能会对系统性能以及安全性和用户体验造成不利影响。以下是一些相关指令:
- limit_conn and limit_conn_zone–限制NGINX接受的客户端连接数,例如从单个IP地址。设置它们有助于防止单个客户端打开过多的连接并消耗超过其资源份额的资源。
- limit_rate–限制每个连接将响应传输到客户端的速率(以便打开多个连接的客户端可以为每个连接消耗此数量的带宽)。设置限制可以防止系统被某些客户端过载,从而确保所有客户端的服务质量更加均匀。
- limit_req and limit_req_zone–限制NGINX处理请求的速率,这与设置limit_rate有相同的好处。它们还可以提高安全性,特别是登录页面的安全性,方法是将请求速率限制为对人类用户合理的值,但对于试图用请求压倒应用程序的程序(如DDoS攻击中的机器人程序)来说太慢。
- 上游配置块中服务器指令的max_conns参数-设置上游组中服务器同时接受的最大连接数。设置一个限制可以帮助防止上游服务器过载。将该值设置为0(零,默认值)意味着没有限制。
- queue(NGINX Plus)–创建一个队列,当上游组中的所有可用服务器都达到最大连接数限制时,将在其中放置请求。此指令设置队列中请求的最大数量,还可以选择设置在返回错误之前它们等待的最长时间(默认为60秒)。如果省略此指令,则请求不会排队。
缓存和压缩可以提高性能
NGINX可以用来提高web应用程序性能的一些附加特性实际上并不属于优化的范畴,但值得一提的是,它们的影响是相当大的。它们包括缓存和压缩。
缓存
通过在NGINX实例上启用缓存(NGINX实例是一组web或应用程序服务器的负载平衡),可以显著提高对客户端的响应时间,同时显著减少后端服务器上的负载。缓存本身就是一个主题,我们不会在这里讨论它。请参阅NGINX Plus管理指南。
压缩
压缩发送到客户端的响应可以大大减小它们的大小,因此它们使用较少的网络带宽。然而,由于压缩数据会消耗CPU资源,因此当确实值得减少带宽使用时,它是最有用的。需要注意的是,不应为已压缩的对象(如JPEG文件)启用压缩。有关更多信息,请参阅NGINX Plus管理指南。
谢谢大家关注,转发,点赞
Original: https://blog.51cto.com/jiagoushipro/5560413
Author: 超级架构师
Title: 【性能调优】NGINX的性能调优宝典
相关阅读3
Title: 不可不知的 JVM 预热
一、JVM 架构基础
JVM 进程启动时,ClassLoader 会将需要的所有类加载到内存,主要分为以下三步:
- Bootstrap Class:核心类库,由" Bootstrap Class Loader"负责加载,例如基础的运行时类库 JRE\lib\rt.jar。
- Extension Class: _java.ext.dirs_路径下的类,由ExtClassLoader 负责加载。在实际开发中,如果需要添加额外的类库,通常放置于此位置。
- Application Class: 实际应用包含的类,由AppClassLoader 负责加载。
二、JVM 预热是指什么?
当应用的第一个请求到来,会触发逻辑相关类的第一次加载,此过程会有一定的耗时,会影响第一次调用的实时响应。这主要是因为JVM的懒加载及JIT机制。因此对于低延迟应用,必须采用特定的策略来处理第一次的预加载逻辑,以保障第一次的请求的快速响应。此过程,我们称之为 JVM 的预热。
三、Tiered Compilation
JVM 即时编译机制会将使用频率较高的方法或者代码块儿编译优化放入本地缓存。以提高程序响应速度。基于此,我们可以通过在应用启动之初,强制加载我们预先认知的高频方法。相应设置参数包括如下:
-XX:+TieredCompilation:开启分层编译(1.7 Server 模式默认开启)
-XX:CompileThreshold:设置触发即时编译阈值
-XX:+PrintCompilation:打印被编译成本地代码的方法名称
通常虚拟机会通过解释器来收集反馈到编译器的方法调用信息。
附:解释器 & 编译器
解释器:快速启动,执行
编译器:将热点方法及代码块儿编译成本地代码,提高执行效率
即时编译器编译本地代码需要占用程序运行时间,同时,为了编译出高效的本地代码,解释器需要收集相应的性能监控信息(基于采样、计数器热点探测)供编译器使用,从而影响解释器的执行速度。
分层编译:平衡程序启动相应速度及运行效率
C0:解释执行,不进行编译器编译
C1:将字节码编译为本地代码,进行简单可靠的优化,必要时加入性能监控逻辑
C2:将字节码编译为本地代码,基于性能监控,启用一些优化程度更高,编译耗时更长的优化。
四、自定义实现
基于上一小节所述,我们可以额外实现特定逻辑来进行特定方法的多次调用(-XX:CompileThreshold),以触发JVM的编译。如下示例:
首先,我们定义一个包含基础方法的类:
其次,我们创建一个加载类,在其内部添加静态方法,循环100000次重复生成Dummy对象,并调用其方法:
现在我们使用如下过程,测试性能:
如下为测试结果:
预热之后
未预热
差别 (%)
1220056
8903640
730
1083797
13609530
1256
1026025
9283837
905
1024047
7234871
706
868782
9146180
1053
预热之后的性能明显好于未预热状态下的调用。
当然,这里只是一个简单的示例测试,具体到实际的应用中,还需要考虑特定的业务逻辑需求。
五、 工具
通常用于基准测试,基本使用如下:
依赖 pom.xml:
定义预热处理方法,并添加@Benchmark注解:
将需要预热的业务逻辑放置于预热处理方法内。
Original: https://www.cnblogs.com/niejunlei/p/14435438.html
Author: WindWant
Title: 不可不知的 JVM 预热