一、引言
大家好,今天给研友们配置一下这个VITIS_HLS,因这其中经历太多的坎坷,为让大家原理配置环境的烦扰,本人出个详细版,望大家喜欢
二、VITIS的安装
我之前的博客已经出过vitis的安装,在此不在赘述,直接给出我博客的链接,请大家不要使用里面的opencv的安装,我在第三节会讲解opencv的安装(这个巨大的坑)
三、opencv的安装
step 1:原理(吐槽大会)
在此想吐槽几句,因为这个opencv的安装真的是困扰了我几天,头疼欲裂,反复的删除安装,搞得我头很大,不过终于在今天解决了,吐槽一下我遇到的问题:
/usr/local/lib/libopencv_core.so: undefined reference to `std::__cxx11::basic_stringstream<char, std::char_traits<char>, std::allocator<char> >::basic_stringstream()@GLIBCXX_3.4.26'
collect2: error: ld returned 1 exit status</char></char,>
这是我遇到的问题,大家如果不按照我的opencv安装教程来安装的话,大概率会遇到这个问题,而且我可以比较嚣张的说,大家一般解决不了这个问题,网上各种解决方案,就是解决不了,不装了,我来说下原因。
咱们安装opencv的时候正常是用ubuntu自带的g++(9.4)编译器来编译的,然后咱们opencv要和HLS结合起来,然而HLS自带的g++编译器是6.20好像,这样问题就来了,两个采用不同版本的编译器编译的东西,怎么可能搭建在一起呢。不装了,下面进入正题。
step 2:opencv4.4.0的下载与安装
1、下载opencv4.4.0和contrib版
在此直接给出下载链接,方便你我他==>>oepcv4.4包
注:一定是opencv4.4,不要乱下载其他版本,因为这个版本是经过xilinx全线测试的。
2、解压并安装依赖
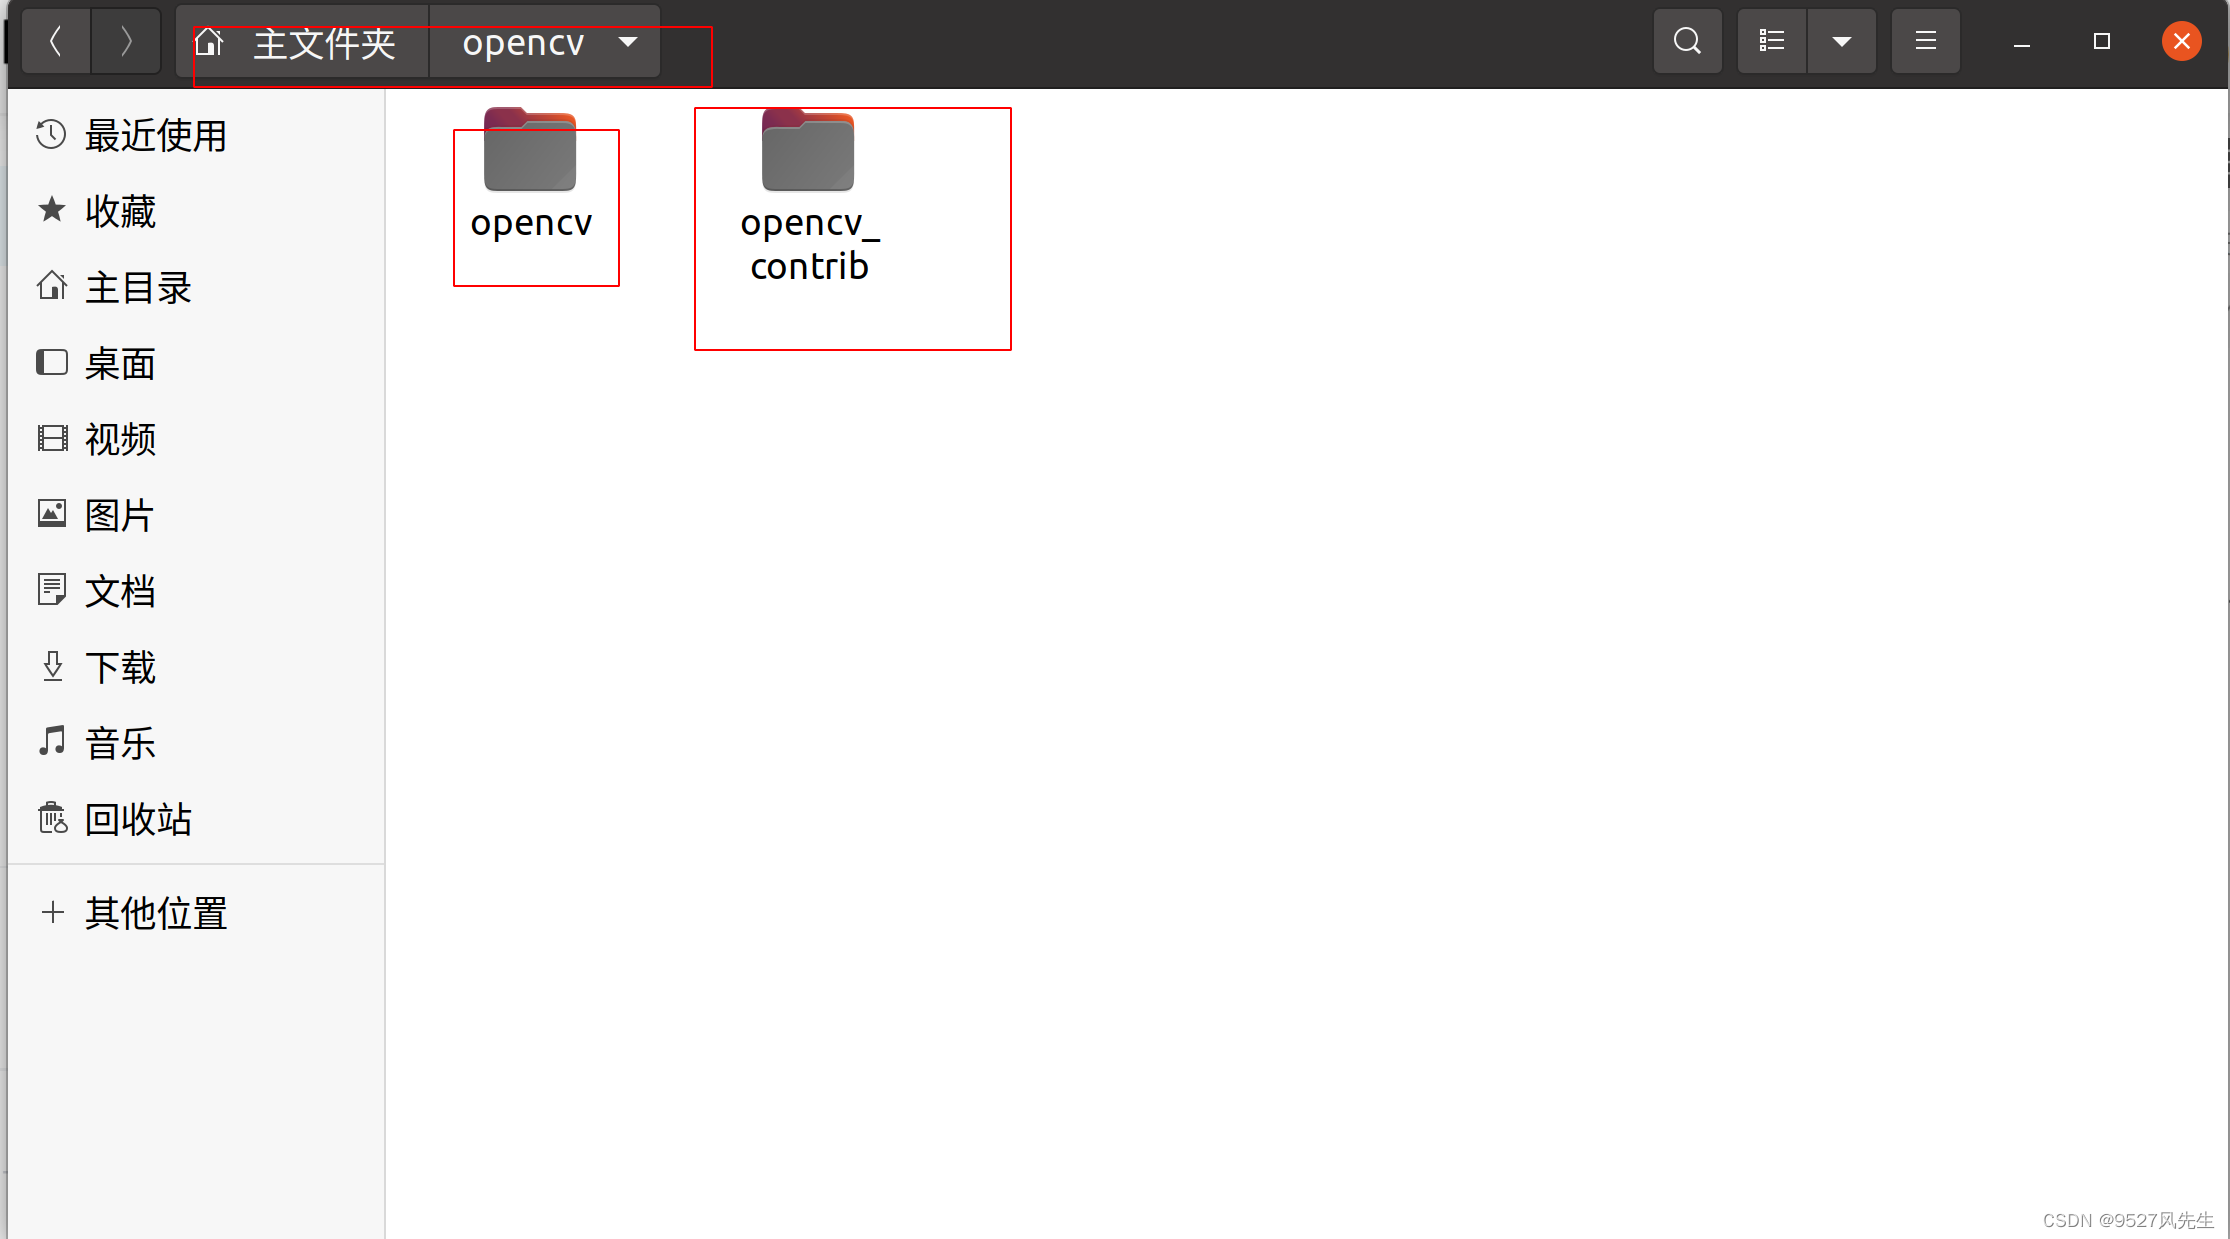
将下载好的压缩包提取到主目录,并新建一个文件夹(opencv),将解压后的文件放入这个文件夹,如图所示:

打开后如图所示,一个是opencv4.4,一个是opencv4.4_contrib,为了方便我将其改名为图片里的样子。
下面安装依赖,打开一个终端,输入以下指令:
 sudo add-apt-repository "deb http://security.ubuntu.com/ubuntu xenial-security main"
 sudo apt update
 sudo apt-get install build-essential
 sudo apt-get install cmake git libgtk2.0-dev pkg-config libavcodec-dev libavformat-dev libswscale-dev libopenexr-dev libgstreamer1.0-dev libgstreamer-plugins-base1.0-dev
 sudo add-apt-repository "deb http://security.ubuntu.com/ubuntu xenial-security main"
 sudo apt update
 sudo apt-get install python-dev-is-python3 python-numpy libtbb2 libtbb-dev libjpeg-dev libpng-dev libtiff-dev libjasper1 libjasper-dev libdc1394-22-dev
3、安装opencv
安装完成后,进入opencv/opencv这个文件夹,创建一个build文件夹:
cd opencv/opencv
mkdir build
cd build
export LIBRARY_PATH=/usr/lib/x86_64-linux-gnu/:$LIBRARY_PATH
然后运行以下命令:(将目录替换为您自己的设置)
cmake -D CMAKE_BUILD_TYPE=RELEASE -D CMAKE_INSTALL_PREFIX=<choose your own output directory> -D WITH_V4L=ON -D OPENCV_EXTRA_MODULES_PATH=<point to opencv_contrib>/modules -DBUILD_TESTS=OFF -DBUILD_ZLIB=ON -DBUILD_JPEG=ON -DWITH_JPEG=ON -DWITH_PNG=ON -DBUILD_EXAMPLES=OFF -DINSTALL_C_EXAMPLES=OFF -DINSTALL_PYTHON_EXAMPLES=OFF -DWITH_OPENEXR=OFF -DBUILD_OPENEXR=OFF -D CMAKE_CXX_COMPILER=<path to vitis_hls>/Vitis_HLS/2021.2/tps/lnx64/gcc-6.2.0/bin/g++ ..

</path></point></choose>
注:这个里面有
这种,请替换成自己的路径,下面给出我自己的路径,仅供参考
cmake -D CMAKE_BUILD_TYPE=RELEASE -D CMAKE_INSTALL_PREFIX=/usr/local/opencv -D WITH_V4L=ON -D OPENCV_EXTRA_MODULES_PATH=/home/wind/opencv/opencv_contrib/modules -DBUILD_TESTS=OFF -DBUILD_ZLIB=ON -DBUILD_JPEG=ON -DWITH_JPEG=ON -DWITH_PNG=ON -DBUILD_EXAMPLES=OFF -DINSTALL_C_EXAMPLES=OFF -DINSTALL_PYTHON_EXAMPLES=OFF -DWITH_OPENEXR=OFF -DBUILD_OPENEXR=OFF -D CMAKE_CXX_COMPILER=/tools/Xilinx/Vitis_HLS/2021.2/tps/lnx64/gcc-6.2.0/bin/g++ ..
然后继续输入:(我是16核,所以是j16)
make -j16
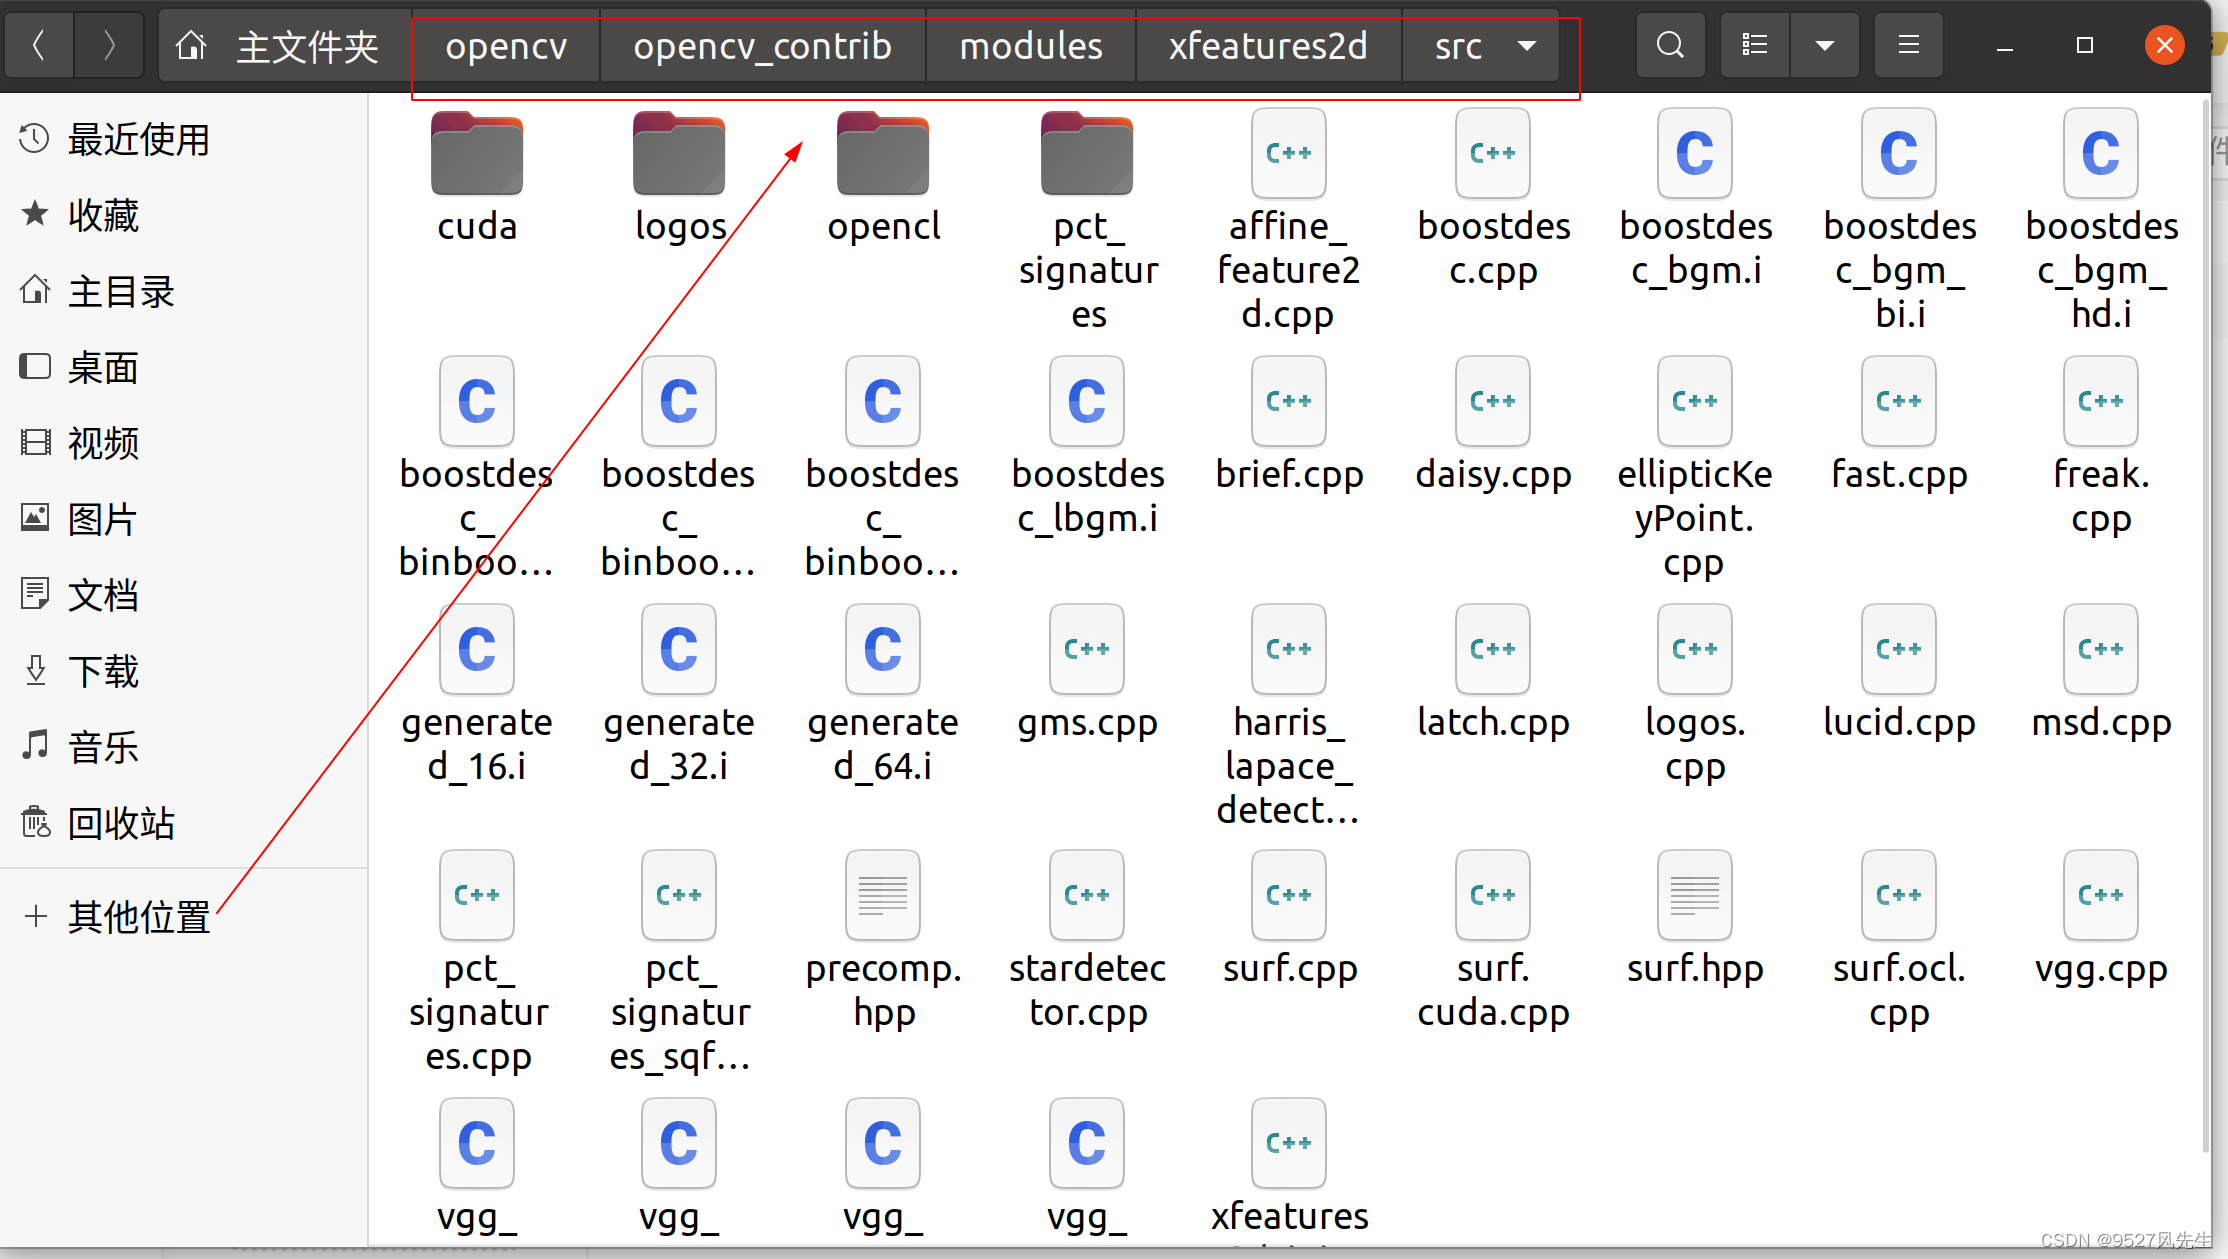
注:在这里可能会出问题,说什么缺少什么boost文件,这些文件我上面已经给出,请大家将其全选复制到opencv_contrib/modules/xfeatures2d/src/此目录下,如图所示:
然后在命令行里输入:
make clean
make -j16
sudo make install
到此opencv安装已经完成,参考文章链接在此给出:vitis库编译
四、VITIS_HLS与VITIS_LIBRARIES的配置
step 1:VITIS_LIBRARIES的下载
在此直接给出下载链接,方便你我他===>>>>VITIS_LIBRARIES
大家下载好后,将其解压到主目录,备用。
step 2:VITIS_HLS配置opencv与 VITIS_LIBRARIES
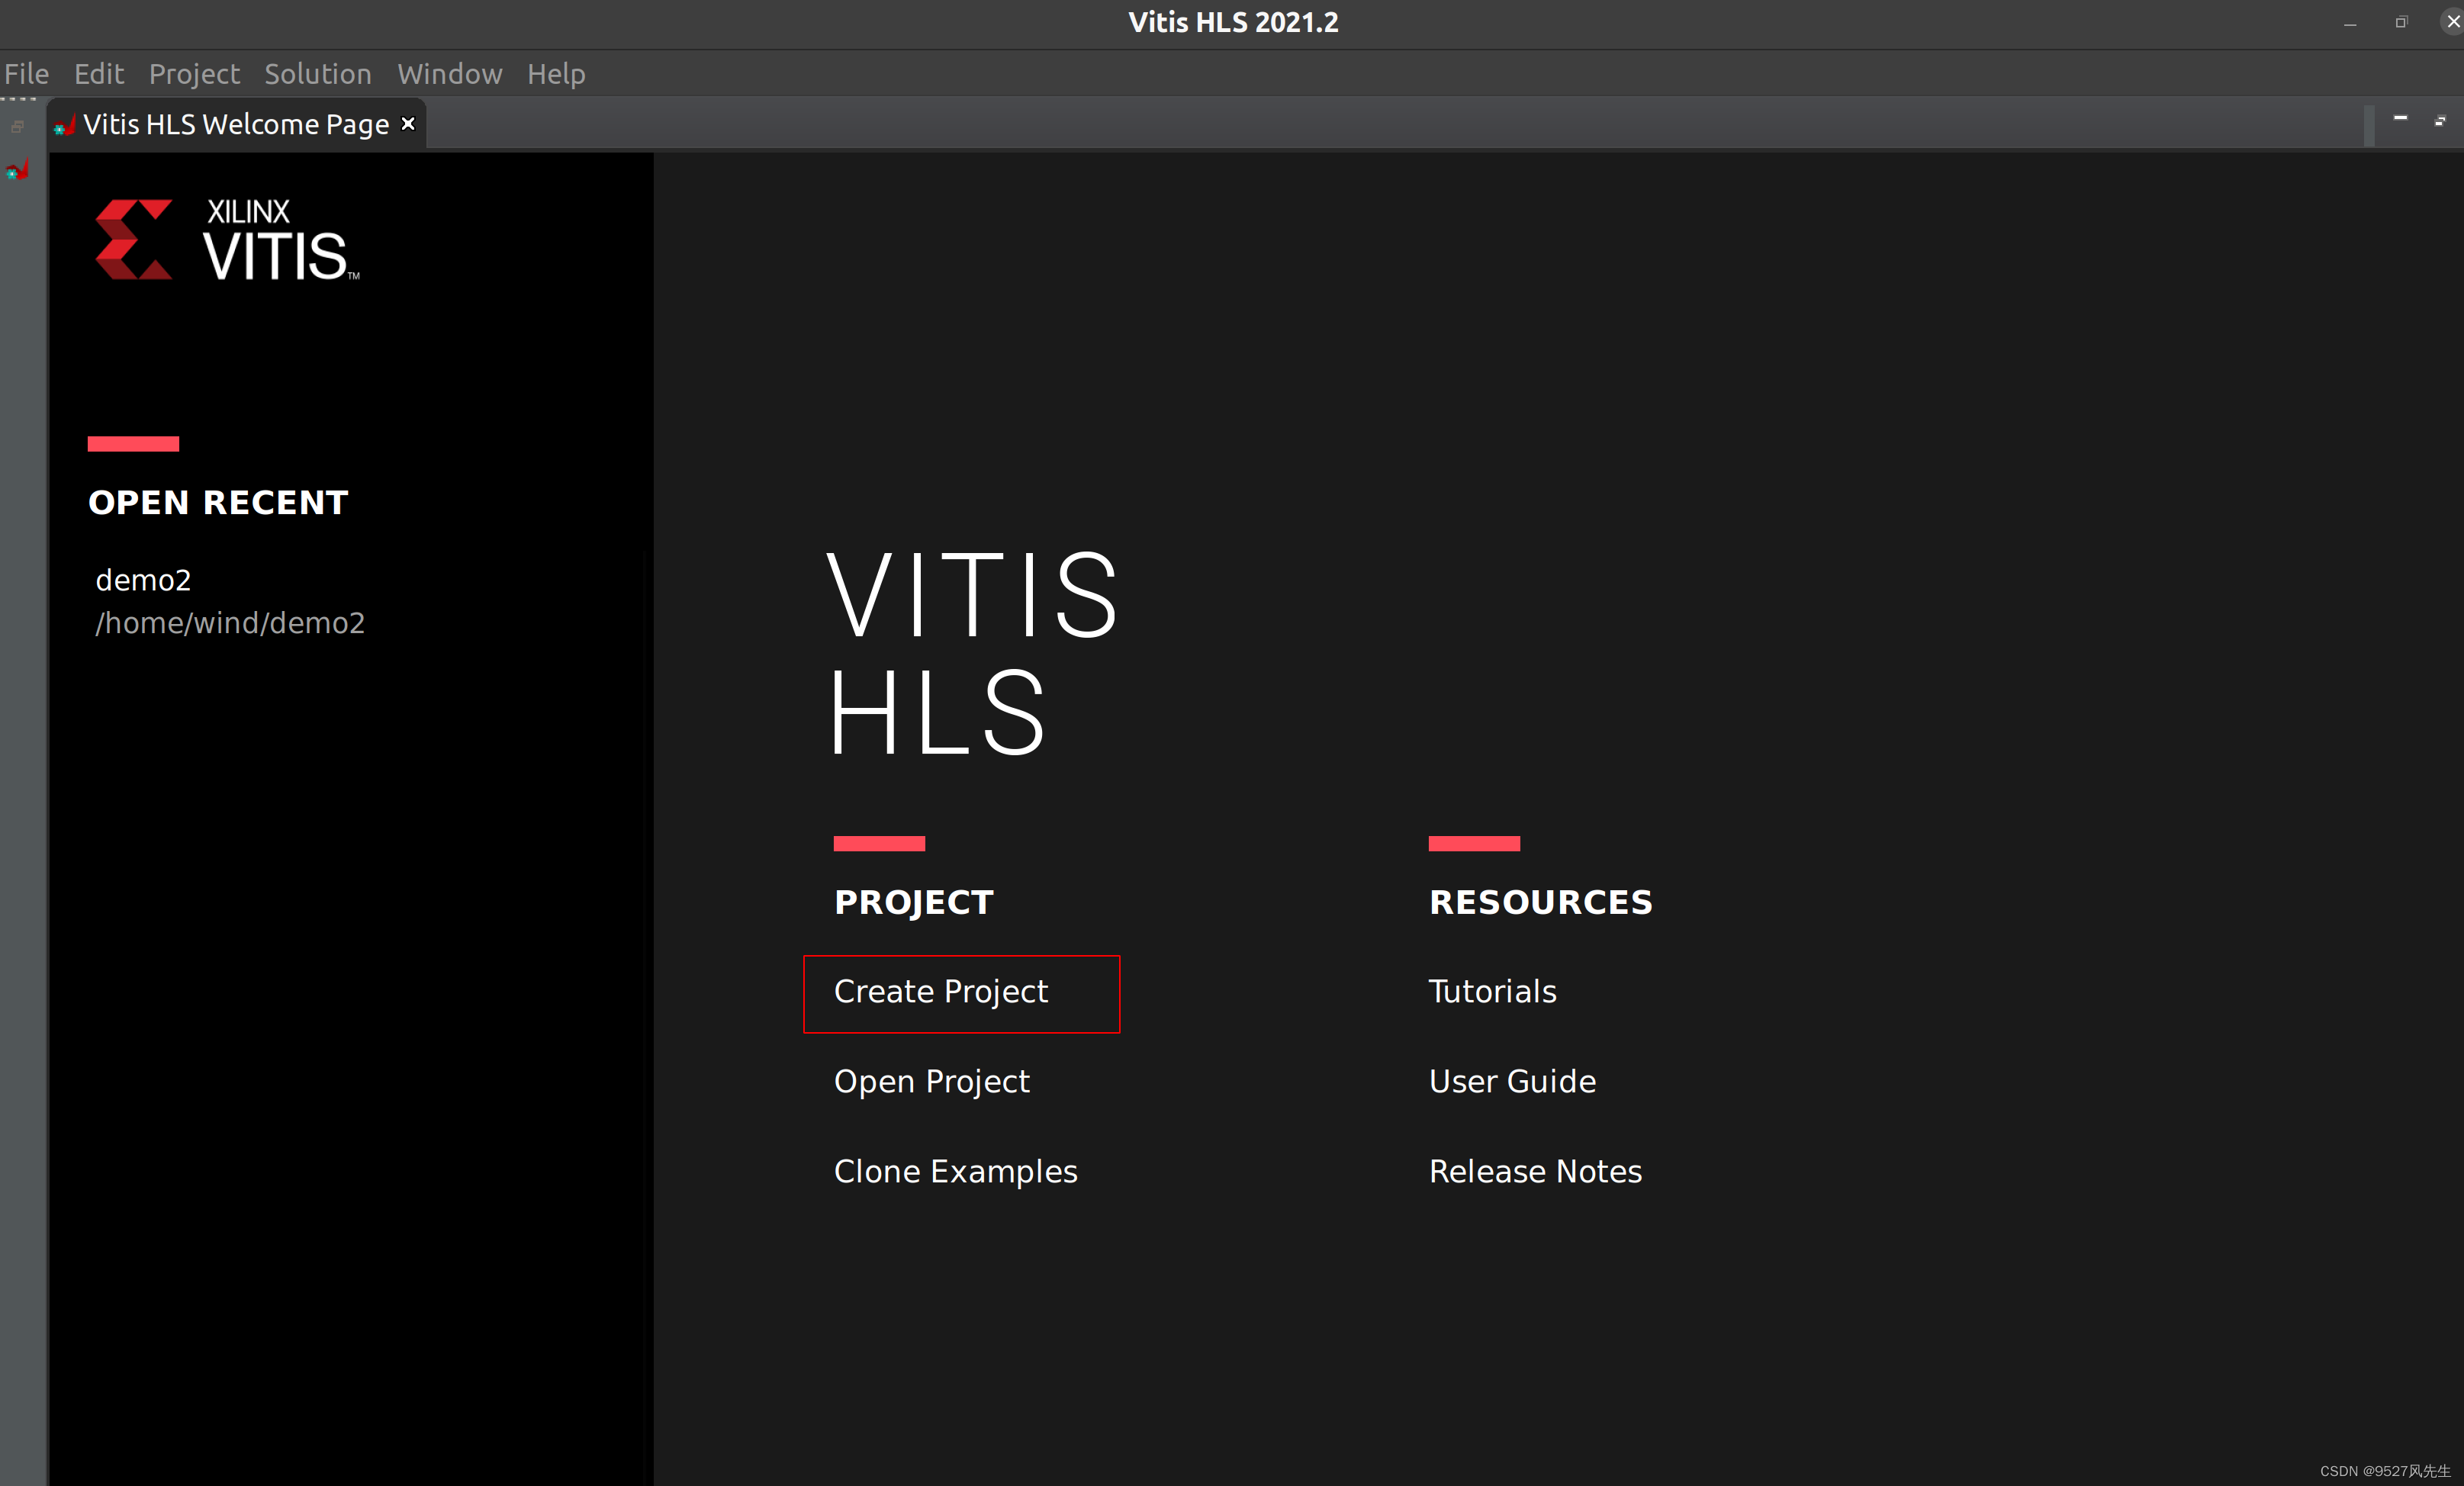
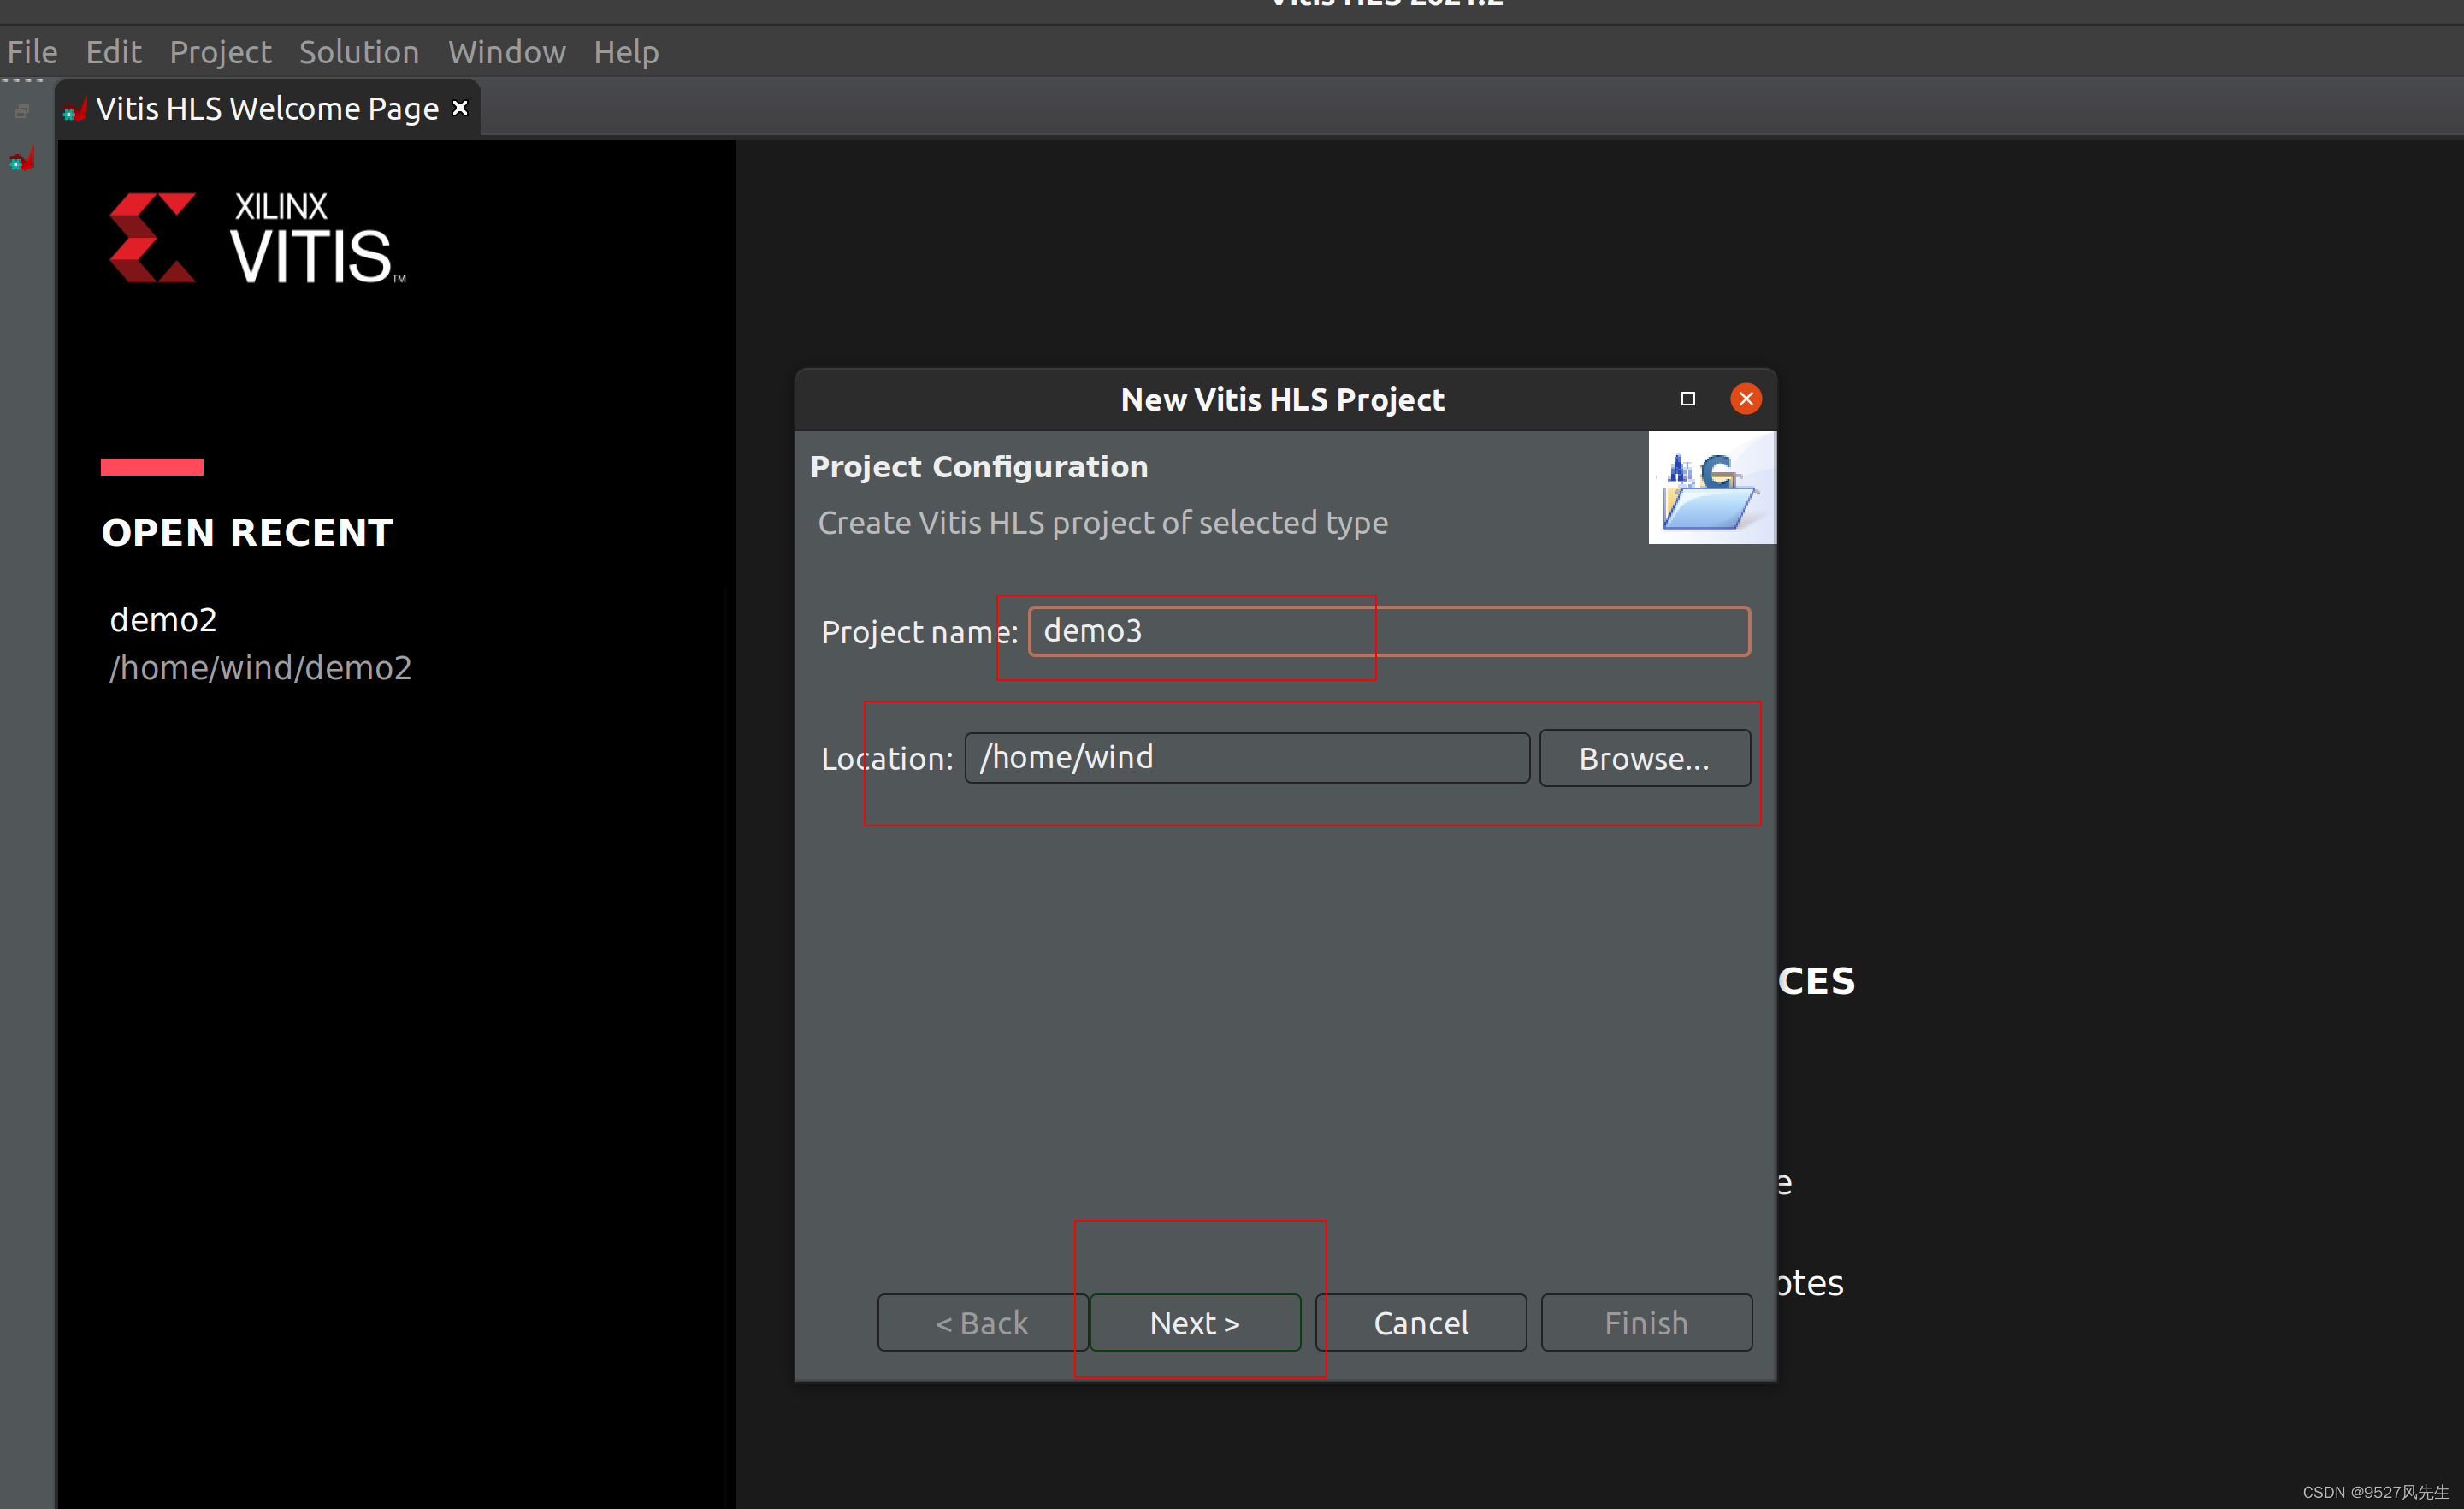
打开VITIS_HLS,创建新工程,如图所示
1、打开vitis_hls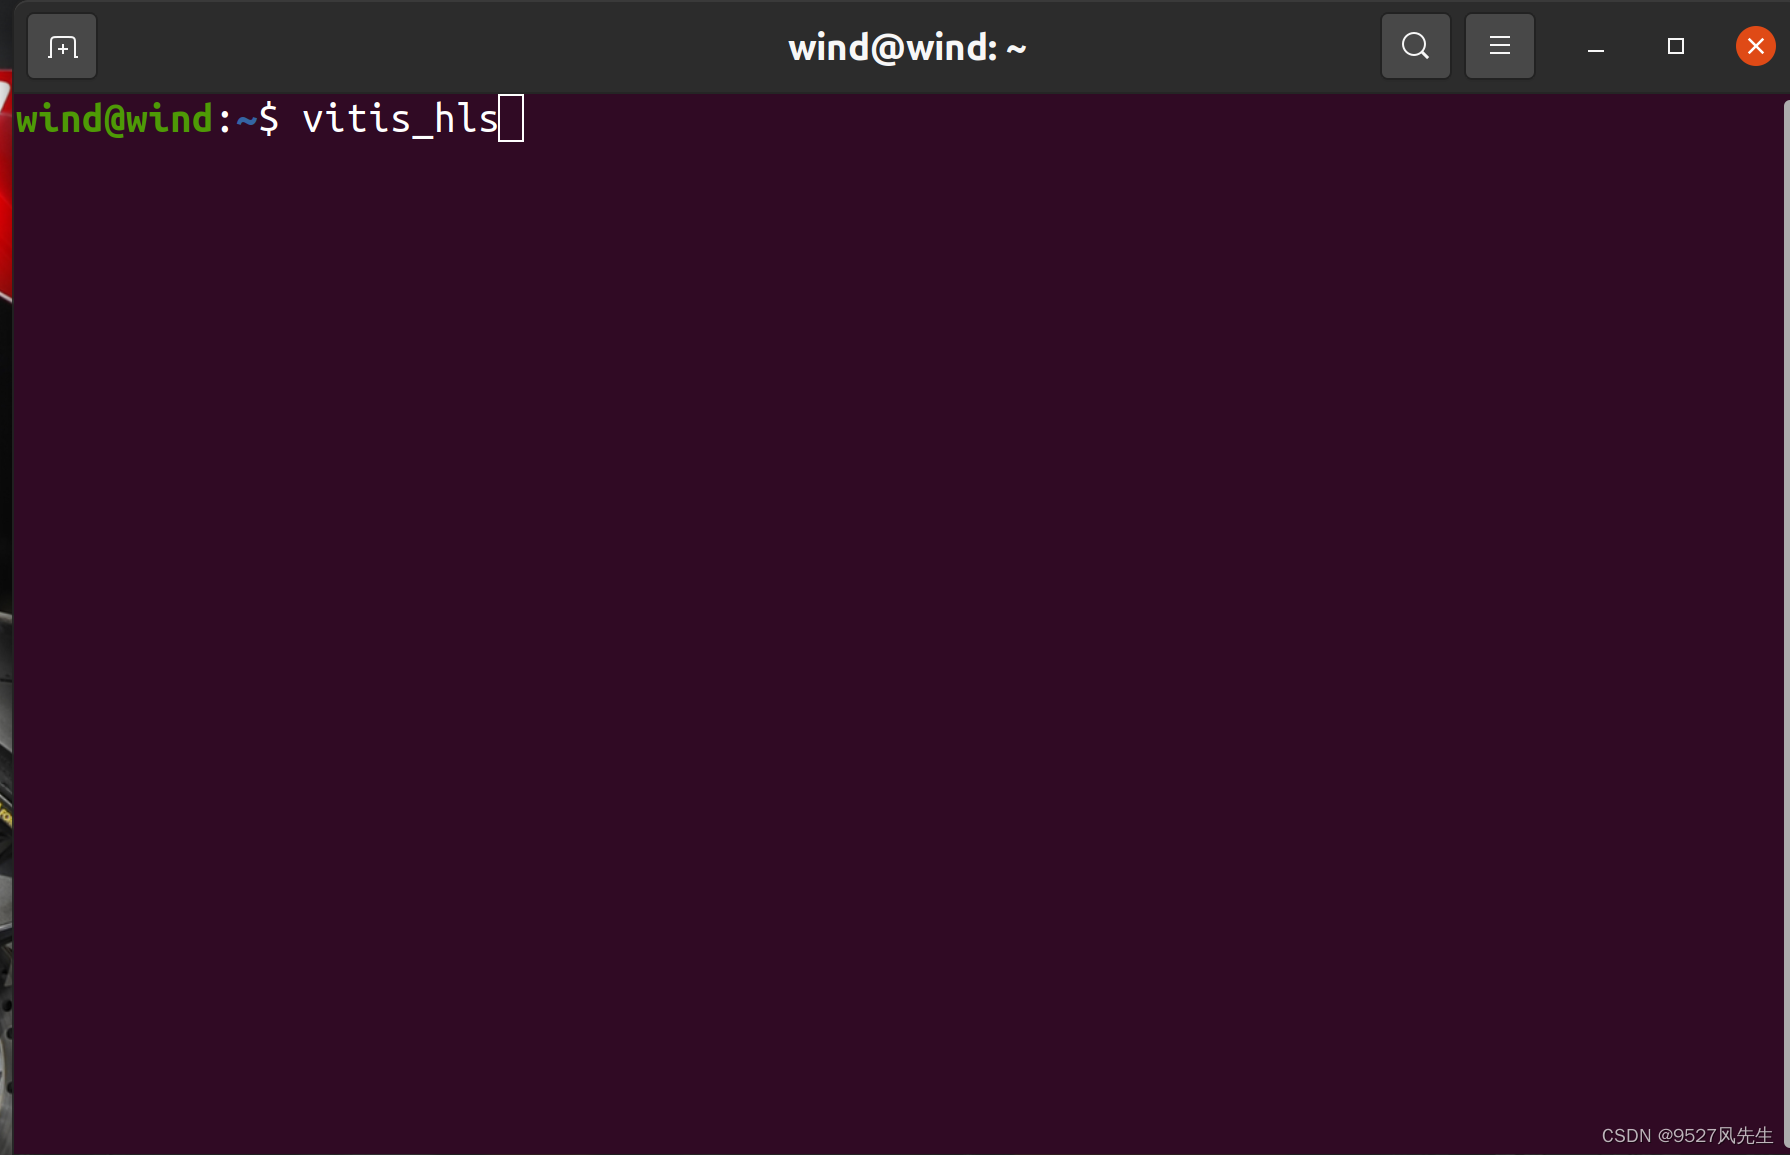
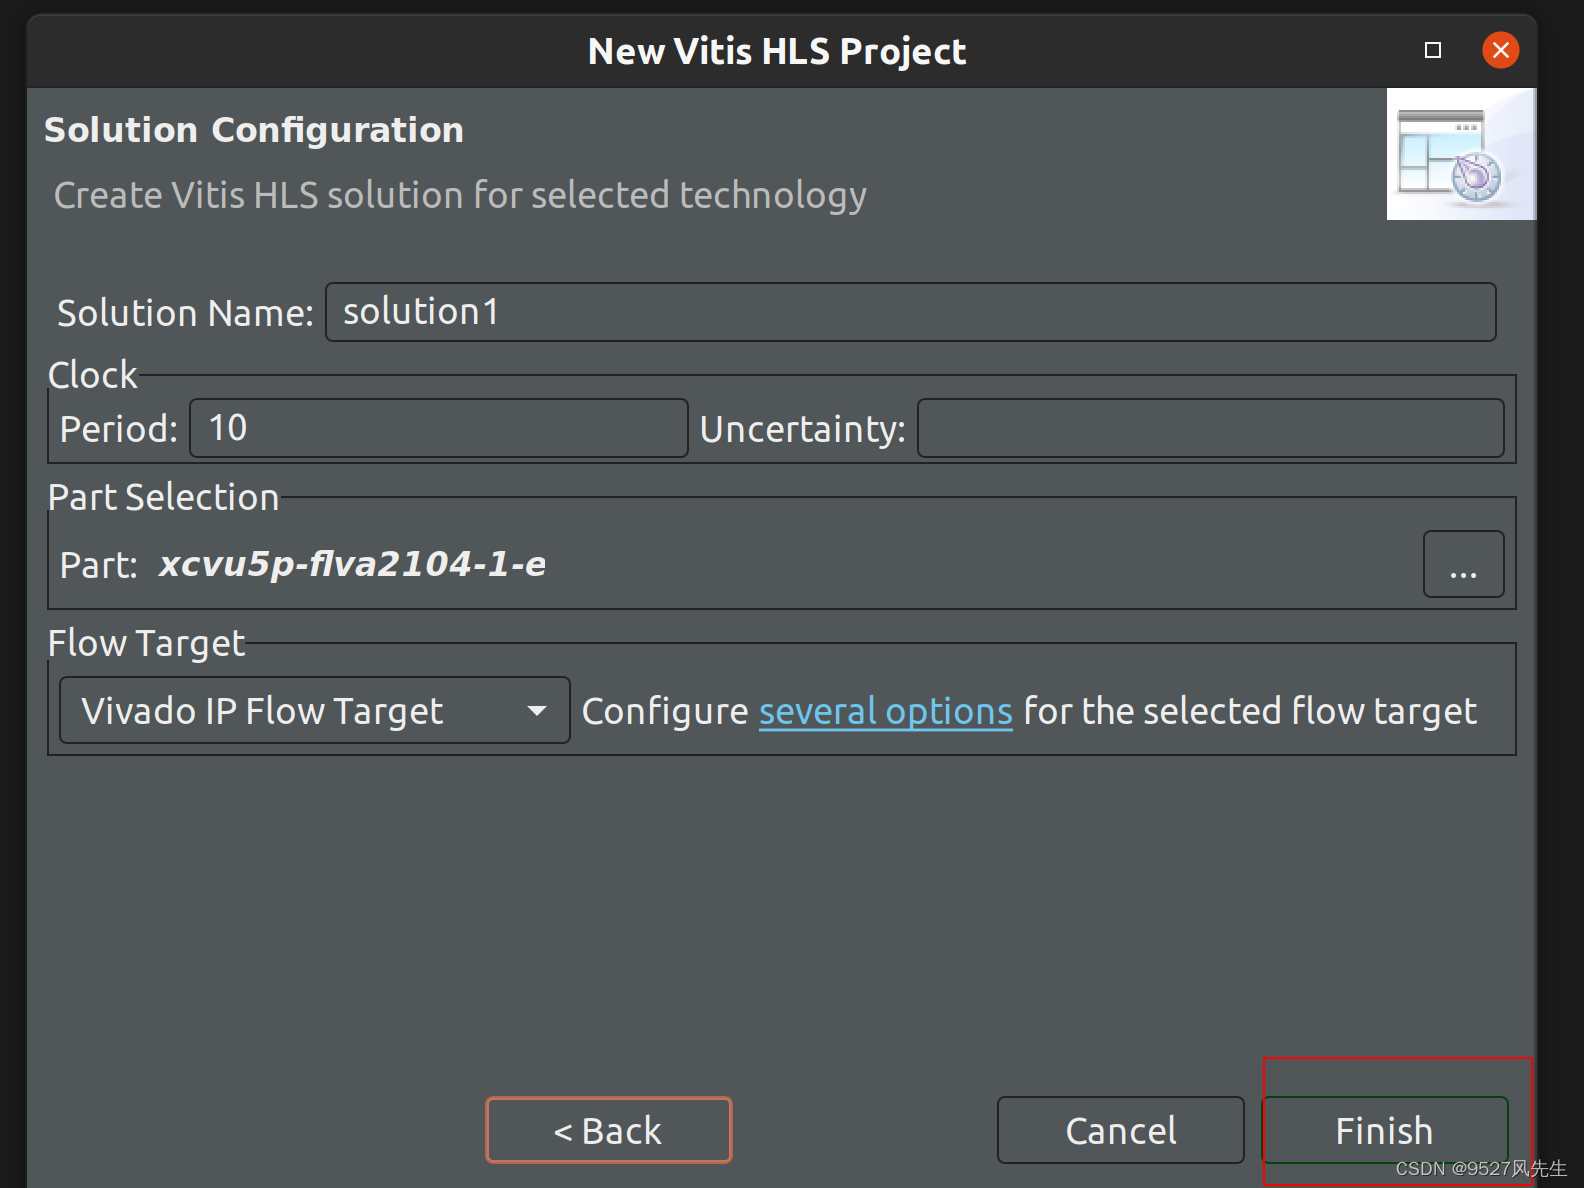
2、 创建新工程

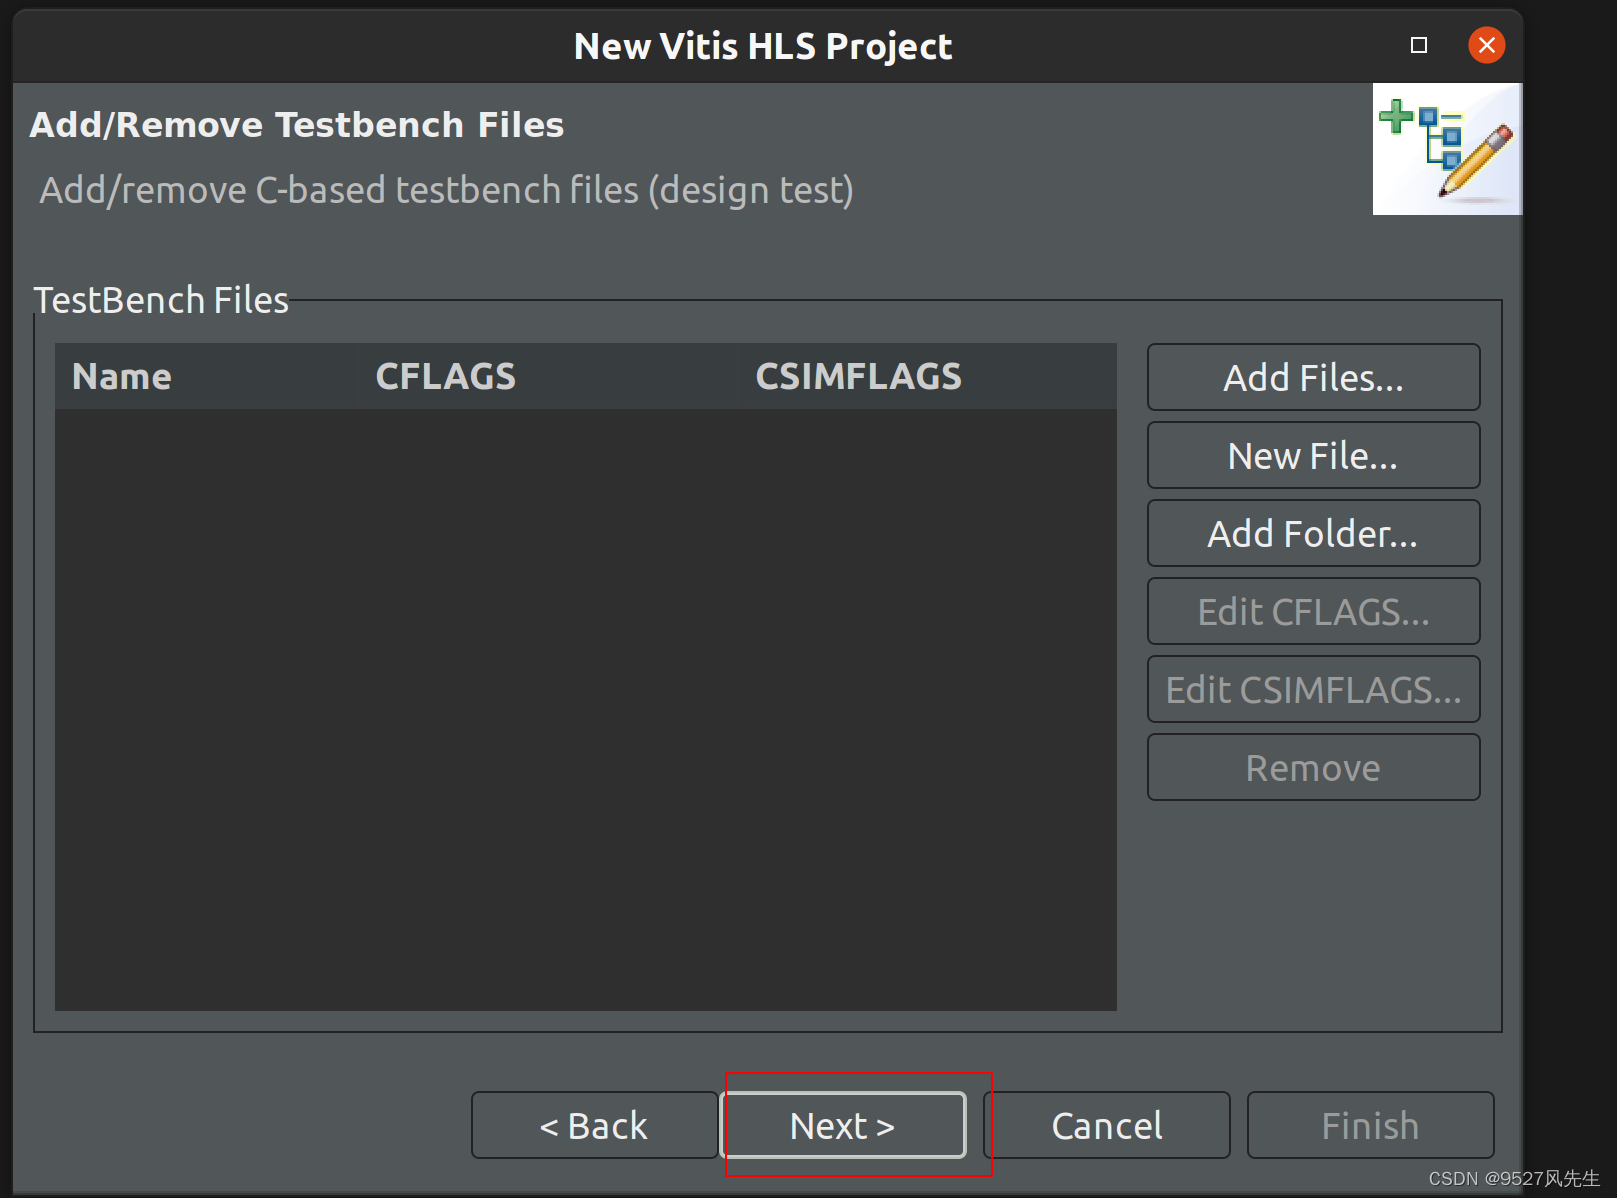
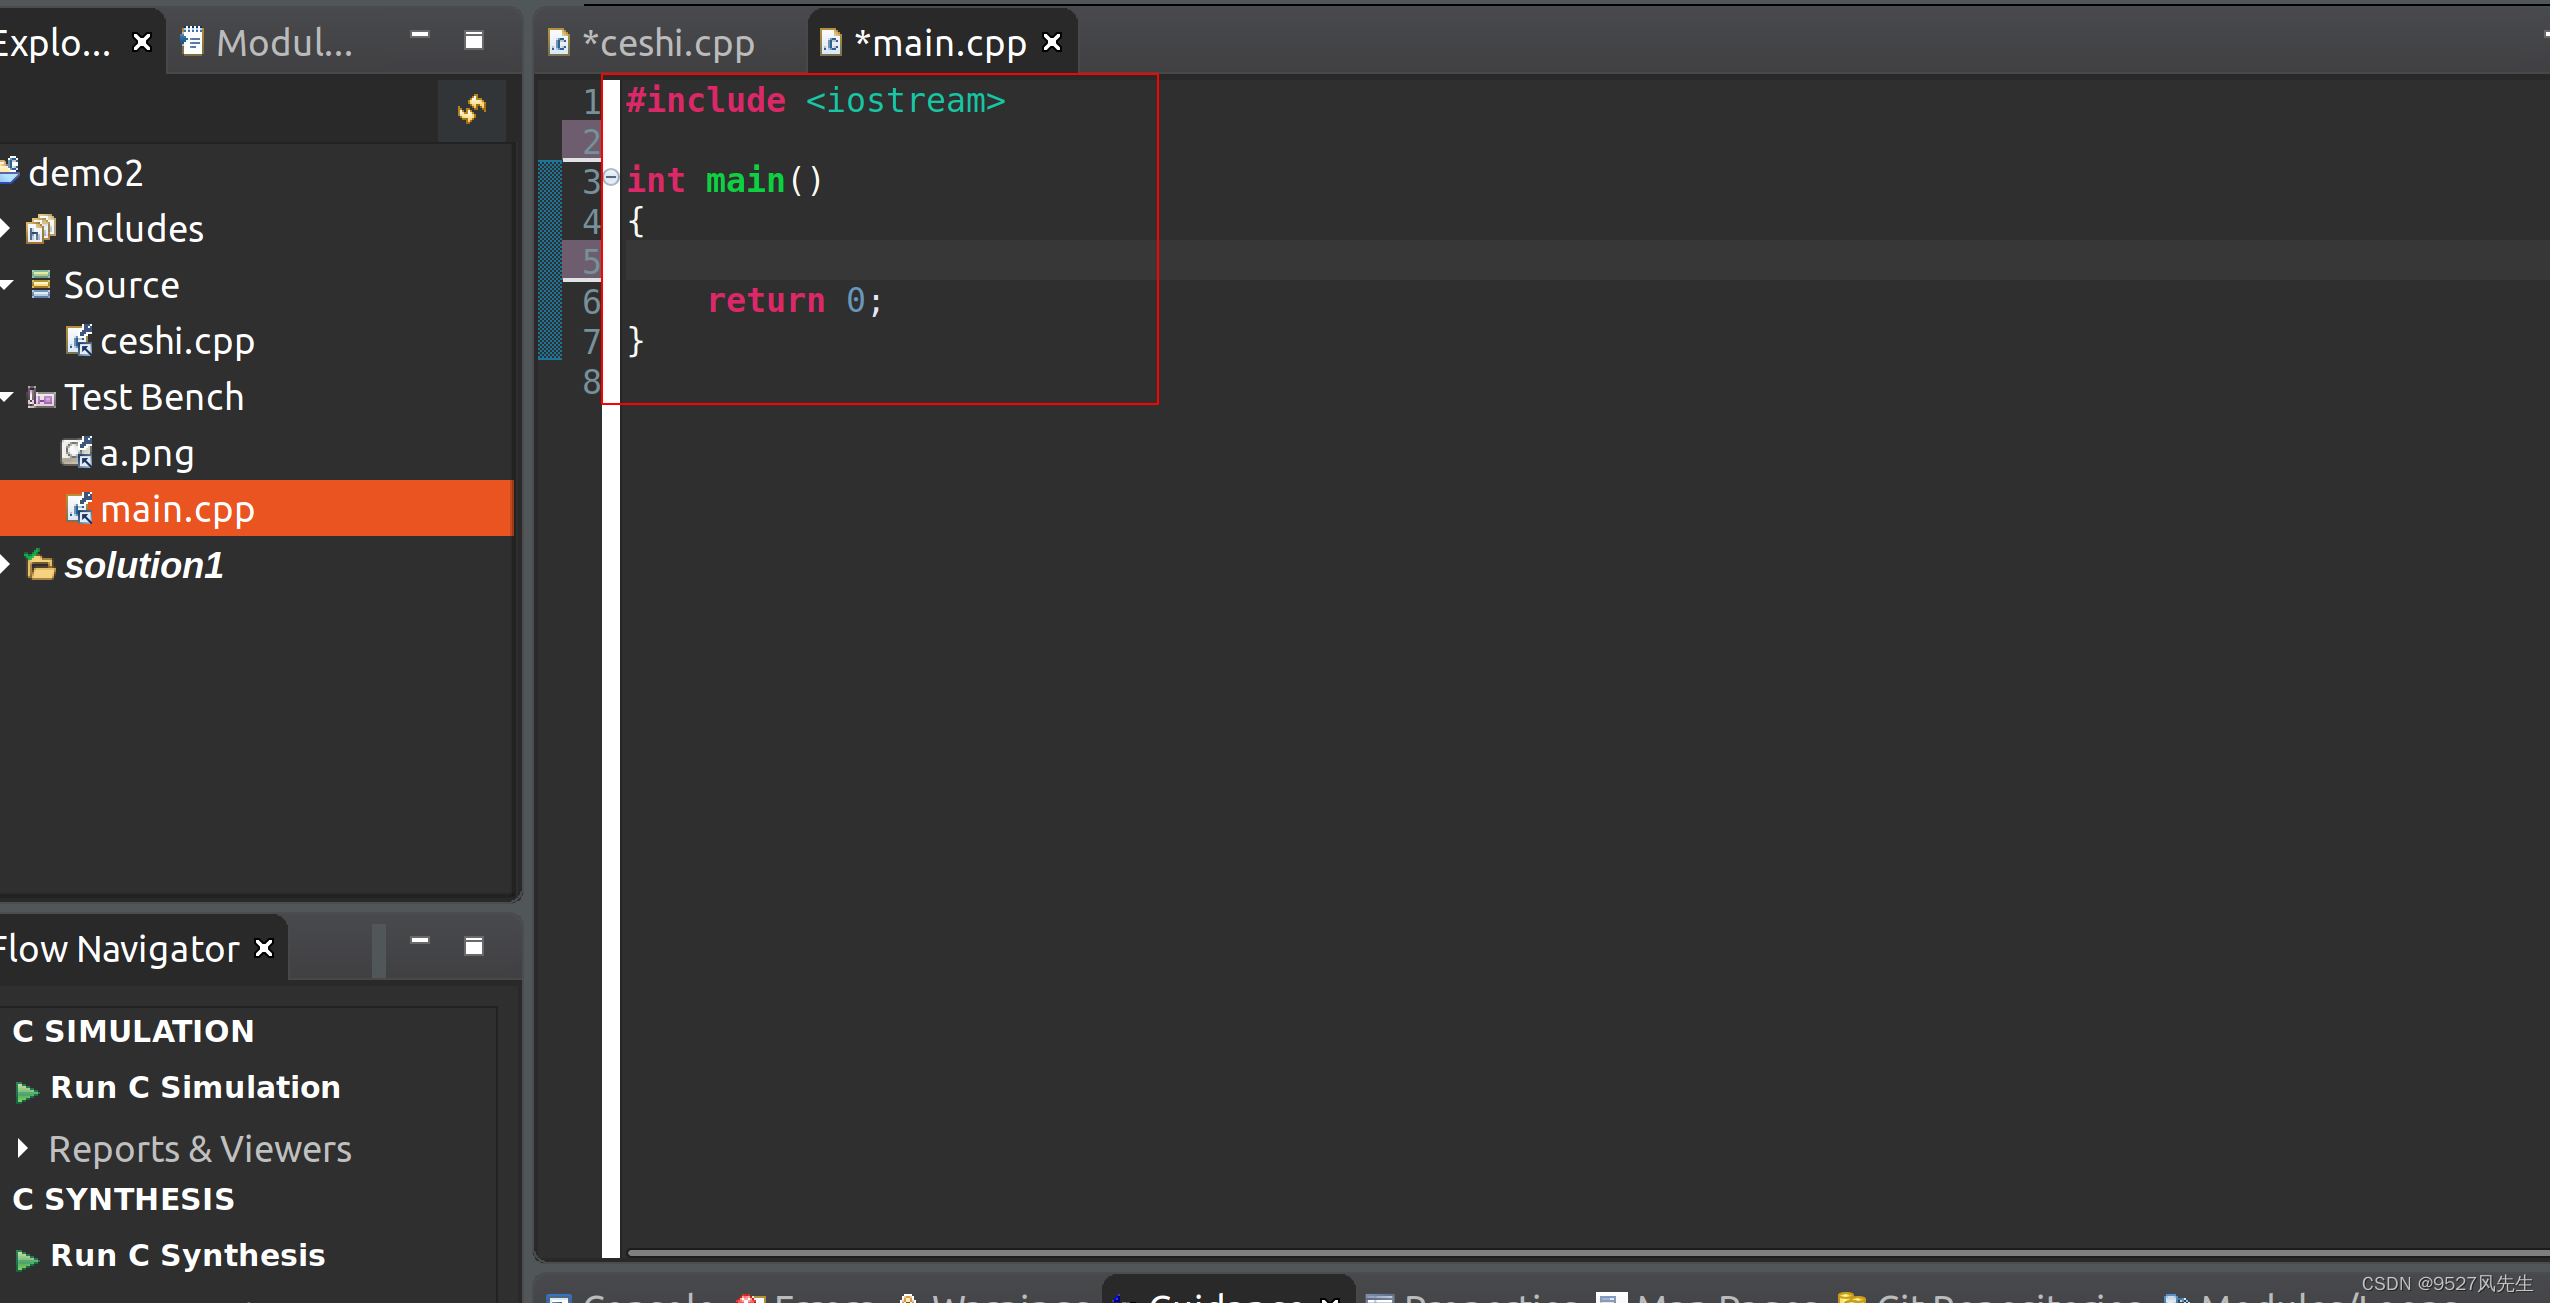
3、创建完成后,在source和testbench里面添加cpp文件,并且在testbench里添加一张图片
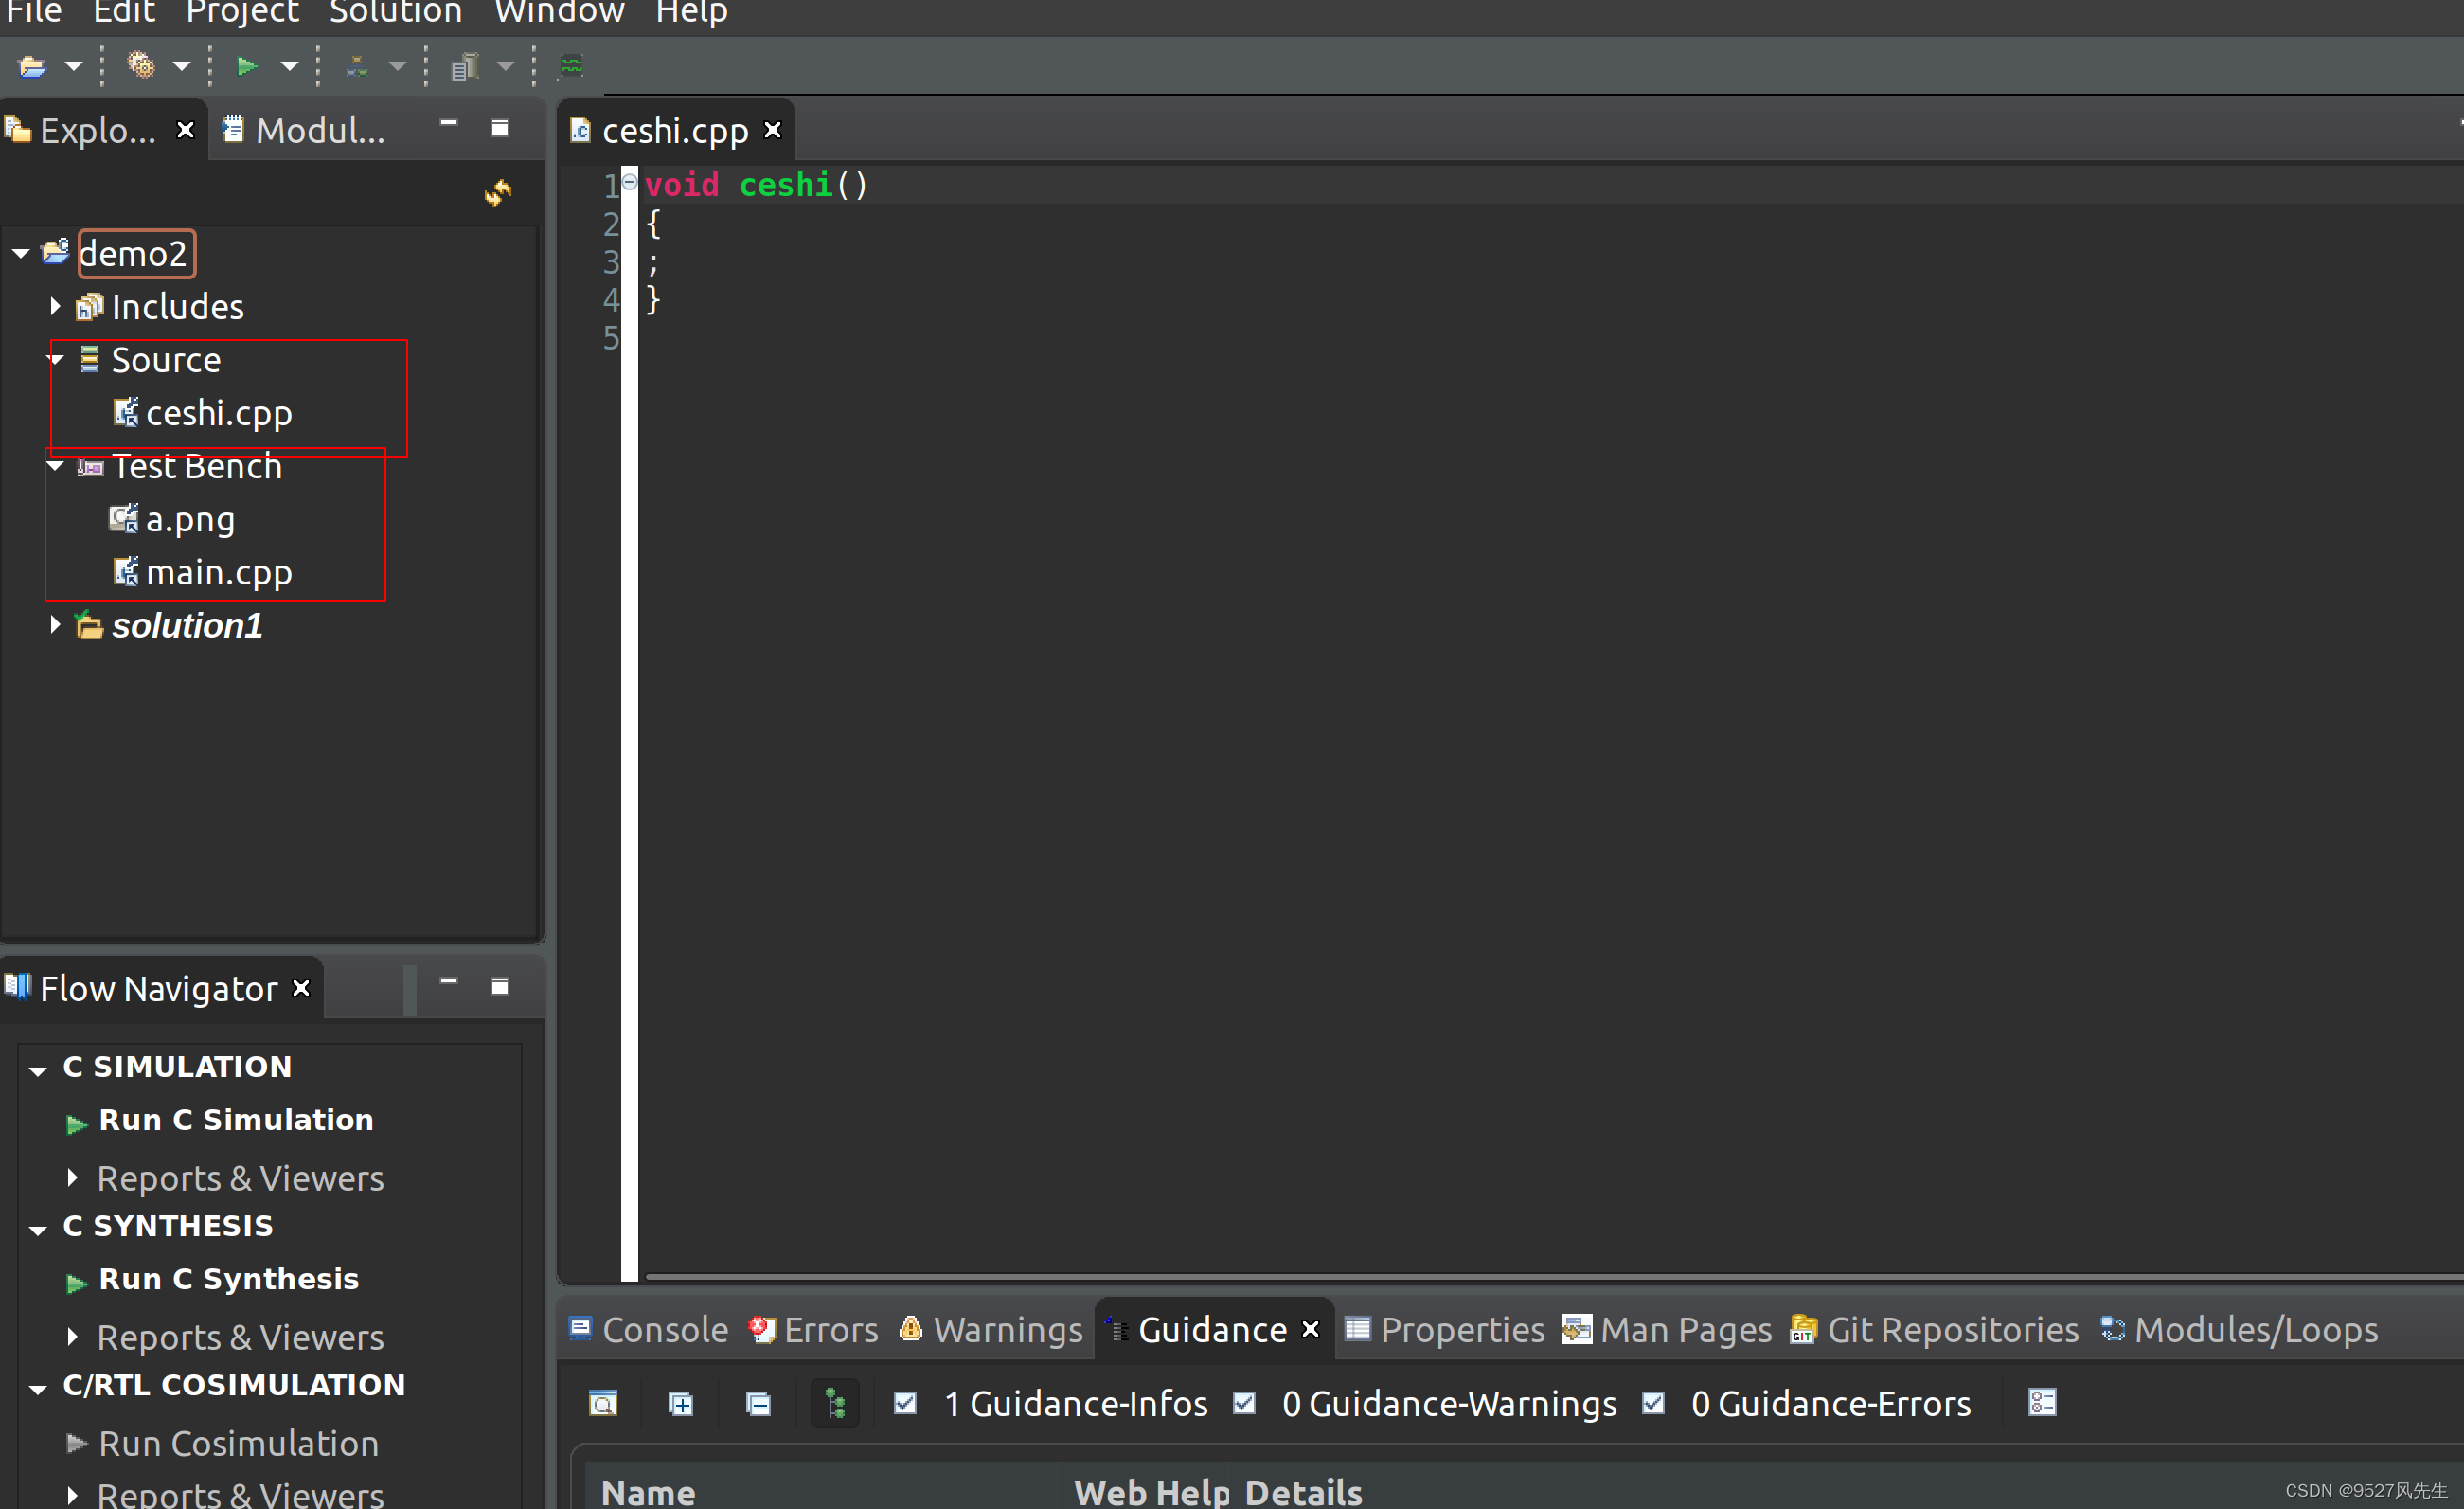
4、ceshi.cpp的内容如上图所示,下图为main.cpp的内容
5、打开project->project settings,点击simulation
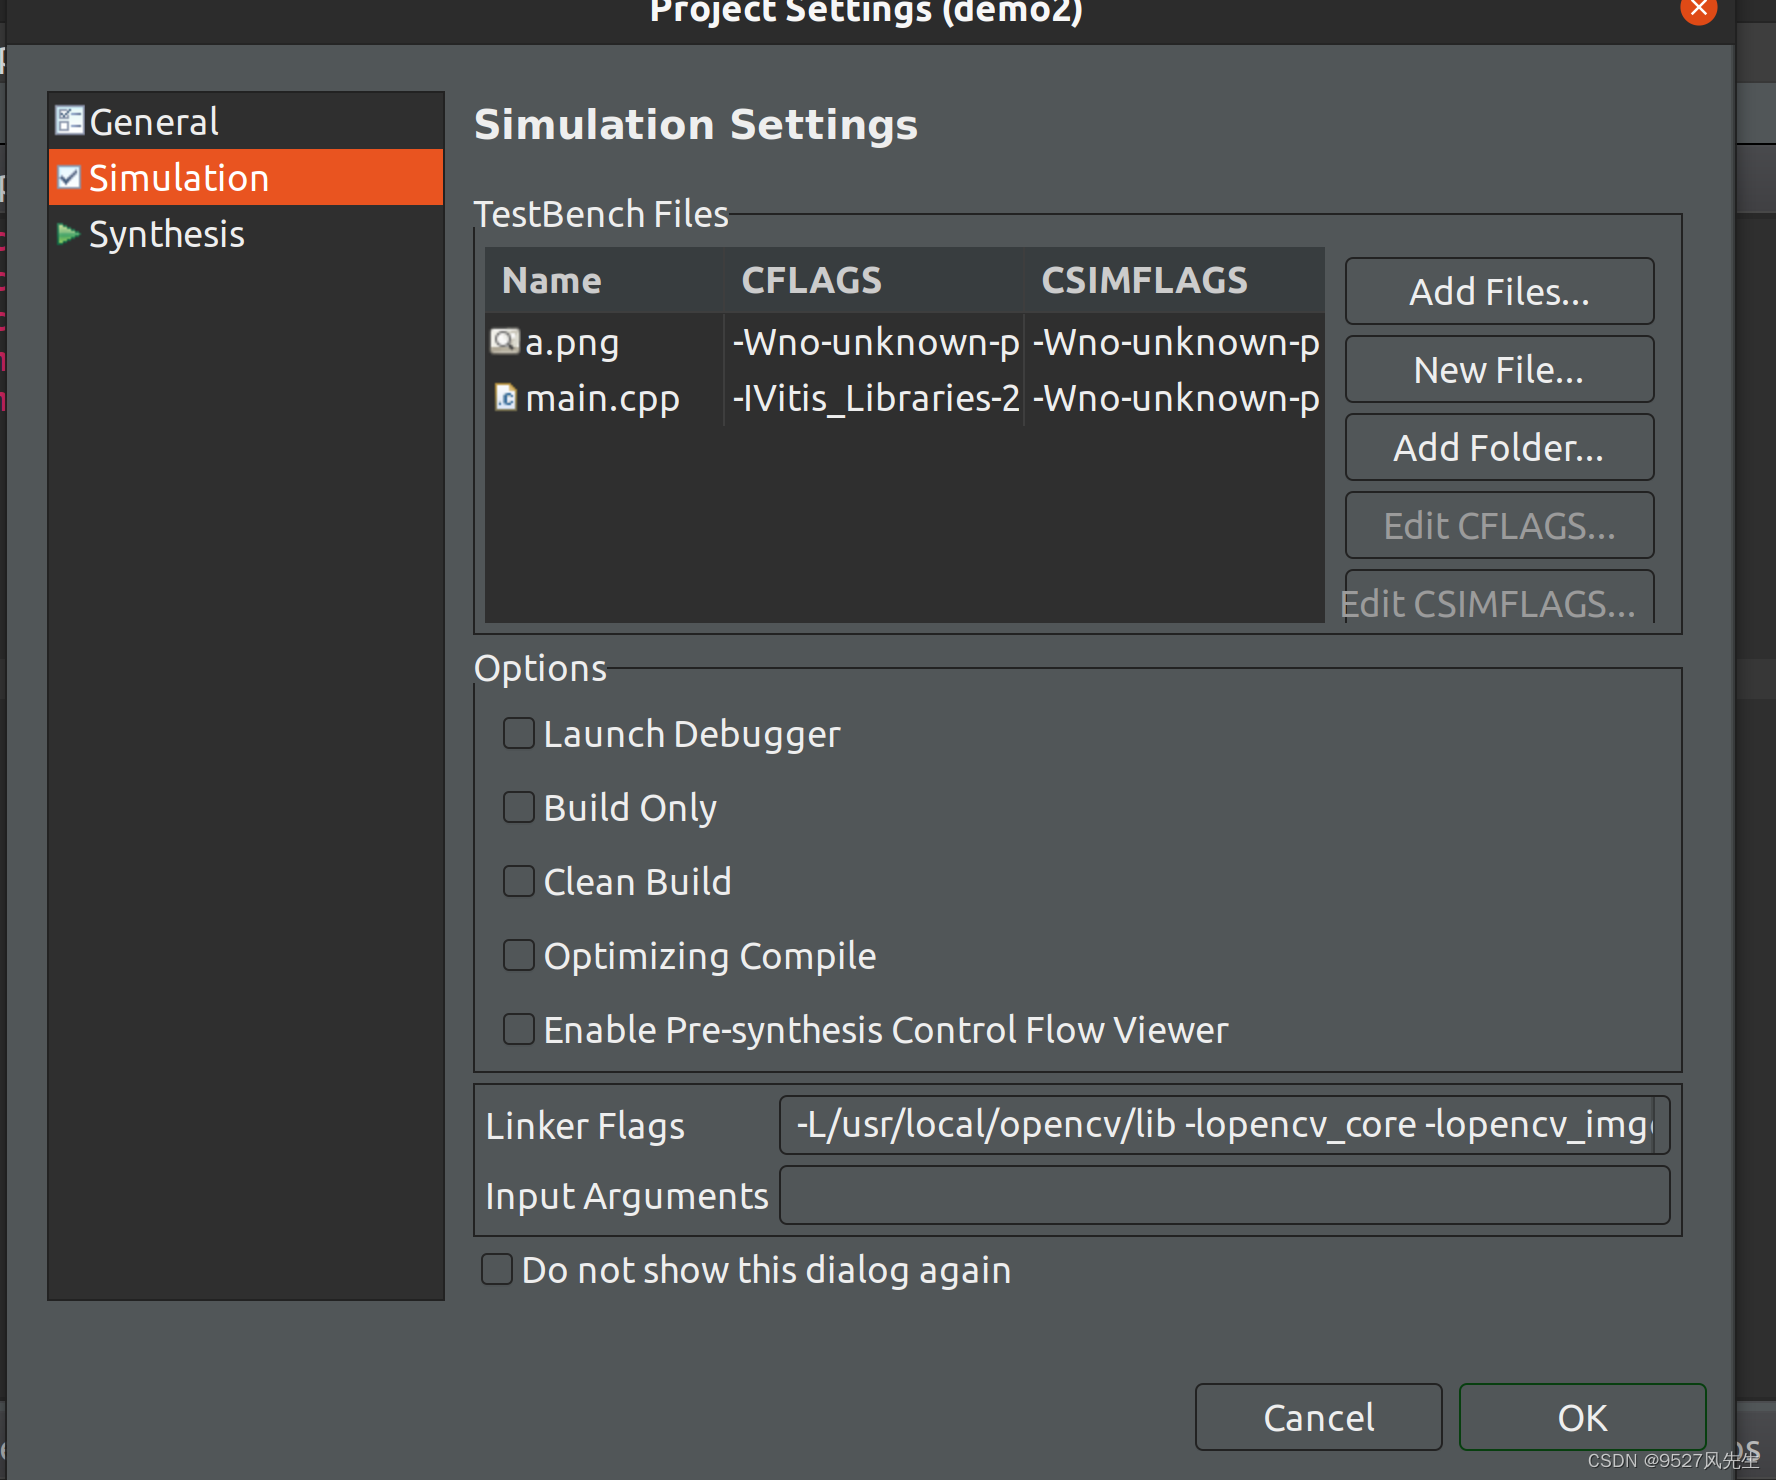
6、点击main.cpp后,点击 Edit CFLAGS
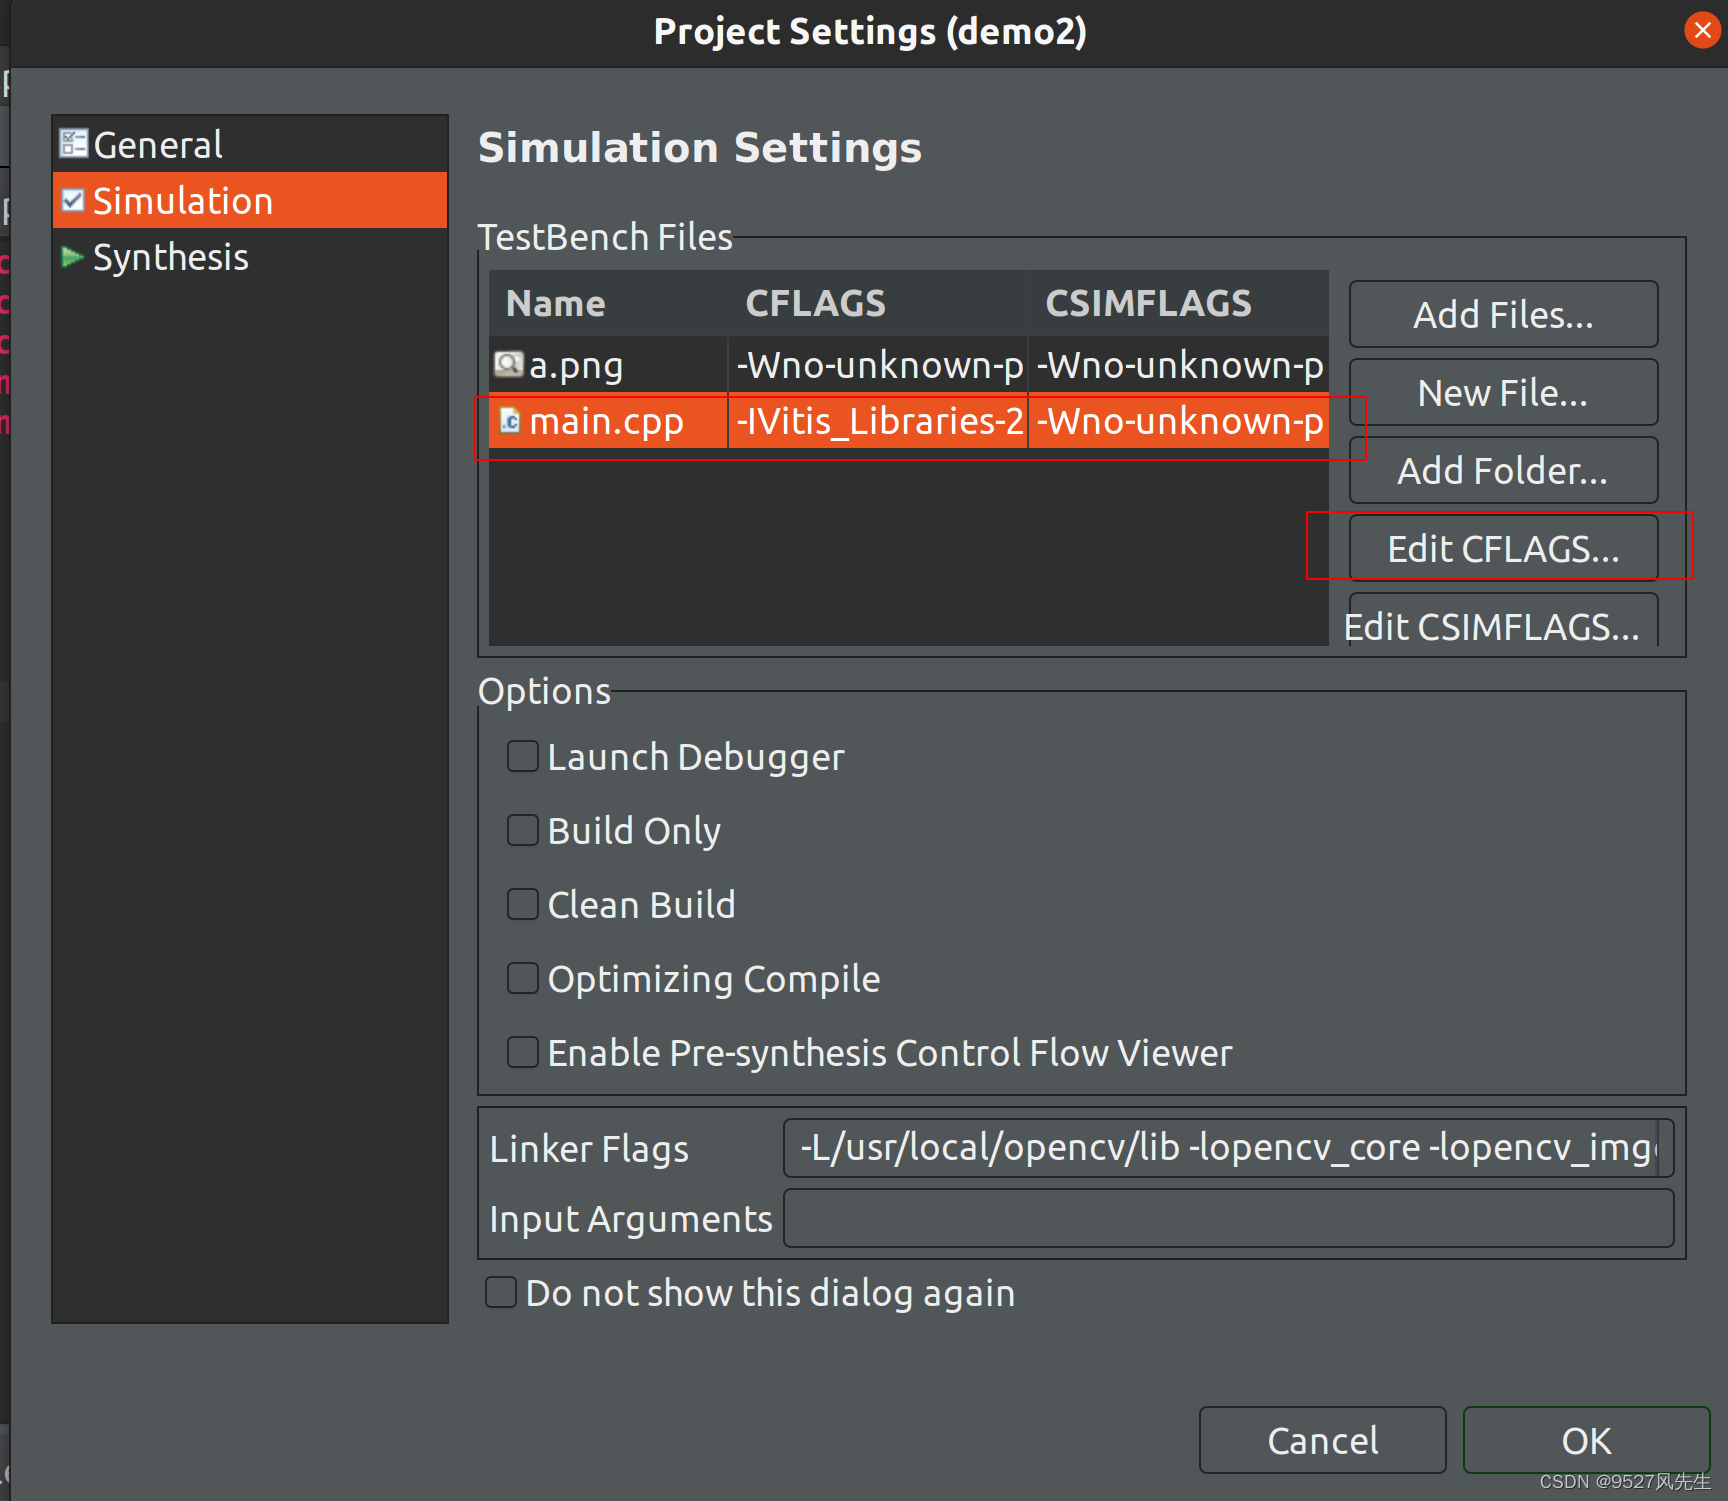
7、输入以下内容:
-I<path-to-l1-include-directory> -std=c++0x -I<path-to-opencv-include-folder>
</path-to-opencv-include-folder></path-to-l1-include-directory>
注:将其中的文件路径改成自己的路径,一个是vitis_libraries里面的L1的include路径,一个是opencv的include的路径,在此给出我自己的路径,仅供参考:
-I/home/wind/Vitis_Libraries-2021.2/vision/L1/include -std=c++0x -I/usr/local/opencv/include
8、在下方的Linker Flags 里面输入以下内容:
-L<path-to-opencv-lib-folder> -lopencv_core -lopencv_imgcodecs -lopencv_imgproc</path-to-opencv-lib-folder>
注:将其中的文件路径改成自己的路径,该路径为opencv的库路径,在此给出我自己的路径,仅供参考:
-L/usr/local/opencv/lib -lopencv_core -lopencv_imgcodecs -lopencv_imgproc
9、点击synthesis,点击ceshi.cpp,选择top function,选择ceshi
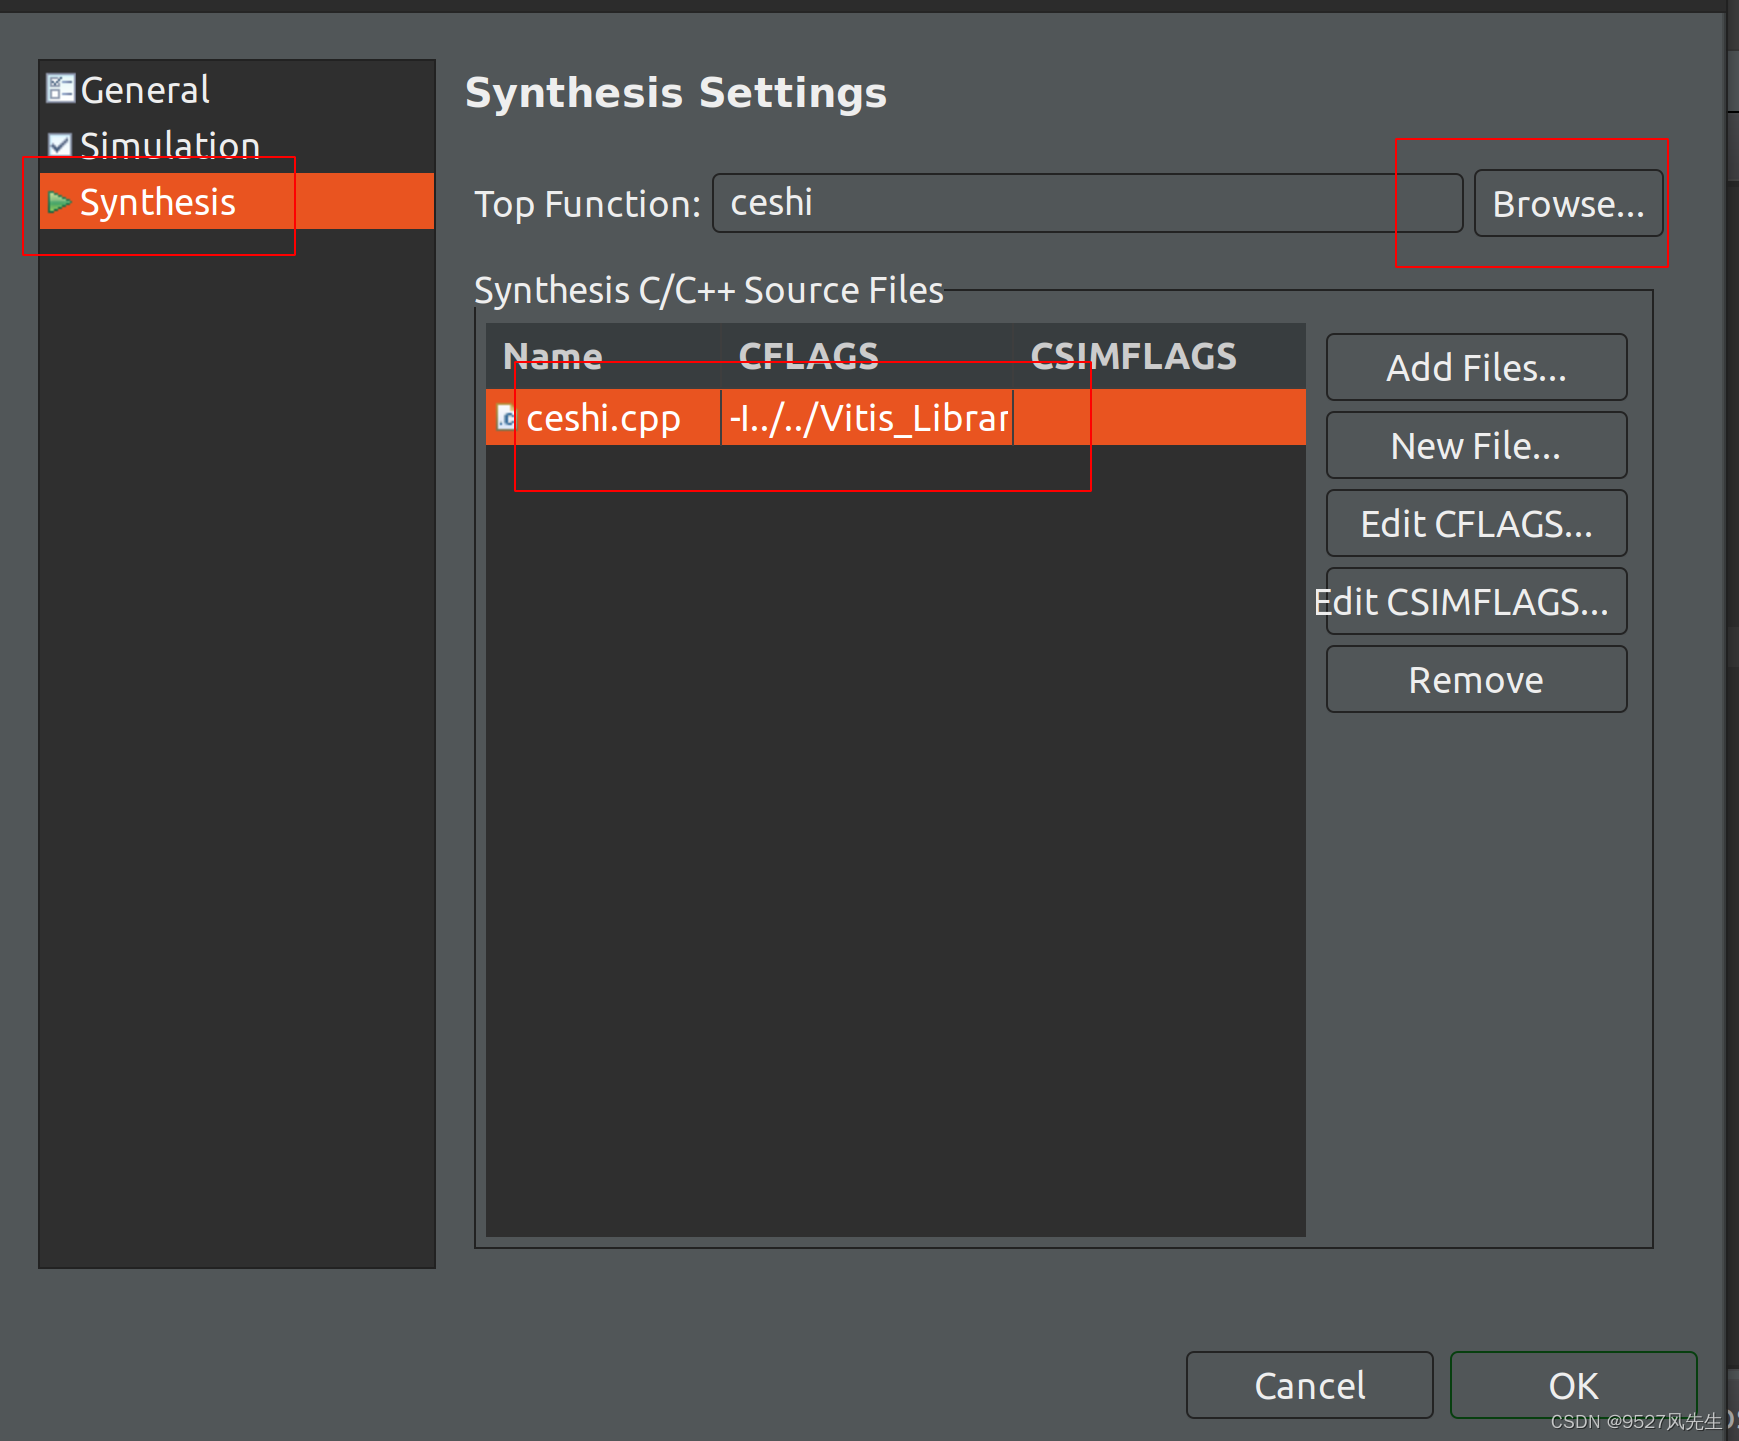
10、再次点击ceshi.cpp,点击Edit CFLAGS,输入以下内容:
-I<path-to-l1-include-directory> -std=c++0x
</path-to-l1-include-directory>
在此给出我的路径,仅供参考 :
-I/home/wind/Vitis_Libraries-2021.2/vision/L1/include -std=c++0x
11、所有配置完成后,点击ok
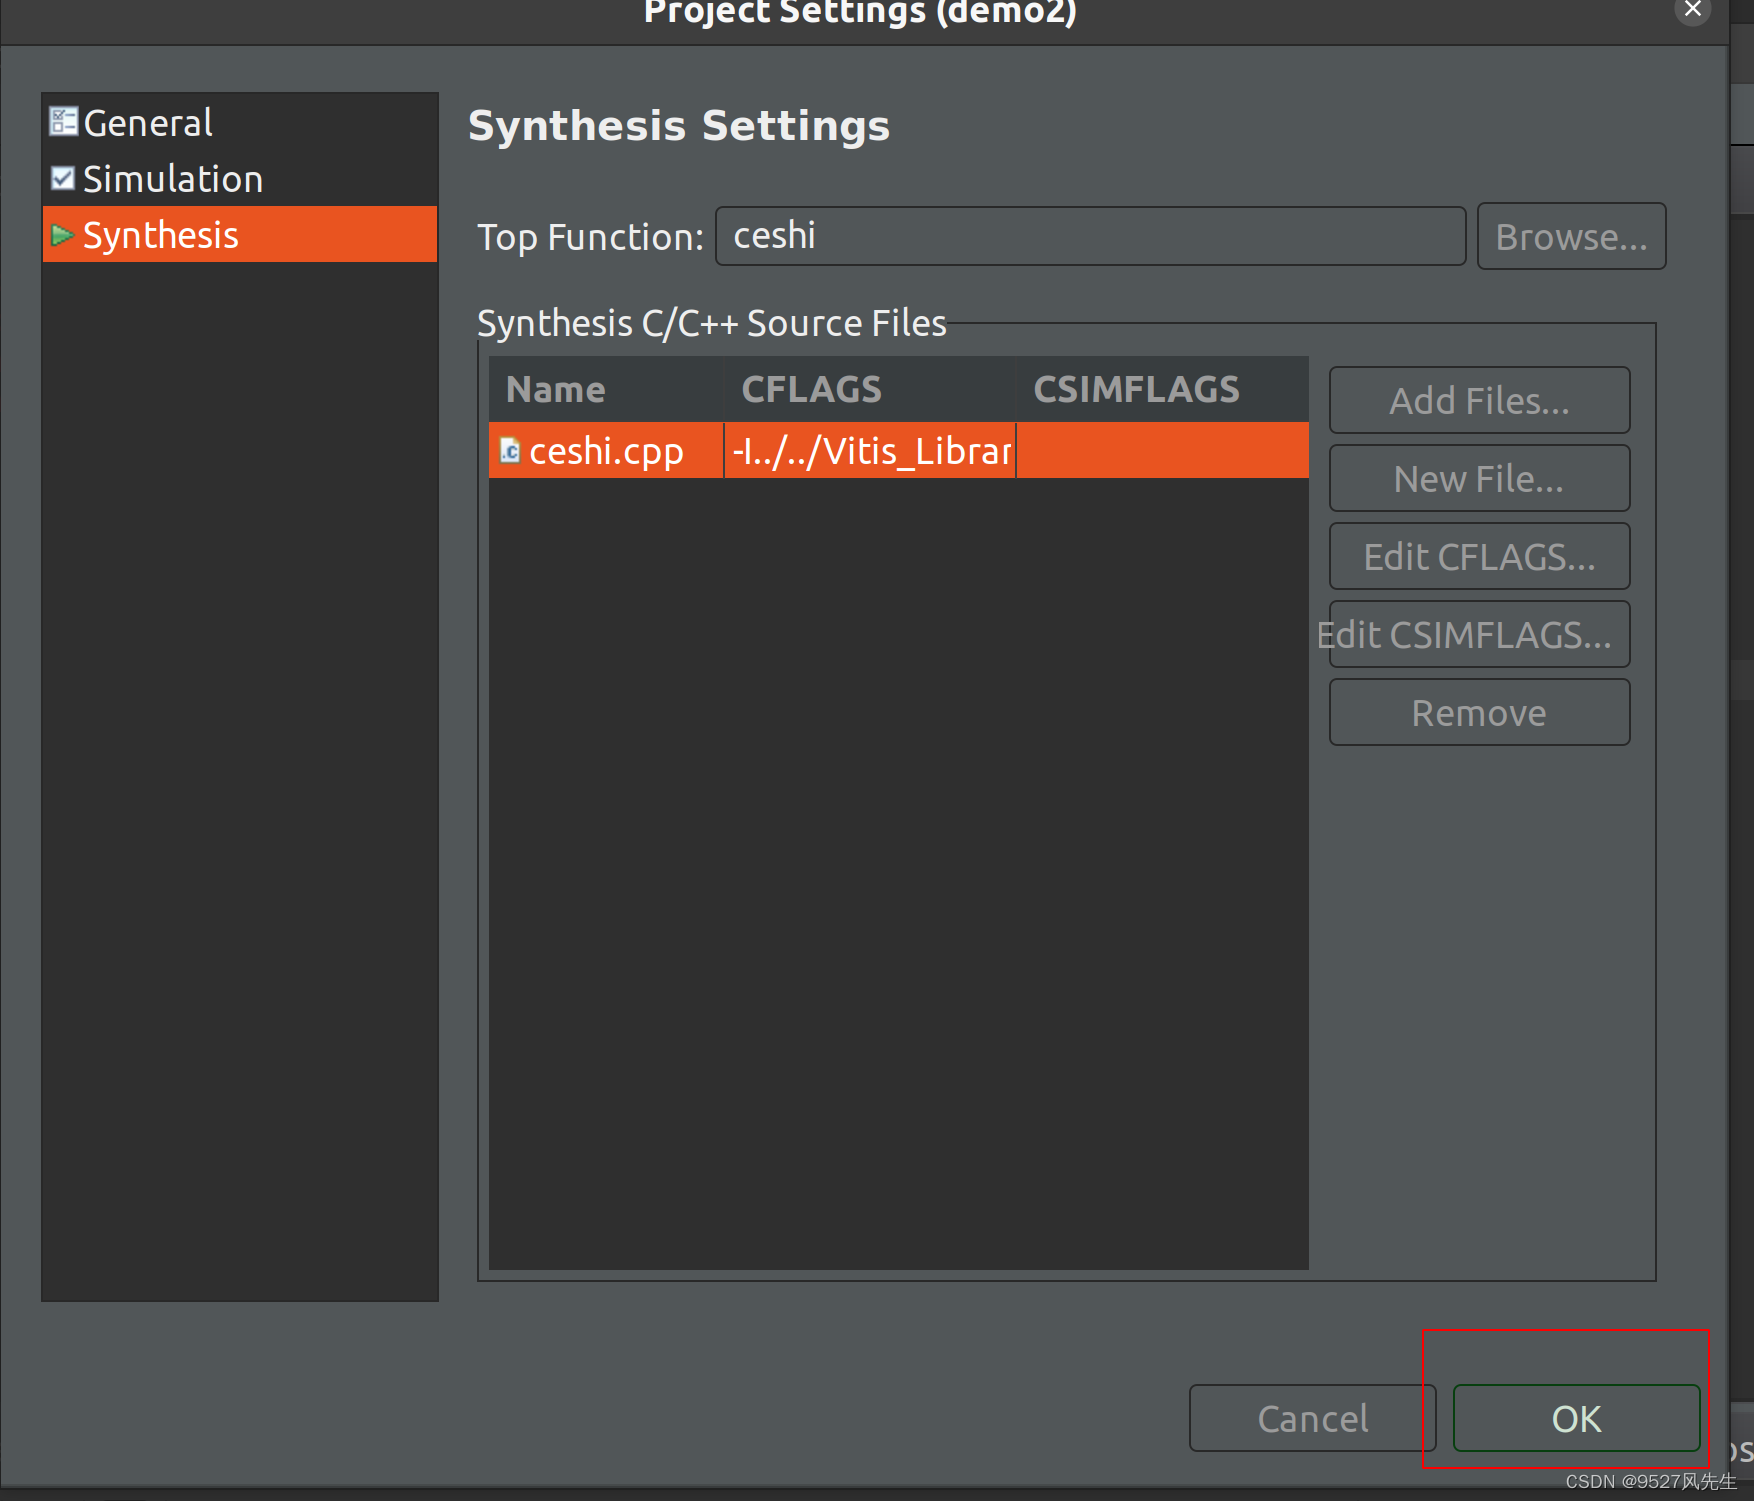
到此,配置已经全部完成,下面进入测试环节!
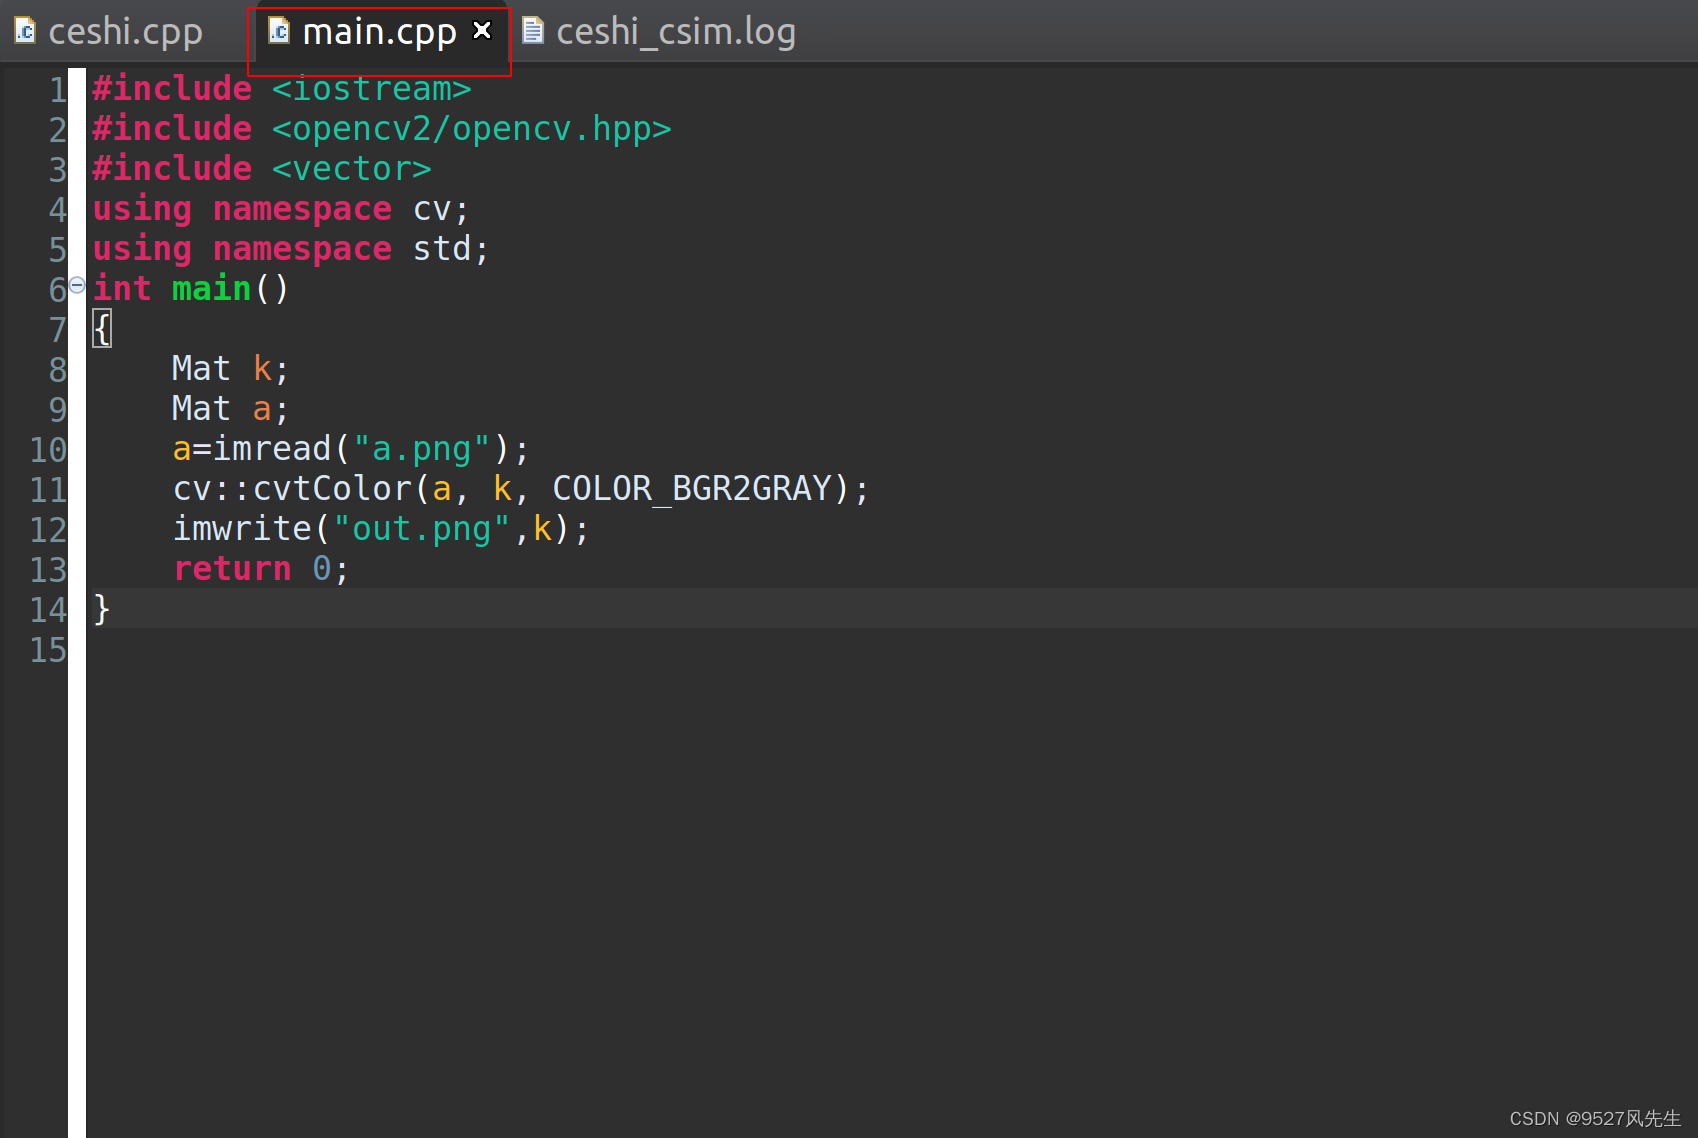
step 3: 测试(彩图转灰图)
1、打开main.cpp,打入以下内容:并且保存(crtl + s)
2、点击 run c simulation
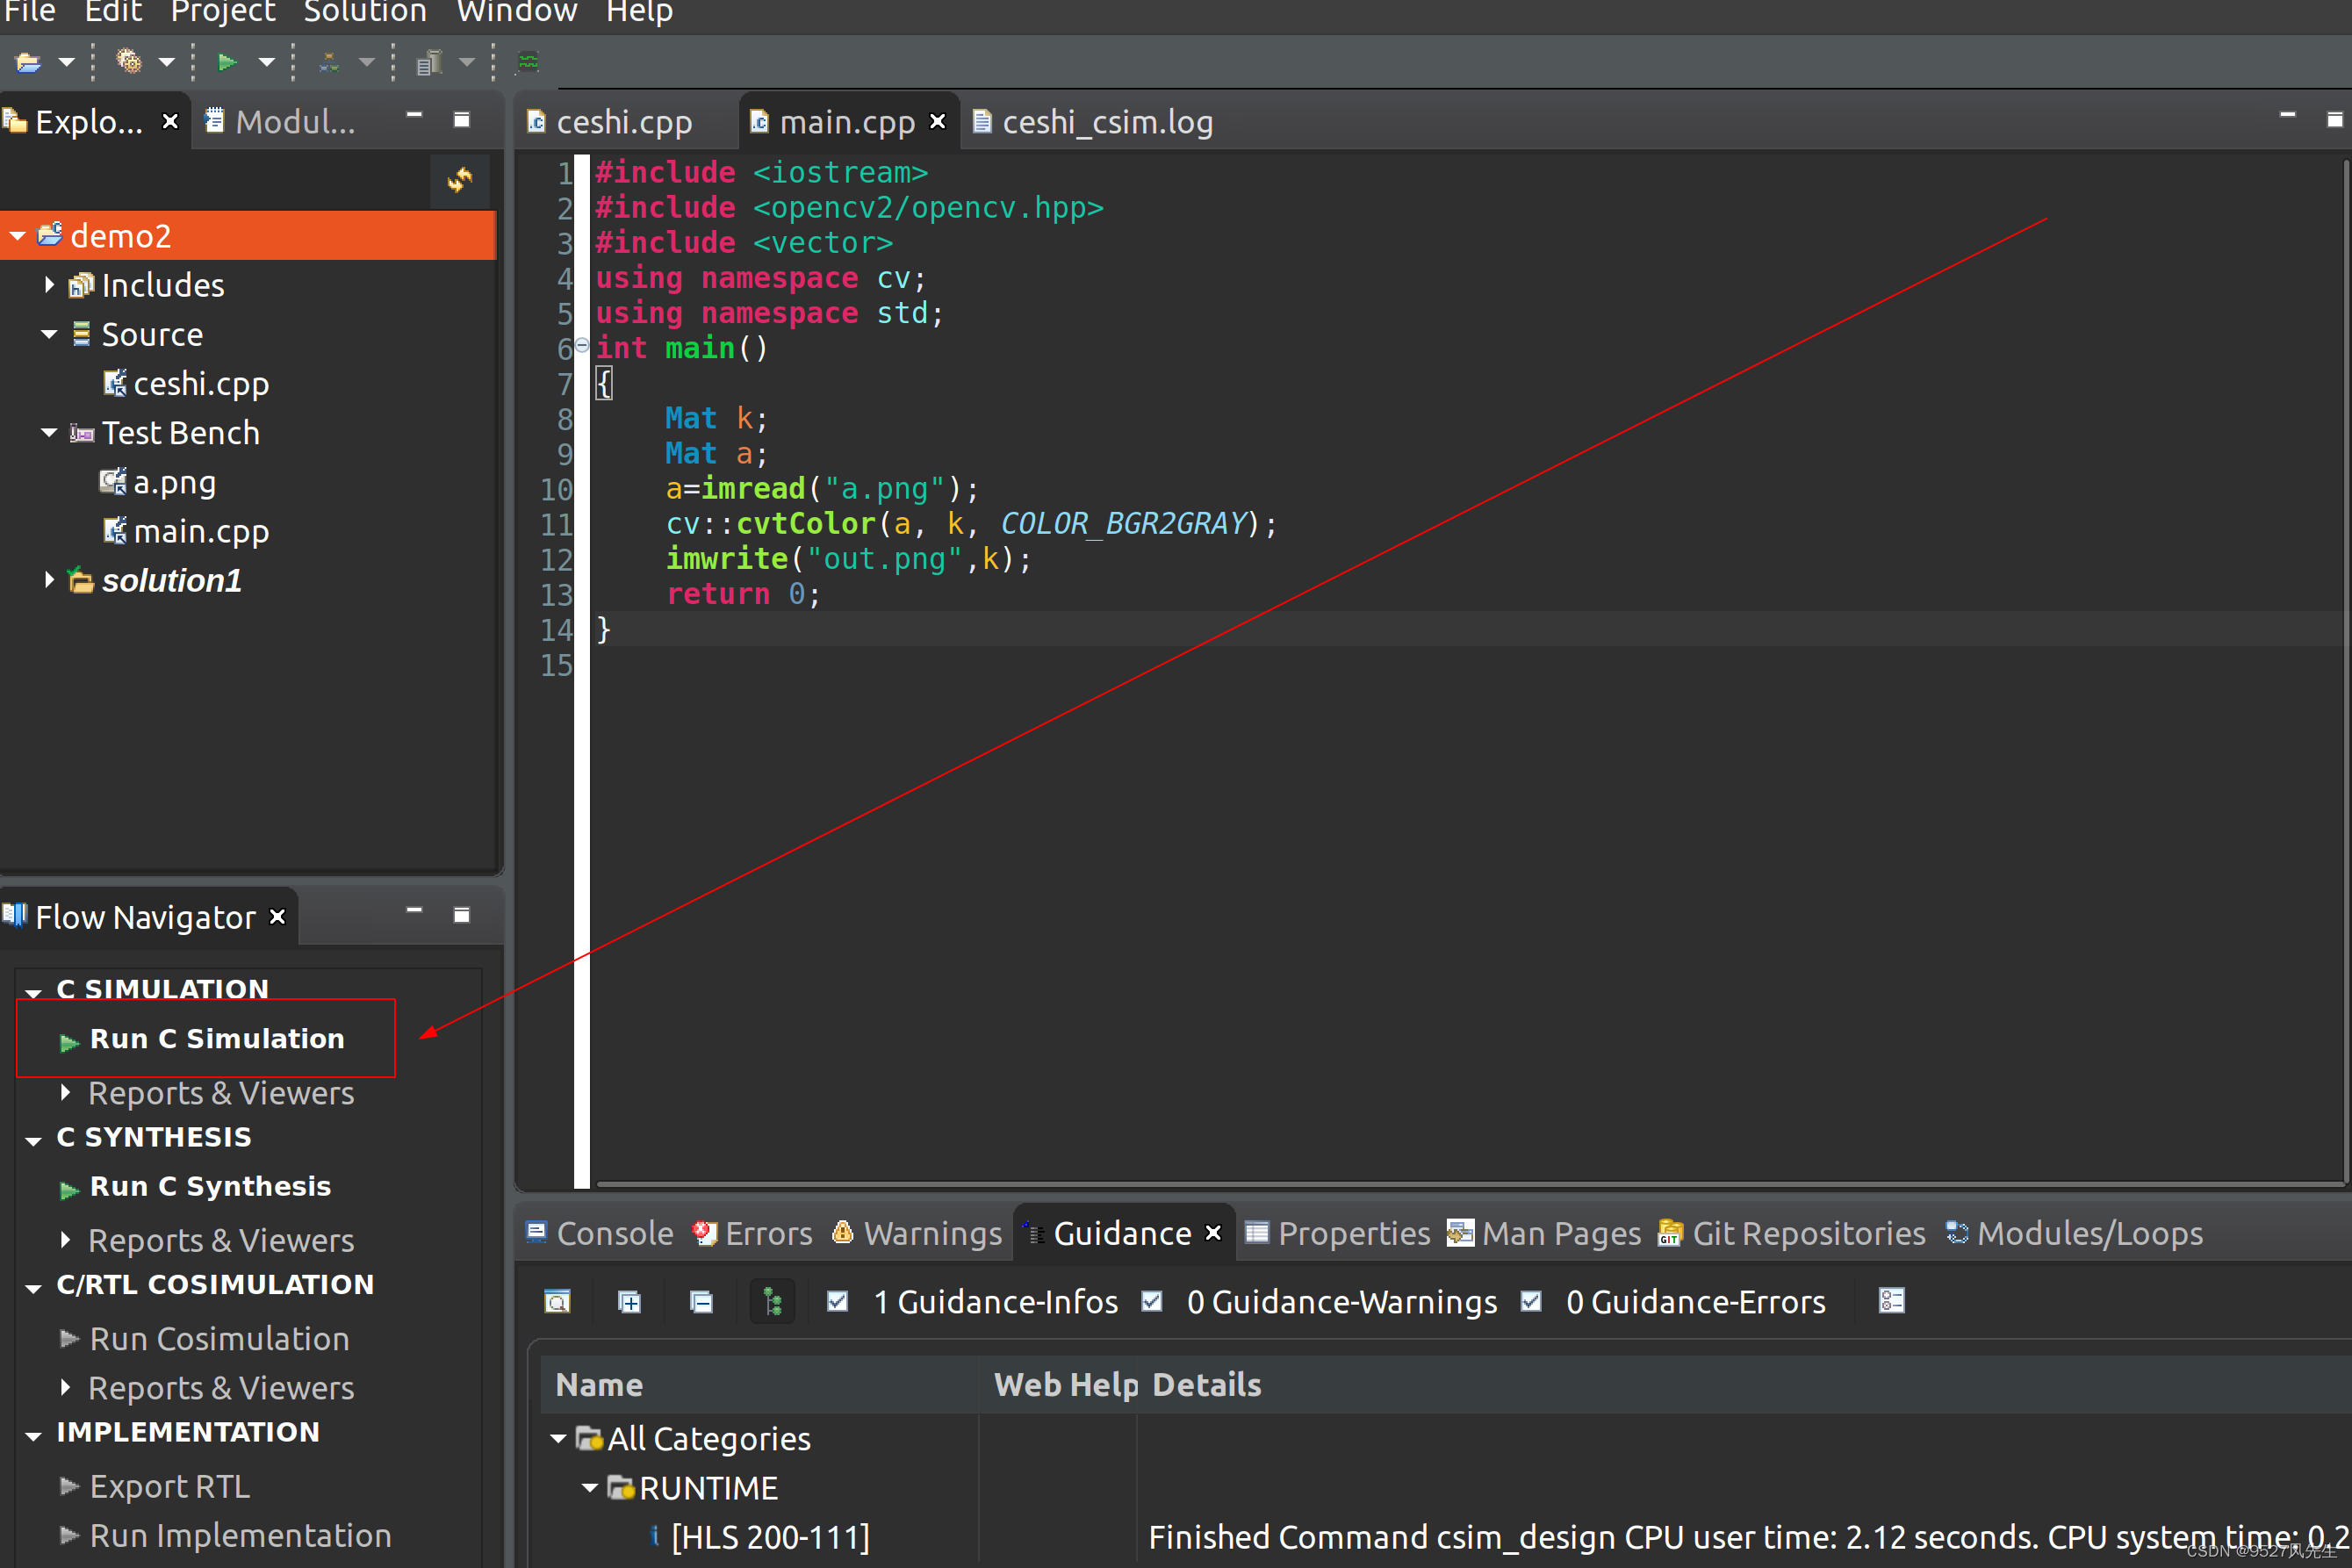
3、出现下图:
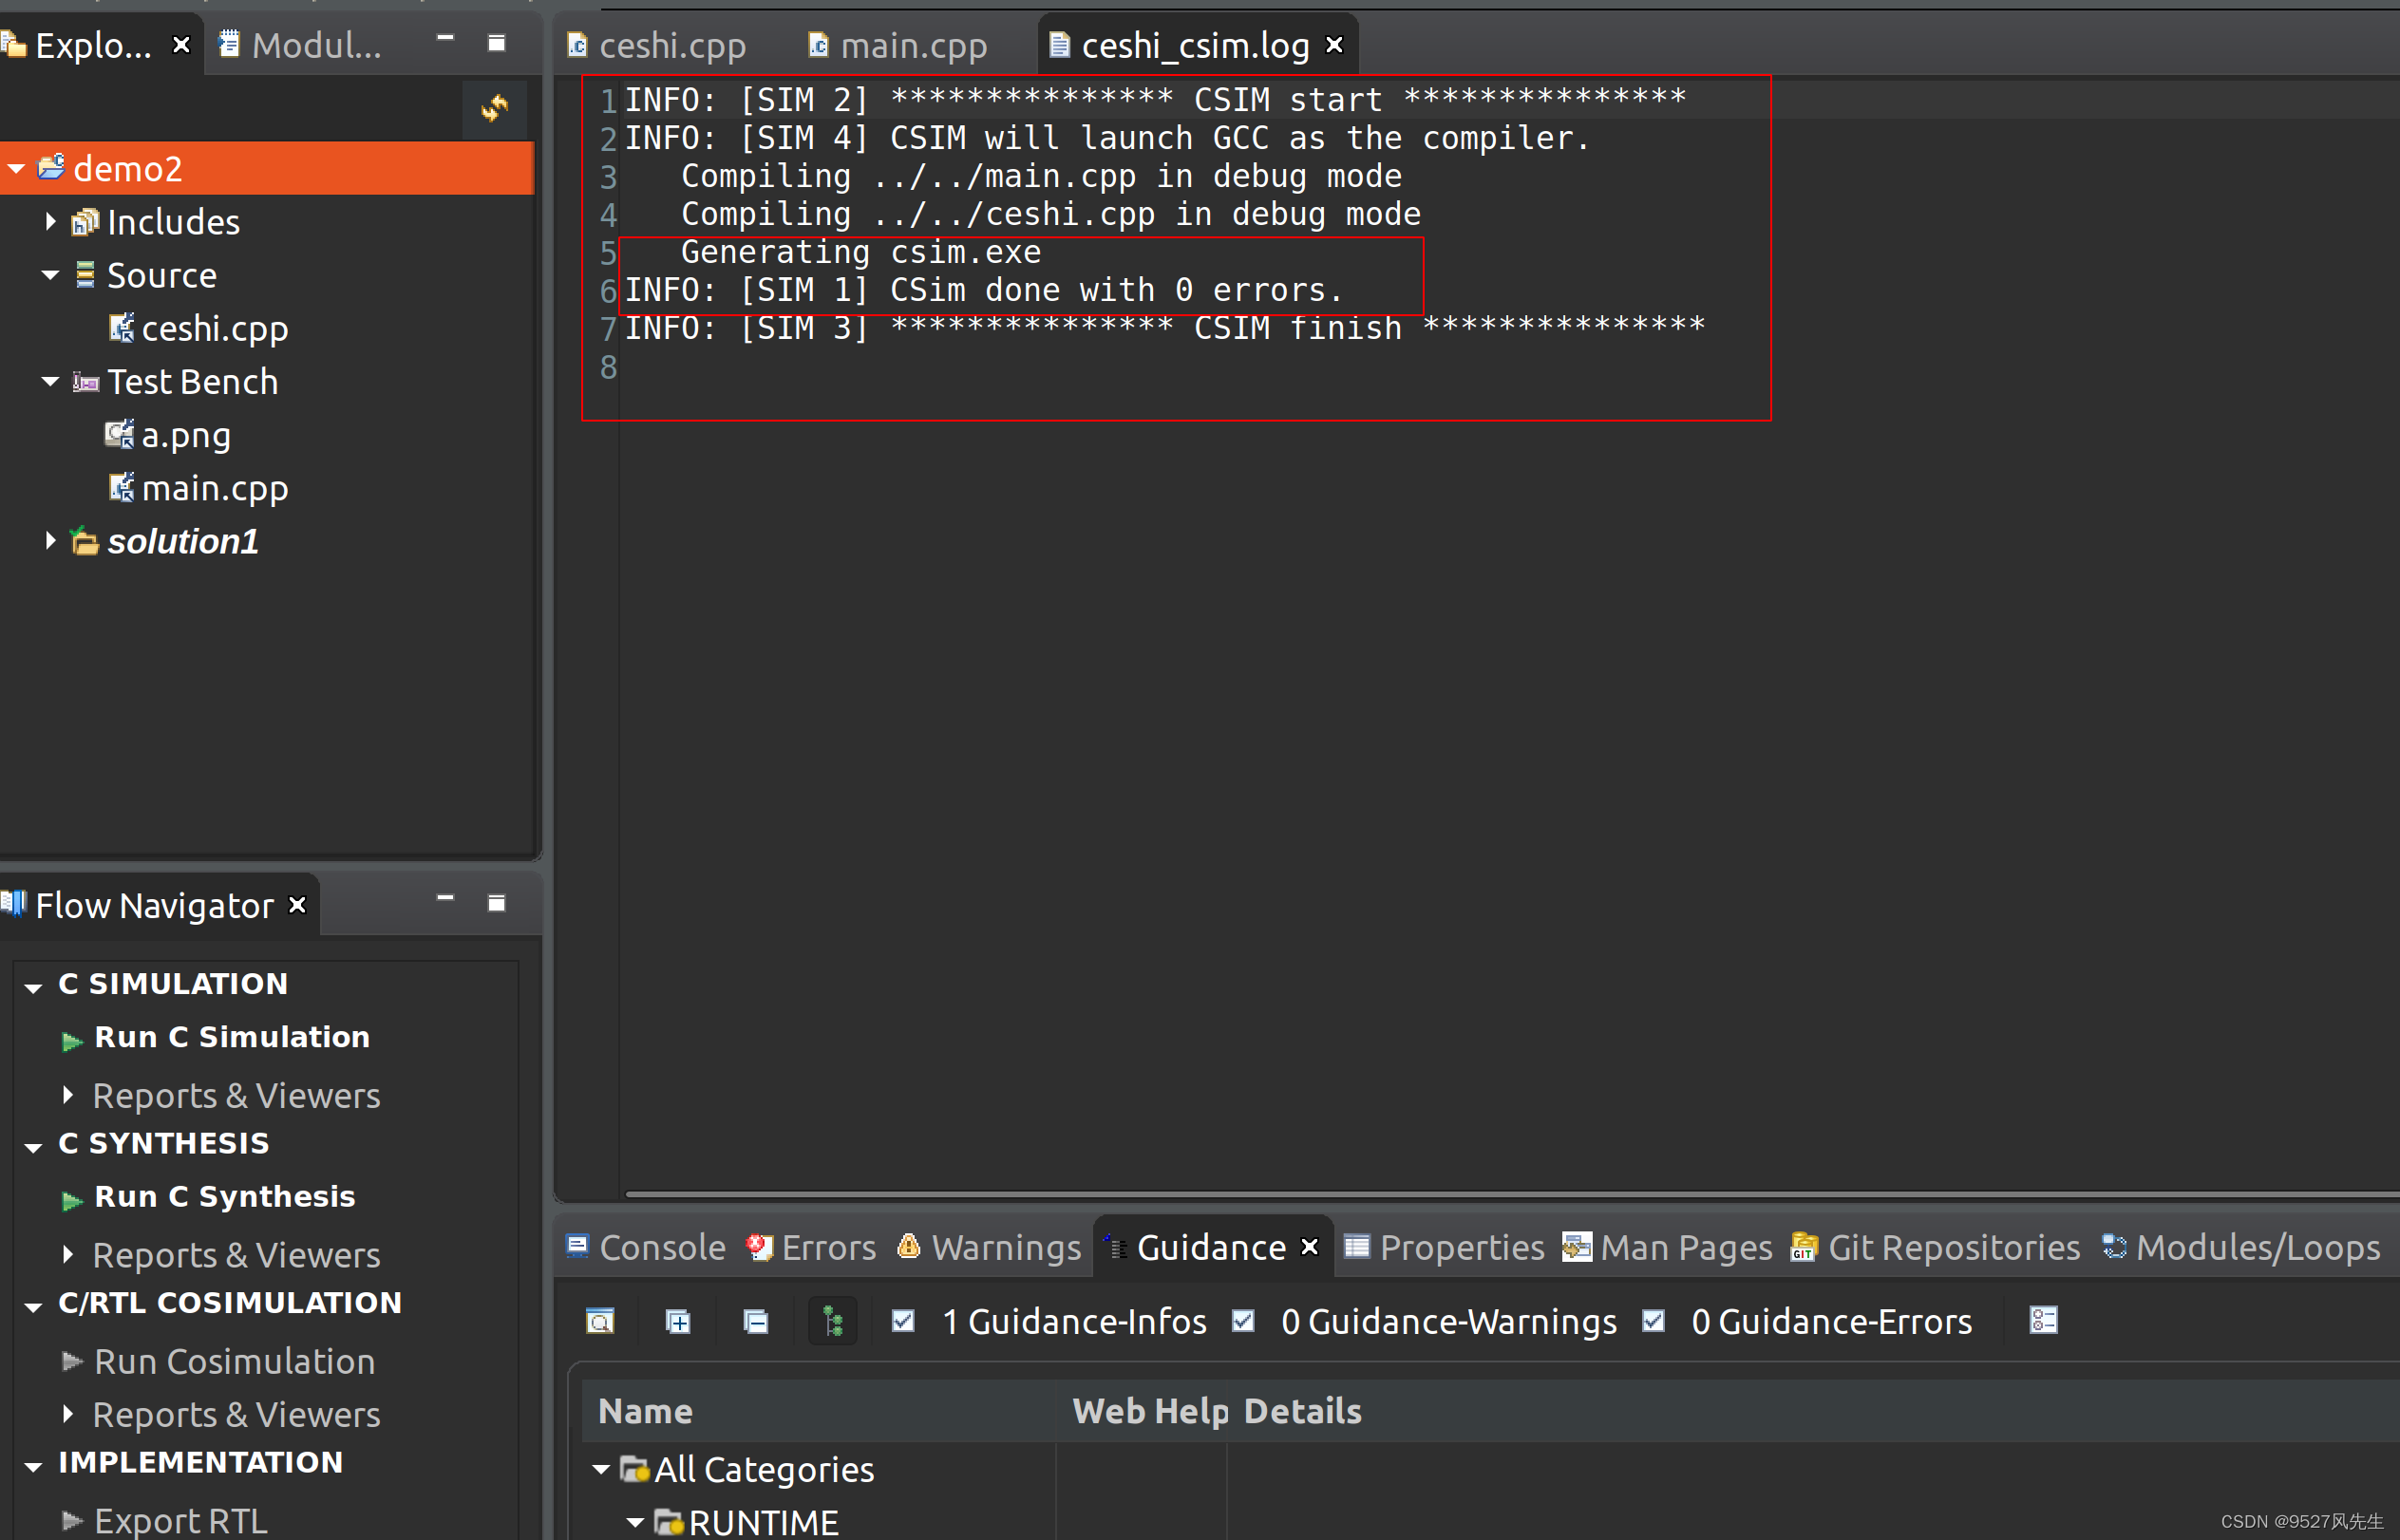
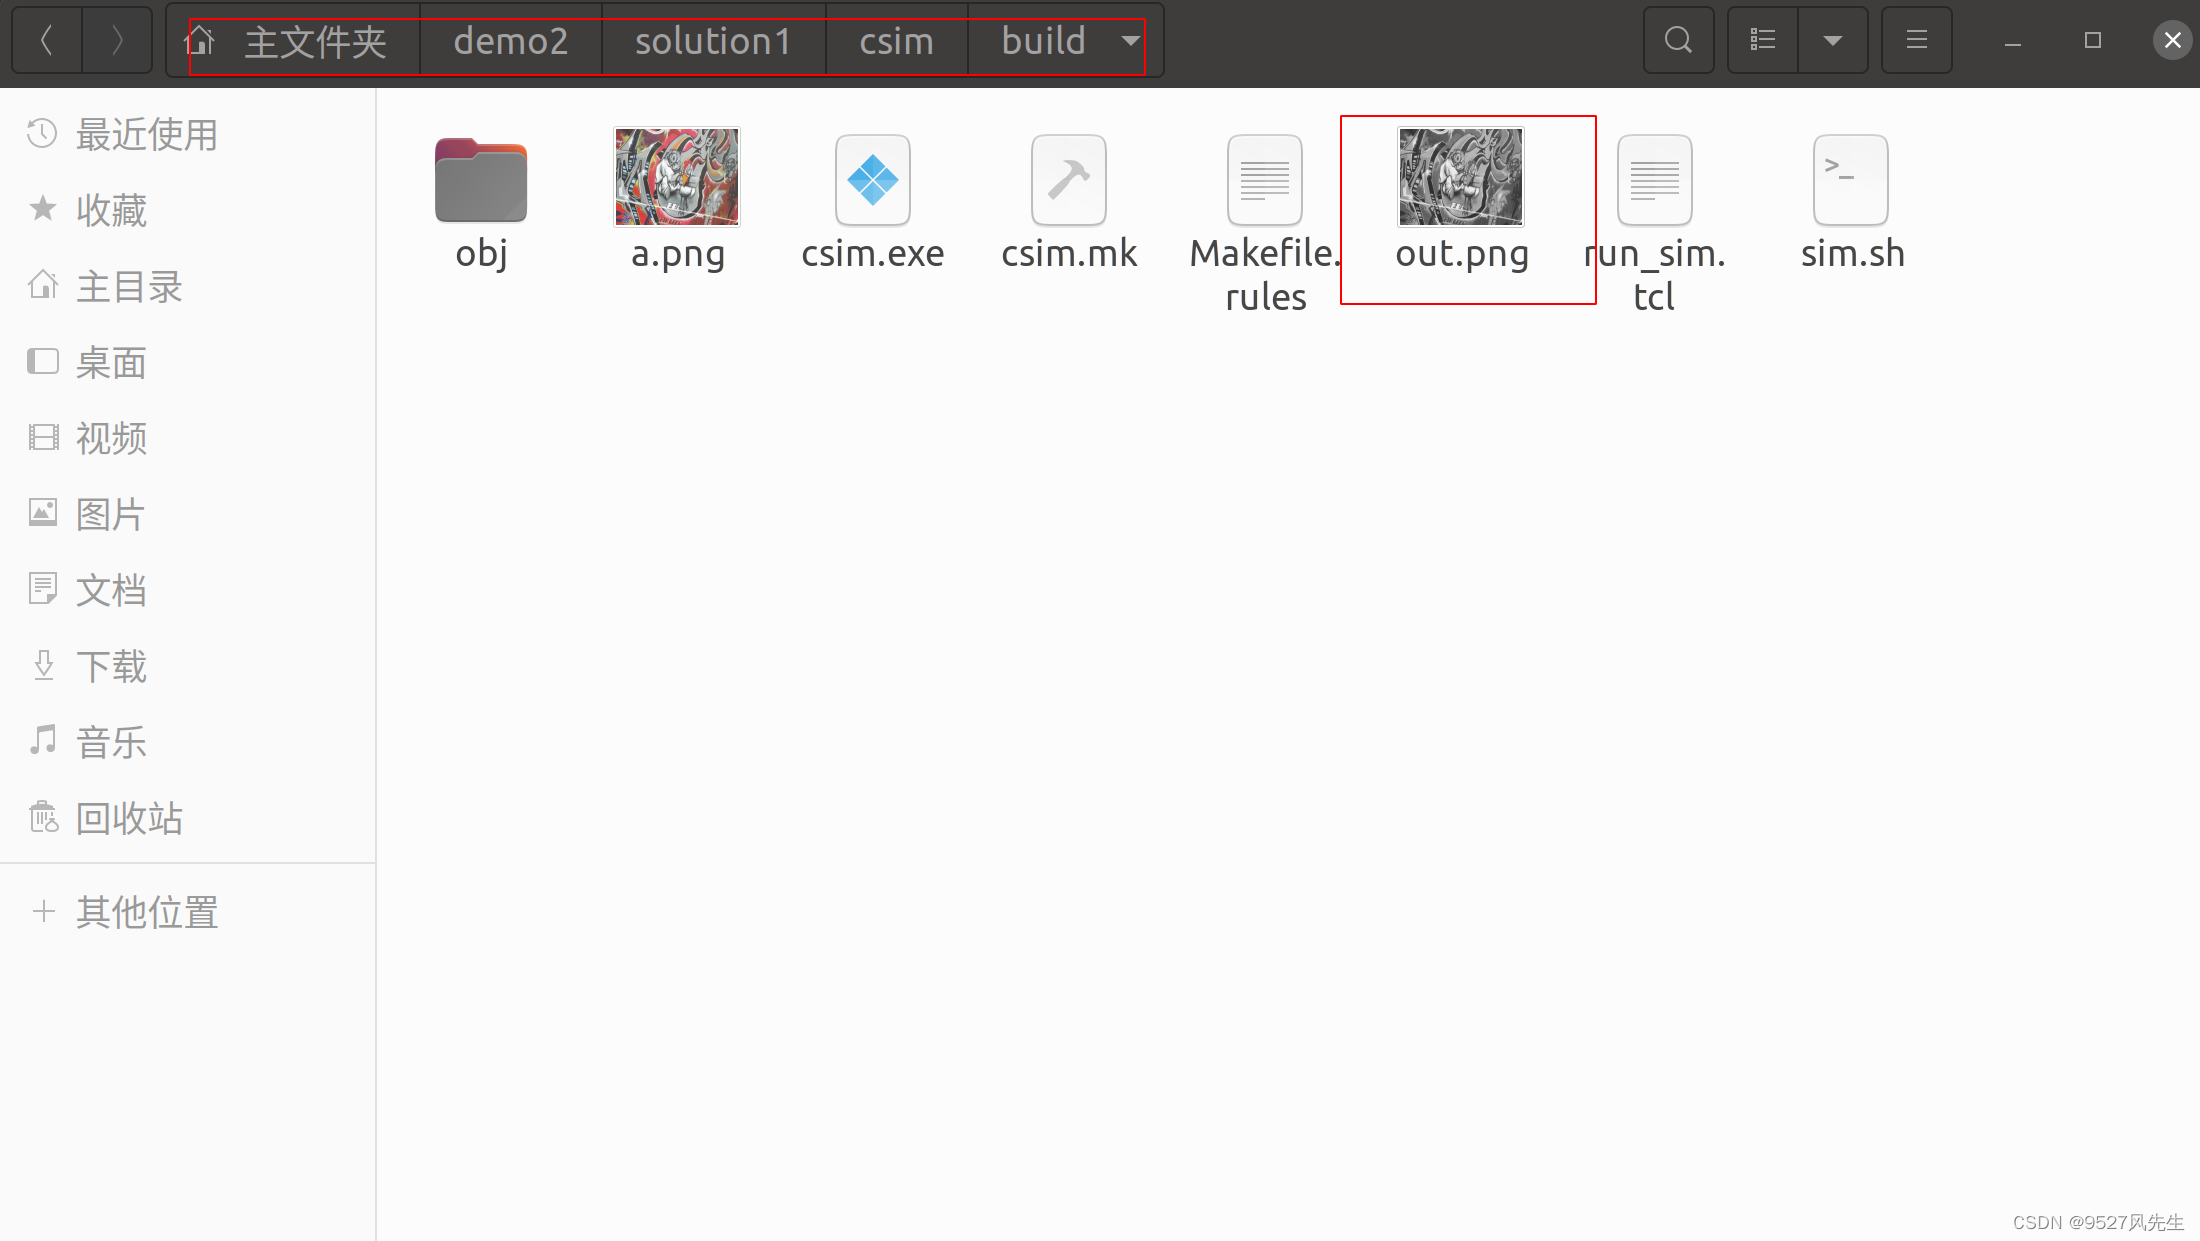
4、仿真成功,图片保存在,这个工程文件下,soultion1->csim->build,如图
到此结束,配置完成!
五、参考文献
3、详细安装视频
Original: https://blog.csdn.net/weixin_56566649/article/details/125620148
Author: 9527风先生
Title: ubuntu20.04安装VITIS_HLS2021.2配置OPENCV4.4和VITIS_LIBRARIES(详细版)
相关阅读1
Title: tensorflow-gpu下载(CUDA,cudnn)与使用时GPU情况查看
配置步骤:
1.上网搜电脑的gpu是否支持深度学习
2.下载nvidia的显卡驱动器
(若电脑桌面点右键能出现NVIDIA的控制面板入口,可略过这一步)。可以先找出自己电脑的gpu型号,再搜索对应的驱动器(e.g. nvidia的NVIDIA Quadro K620驱动下载)
查看电脑gpu型号的方法:
控制面板点性能

3.找对应关系
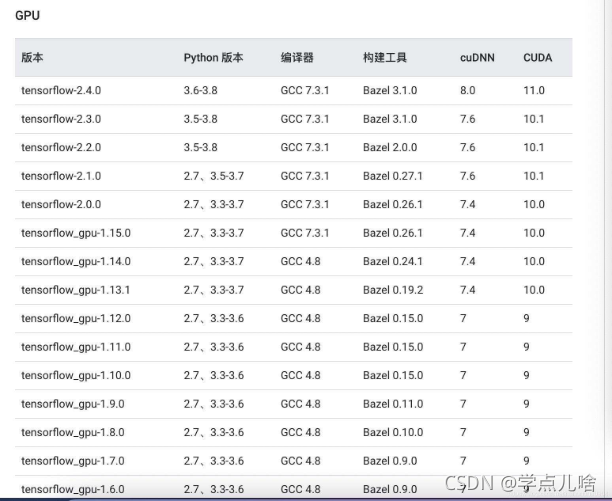
在tf官网 https://www.tensorflow.org/install/source_windows查询tensorflow-gpu对应的CUDA和cudnn版本号。比如:
4.下载CUDA
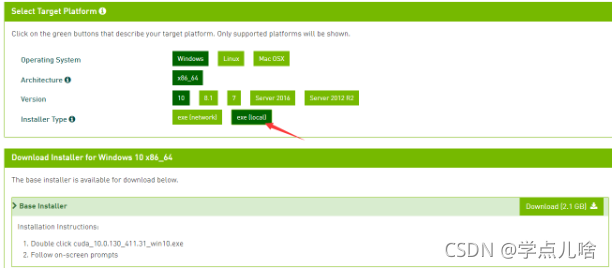
到链接 https://developer.nvidia.com/cuda-toolkit-archive下载对应版本的CUDA,下载local版的。我的windows的:
一路运行安装,一般会自己将其中的
CUDA_PATH
CUDA_PATH_V10
添加到环境变量。
检测CUDA是否安装成功,打开cmd命令行,输入 nvcc -V,不报错即成功
5.下载对应的cudnn
清华的镜像源中有一部分版本的cudnn,但是不全,可以尝试用 conda search cudnn -c conda-forge 找找能下载那些版本的,找不到的话可以去管网下载对应的cudnn。官网地址: https://developer.nvidia.com/rdp/cudnn-download 该网站需要先注册,也可以到网上搜共享账号,不嫌麻烦可以自己注册,也花不了多久。
下载后解压文件,会得到三个文件夹与一个文件,把他他们复制到刚安装的CUDA的安装目录下即可:
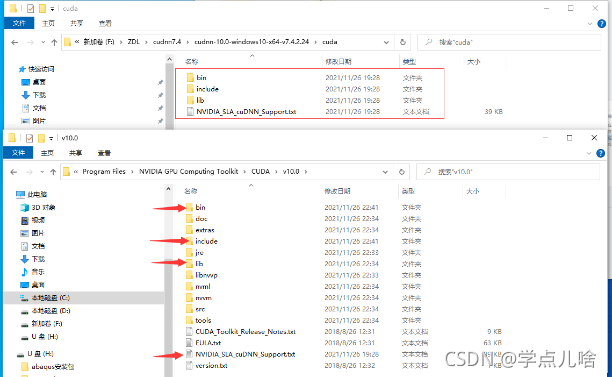
之后为了能让下载的tensorflow-gpu运行时能找到CUDA,需要把这三个路径加入环境变量:
XXX\NVIDIA GPU Computing Toolkit\CUDA\v10.0\bin
XXX\NVIDIA GPU Computing Toolkit\CUDA\v10.0\lib\x64
XXX\NVIDIA GPU Computing Toolkit\CUDA\v10.0\include  v10.0版本号是你下载的CUDA版本
6.下载tensorflow-gpu
推荐最后下载tensorflow-gpu,避免安装不成功的现象。可以使用pip在cmd直接安装(注意如果在annoconda中配置了单独的环境,要先activate 那个环境,再使用 pip insall tensorflow-gpu==1.xx.x 安装想装的gpu版本tf。
测试是否安装成功:
先切换到安装tensorflow-gpu的那个环境,然后
import tensorflow as tf
print(tf.test.is_gpu_available())
补充:直接安装pip insall tensorflow==1.15.0这样的话同时安装了cpu和gpu版定的,运行时会根据代码自己调用cup或者gpu的。
7.在代码中使用:
在代码开始使用
os.environ['CUDA_VISIBLE_DEVICES'] = '/gpu:0'
config = tf.compat.v1.ConfigProto(allow_soft_placement=True)
config.gpu_options.per_process_gpu_memory_fraction = 0.7
tf.compat.v1.keras.backend.set_session(tf.compat.v1.Session(config=config))
8 使用时查看gpu状态:
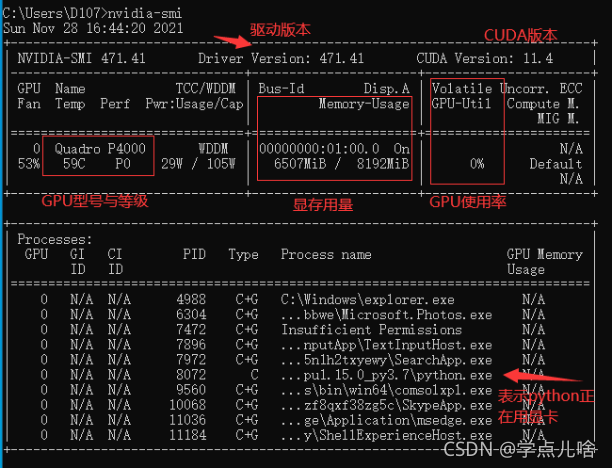
可以按照步骤2从任务管理器查看,但是这个显示的不准确,只能显示显存用量,不能确定GPU是否在工作(类似于内存与cpu)很有可能会因为输入的batch_size或者隐藏层层数太多,显存已经占满还未能将数据全部加载,此时gpu不会开始工作(甚至会出现 self._traceback = tf_stack.extract_stack()的报错,解决办法就是调小bath_size和隐藏层层数),此时可以通过在cmd输入命令 nvidia-smi 查看GPU运行状态,如图:
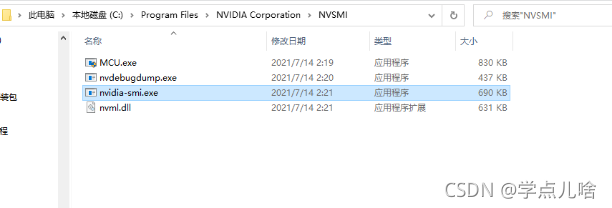
如果输入语句之后报错,则是因为没有配置环境变量,按下图路径找到exe文件,加入系统变量的path中,重启cmd,在运行 nvidia-smi 即可
Original: https://blog.csdn.net/weixin_45747396/article/details/121598615
Author: 学点儿啥
Title: tensorflow-gpu下载(CUDA,cudnn)与使用时GPU情况查看
相关阅读2
Title: Win7下Python与Tensorflow-CPU版开发环境的安装与配置
最近刚学下tensorflow ,保留下安装过程中出现的问题
- python 3.7 版本
- 对应的tensorflow 是cpu的 ,没有显卡
- window 系统
软件下载 :
- 下载python 3.7 python官网可以下载
- tensorflow 对应py37 版本 ,再最下面网盘中可以下载
安装完成后出现的问题 :
C:\Users\wei\.virtualenvs\pyqt51-EL5sW8oD\Scripts\python.exe E:/work/facode/renlian-master/face_train.py
Traceback (most recent call last):
  File "C:\Users\wei\.virtualenvs\pyqt51-EL5sW8oD\lib\site-packages\tensorflow_core\python\pywrap_tensorflow.py", line 58, in
    from tensorflow.python.pywrap_tensorflow_internal import *
  File "C:\Users\wei\.virtualenvs\pyqt51-EL5sW8oD\lib\site-packages\tensorflow_core\python\pywrap_tensorflow_internal.py", line 28, in
    _pywrap_tensorflow_internal = swig_import_helper()
  File "C:\Users\wei\.virtualenvs\pyqt51-EL5sW8oD\lib\site-packages\tensorflow_core\python\pywrap_tensorflow_internal.py", line 24, in swig_import_helper
    _mod = imp.load_module('_pywrap_tensorflow_internal', fp, pathname, description)
  File "C:\Users\wei\.virtualenvs\pyqt51-EL5sW8oD\lib\imp.py", line 242, in load_module
    return load_dynamic(name, filename, file)
  File "C:\Users\wei\.virtualenvs\pyqt51-EL5sW8oD\lib\imp.py", line 342, in load_dynamic
    return _load(spec)
ImportError: DLL load failed: 找不到指定的模块。
解决办法 : 
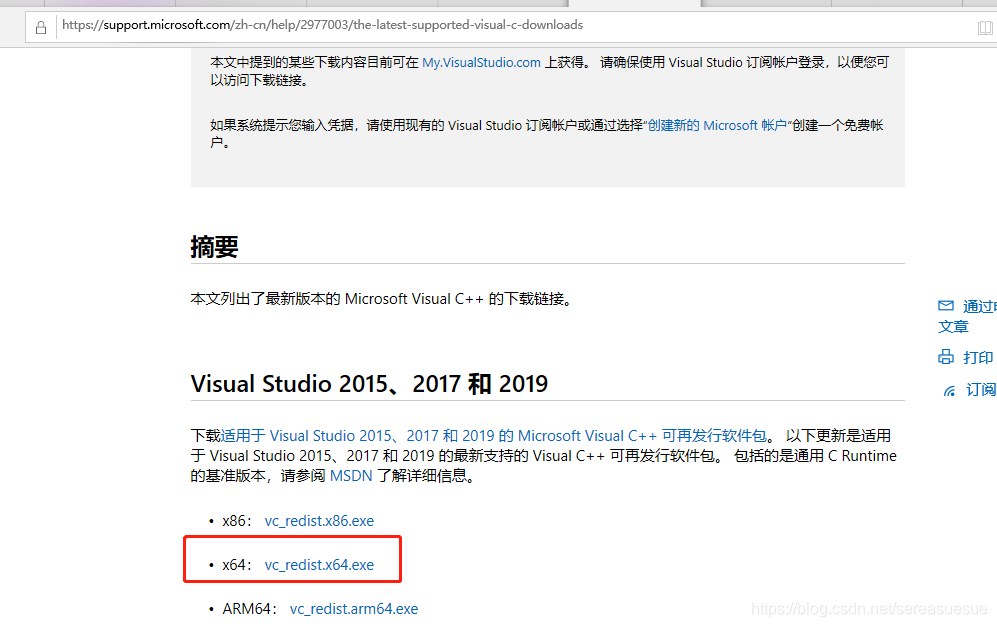
下载地址:最新支持的 Visual C++ 可再发行程序包下载 | Microsoft Docs
Session graph is empty
C:\Python37\python.exe F:/tensorflow_pro/demo.py
Traceback (most recent call last):
  File "F:/tensorflow_pro/demo.py", line 14, in <module>
    run()
  File "F:/tensorflow_pro/demo.py", line 11, in run
    print(sess.run(message).decode())
  File "C:\Python37\lib\site-packages\tensorflow\python\client\session.py", line 968, in run
    run_metadata_ptr)
  File "C:\Python37\lib\site-packages\tensorflow\python\client\session.py", line 1116, in _run
    raise RuntimeError('The Session graph is empty.  Add operations to the '
RuntimeError: The Session graph is empty.  Add operations to the graph before calling run().</module>
解决办法 :
import  tensorflow as tf
tf.compat.v1.disable_eager_execution()      # 保证sess.run()能够正常运行
Session 没有
解决办法 :
    with tf.compat.v1.Session() as sess:              # tf.compat.v1.Session()  版本2.0的行数
        print(sess.run(message).decode())
tensorflow_cpu_py37的地址
链接:https://pan.baidu.com/s/1zBYtq6Gj5mwNN9CVD531jg
提取码:o8uz
有遇到问题的小伙伴 ,可以留言,共同学习
Original: https://blog.csdn.net/hejunw/article/details/121709587
Author: hejunw
Title: Win7下Python与Tensorflow-CPU版开发环境的安装与配置
相关阅读3
Title: NLP的Token embedding和位置embedding
Token Enbedding,也是字符转向量的一种常用做法。
import tensorflow as tf

model_name = "ted_hrlr_translate_pt_en_converter"
tokenizers = tf.saved_model.load(model_name)

sentence = "este é um problema que temos que resolver."
sentence = tf.constant(sentence)
sentence = sentence[tf.newaxis]
sentence = tokenizers.pt.tokenize(sentence).to_tensor()
print(sentence.shape)
print(sentence)
(1, 11)
tf.Tensor([[ 2 125 44 85 231 84 130 84 742 16 3]], shape=(1, 11), dtype=int64)
start_end = tokenizers.en.tokenize([''])[0]
print(start_end)
start = start_end[0][tf.newaxis]
print(start)
end = start_end[1][tf.newaxis]
print(end)
tf.Tensor([2 3], shape=(2,), dtype=int64)
tf.Tensor([2], shape=(1,), dtype=int64)
tf.Tensor([3], shape=(1,), dtype=int64)
token这个词有占用的意思,即该向量被该词占用。
和例1一样是个葡萄牙语翻译为英语的例子
import logging
import tensorflow_datasets as tfds
logging.getLogger('tensorflow').setLevel(logging.ERROR)  # suppress warnings
import tensorflow as tf

examples, metadata = tfds.load('ted_hrlr_translate/pt_to_en', with_info=True,
                               as_supervised=True)
train_examples, val_examples = examples['train'], examples['validation']

for pt_examples, en_examples in train_examples.batch(3).take(1):
  for pt in pt_examples.numpy():
    print(pt.decode('utf-8'))

for en in en_examples.numpy():
  print(en.decode('utf-8'))

model_name = "ted_hrlr_translate_pt_en_converter"
tokenizers = tf.saved_model.load(model_name)
encoded = tokenizers.en.tokenize(en_examples)

for row in encoded.to_list():
  print(row)

round_trip = tokenizers.en.detokenize(encoded)
for line in round_trip.numpy():
  print(line.decode('utf-8'))
e quando melhoramos a procura , tiramos a única vantagem da impressão , que é a serendipidade .
mas e se estes fatores fossem ativos ?
mas eles não tinham a curiosidade de me testar .
and when you improve searchability , you actually take away the one advantage of print , which is serendipity .
but what if it were active ?
but they did n't test for curiosity .
[2, 72, 117, 79, 1259, 1491, 2362, 13, 79, 150, 184, 311, 71, 103, 2308, 74, 2679, 13, 148, 80, 55, 4840, 1434, 2423, 540, 15, 3]
[2, 87, 90, 107, 76, 129, 1852, 30, 3]
[2, 87, 83, 149, 50, 9, 56, 664, 85, 2512, 15, 3]
and when you improve searchability , you actually take away the one advantage of print , which is serendipity .
but what if it were active ?
but they did n ' t test for curiosity .
tokens = tokenizers.en.lookup(encoded)
print(tokens)
embedding——嵌入式,可以理解为低位信息嵌入至高维空间。
import tensorflow as tf

model_name = "ted_hrlr_translate_pt_en_converter"
tokenizers = tf.saved_model.load(model_name)

d_model = 128
input_vocab_size=tokenizers.pt.get_vocab_size().numpy()

embedding = tf.keras.layers.Embedding(input_vocab_size, d_model)

x = tf.constant([[2, 87, 90, 107, 76, 129, 1852, 30,0, 0, 0, 3]])
x = embedding(x)

print(input_vocab_size)
print(x.shape)
print(x)
7765
(1, 12, 128)
tf.Tensor(
[[[-0.02317628 0.04599813 -0.0104699 ... -0.03233253 -0.02013252
0.00171118]
[-0.02195768 0.0341222 0.00689759 ... -0.00260416 0.02308804
0.03915772]
[-0.00282265 0.03714179 -0.03591241 ... -0.03974506 -0.04376533
0.03113948]
...
[-0.0277048 -0.03750116 -0.03355522 ... -0.00703954 -0.02855991
0.00357056]
[-0.0277048 -0.03750116 -0.03355522 ... -0.00703954 -0.02855991
0.00357056]
[ 0.04611469 0.04663144 0.02595479 ... -0.03400488 -0.00206001
-0.03282105]]], shape=(1, 12, 128), dtype=float32)
此例将文本长度为12的向量embedding为高维12×128
transformer的位置embedding,实际算法通常根据深度d_model先计算好1000个位置编码,而计算时根据实时的输入长度截取
import numpy as np
import tensorflow as tf

d_model = 128
position = 1000

def get_angles(pos, i, d_model):
  angle_rates = 1 / np.power(10000, (2 * (i//2)) / np.float32(d_model))
  return pos * angle_rates

def positional_encoding(position, d_model):
  angle_rads = get_angles(np.arange(position)[:, np.newaxis],
                          np.arange(d_model)[np.newaxis, :],
                          d_model)
  # apply sin to even indices in the array; 2i
  angle_rads[:, 0::2] = np.sin(angle_rads[:, 0::2])

  # apply cos to odd indices in the array; 2i+1
  angle_rads[:, 1::2] = np.cos(angle_rads[:, 1::2])
  pos_encoding = angle_rads[np.newaxis, ...]
  return tf.cast(pos_encoding, dtype=tf.float32)

x = tf.constant([[2, 87, 90, 107, 76, 129, 1852, 30,0, 0, 0, 3]])
seq_len = tf.shape(x)[1]
print(seq_len)
pos_encoding = positional_encoding(position, d_model)
print(pos_encoding.shape)
pe = pos_encoding[:, :seq_len, :]
print(pe.shape)
tf.Tensor(12, shape=(), dtype=int32)
(1, 1000, 128)
(1, 12, 128)
Original: https://blog.csdn.net/Arctic_Beacon/article/details/122415392
Author: 飞行codes
Title: NLP的Token embedding和位置embedding